Saturday, July 28, 2012

On the Road

Hello and welcome to another card making day.  I am posting this on the Card a Day blog as a travel card.  I must admit that I have not seen too many cards in the past pertaining to traveling, but today, there are cards out there, wish a friend or loved one safe travels until they meet again in about a week.  In my case, a friend of mine moved to Texas a few years ago, and now she is coming here to take her mom back home to live with her for a while.  Even though that friend's mom is leaving behind her other daughter and her husband, her granddaughter, grandson, and great-grandson, as well as dozens of friends, I am hoping to give this card to her Saturday at her last farewell party before she moves to Texas with my friend, Lena.

This card is simple, and you will need the following materials:   (front of the card)  Mariposa by DCWV, cut 1/8 smaller than the actual card, embellishments that are travel-themed, a rub-on or clear sticker with the hello on it.  I cut the card blank 8.5' x 5' and fold in half. The card mat is an 1/8 of an inch smaller than the card front.  I place the embellishment in the center of the card.  the embellishment is by K and Co and is one of their 3D stickers.   Tip:  of you are frugal enough, you can get that same effect by cutting out two of the same image (or three), stacking them on top of each other, while placing a glue or form adhesive dot in between the images.  a simple clear "hello!" sticker was placed at the bottom of the card.  If you do not have a sticker, you can print in your own handwriting, print with your printer, or some simple alphabet stickers will do.   Now for the inside of the card...

I normally do not dress up the inside of the card, unless I get a request for a sentiment or two on the inside, because some people like my mom write personal notes on the inside.  In this case, I added a special treat to this card.  I modeled it after a card I posted on my blog a couple weeks ago.  the one I posted, I originally made it a couple years ago, and the inside of this card is the updated version. The materials I used for the "pocket" are:
2 tags (1 large and 1 small cut down tag)
Mariposa paper by DCWV
Crumb Cake ink by Stampin! Up
White gel pen.
The first thing I did was to "match" the two Tags.  I took the Crumb Cake ink, and rubbed it on both tags.  with Stampin!Up's new form pads, all I had to do was glide it to coat the tags (I inked both side of the large tag).  With the large tag (#8 tag by Inkssentials), I folded up the tag about 3' to form a pocket, took my ATG glue gun to secure it on two sides, leaving the top edge open.  Then I took the Mariposa paper and  created a false pocket on the tag.  I did a _._ pattern around the tag, and set it to the side.   With the small one, it overwhelmed the larger one, so I cut the length down.and i paced a small strip of the Mariposa Paper on the bottom of the card, and did the same type of faux stitching around the tag, and stuck inside the first tag.   before adhering the set to the card, I stuck a piece of gold organza ribbon around the tag group and tied it off.  more of the 3d stickers from the same K and Co sticker set to complete the picture.
As I explained earlier, no sentiment in the card, but I will write a nice personal note for my friend's mother.  She will be back to visit. she has too in order to visit her other daughter's family.  Until then, I hope she will enjoy her stay in Texas, and I hope you have enjoyed viewing this card. Be blessed on this day, and see you next time.

Enhanced by Zemanta

Thursday, July 19, 2012

Welcome to Our Home

 Welcome to Our Home a set of 8 cards and Envelops
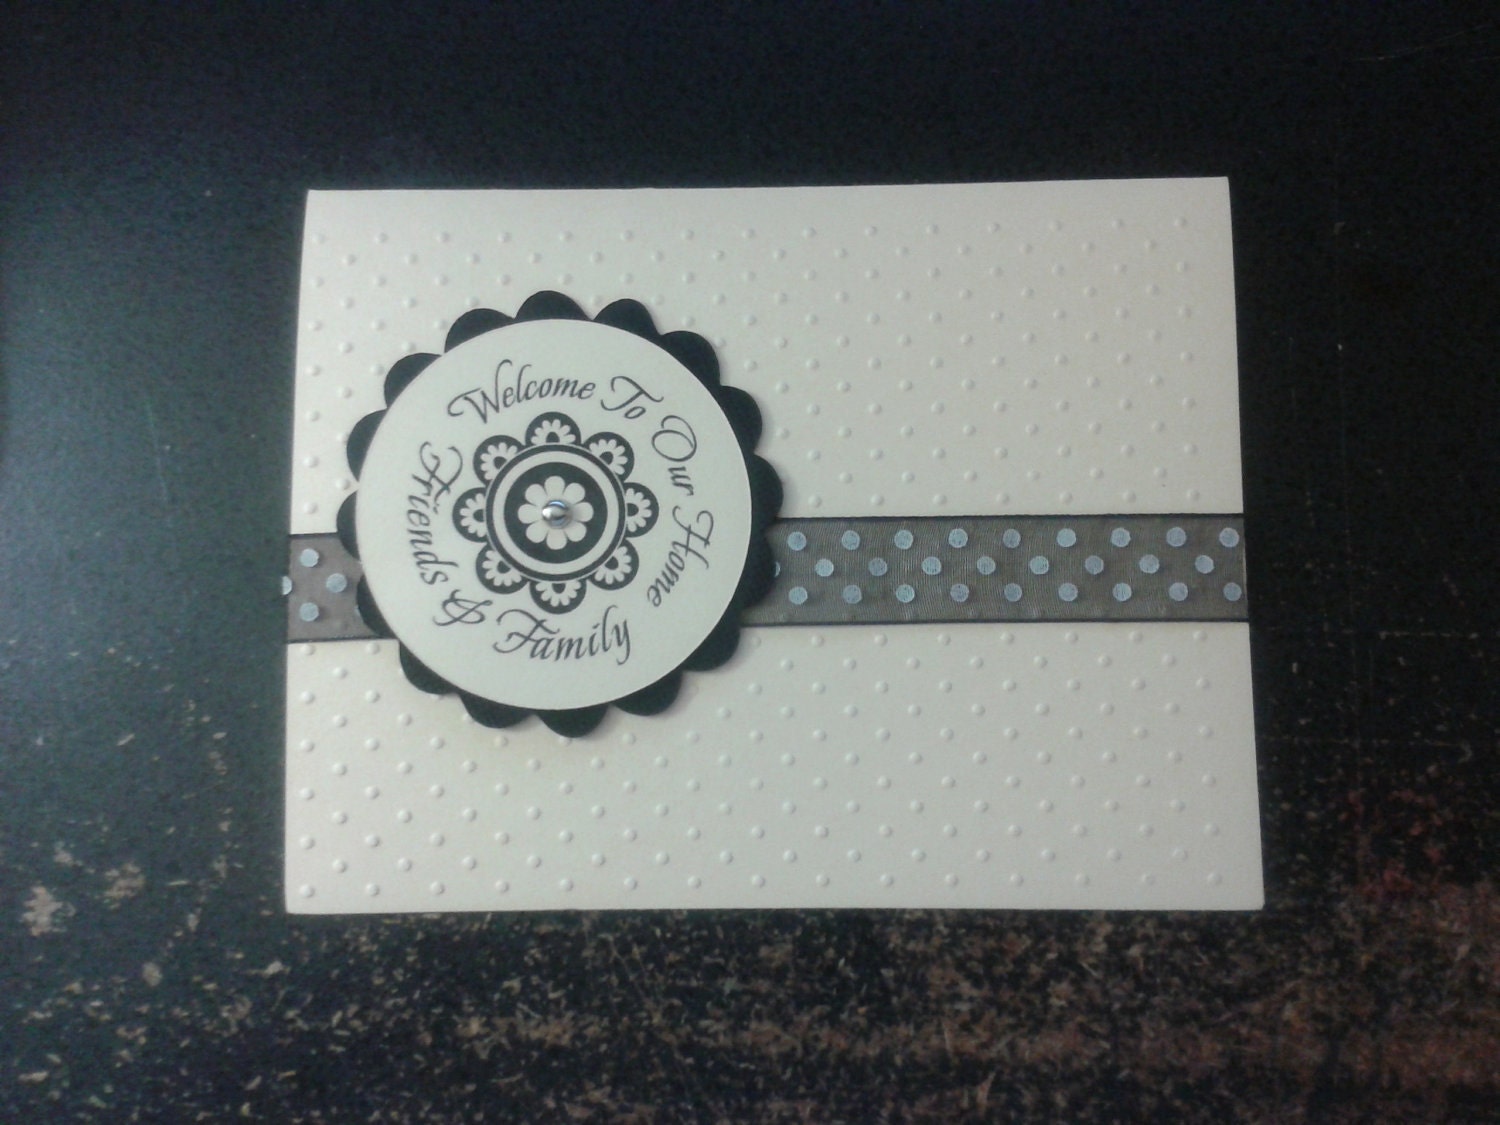
This card was created about a year ago, but I wanted to show that you can make a simple but elegant card, and you still can use it for any setting, rather it is an open house with friends, a intimate gathering for a few, or a dinner party with all the trimmings.  You will need the following materials:


There is nothing like a new home.   If you are a former apartment dweller, this is a sign of relief.  Condos do not count here.  As a lady from my worship center once told me, a condo is nothing more than a fancy apartment.  I say, a home is where you make it, while Oprah always say, "a home should rise up to greet you."  No matter rather your home is an apartment in a gated community, a family mansion where you can fit several generations in it, or a small two bedroom single family home in suburbs, you may want to invite some friends and family over to celebrate the happy occasion of being in a new home.


  1. Cardstock (3 sheets.  1 cut 4'x6', a scrap piece for the circle(2.25'd), and a sheet for the scallop circle)
  2. Ribbon for the center of the card
  3. 1 silver brad for the middle

The tools you will need are:
  • Cuddlebug or another type of embossing machine
  • Swiss Dots embossing folder (or you favorite small pattern embossing folder if you do not have Swiss Dots, which is made by Provocraft)
  • A die cutting machine (manual or electronic) or if you do not have that, a circle punch (2')
  • Note #1:  I used my Cricut machine with both the circle and the scallop circle, and the cartridges I used was the Storybook Cartridge (Pages 53 (right corner-circle) and Page 40 (Middle lower (scallop circle))but any cartridge with these two shapes will do
  • Paper piercer to poke the center of the whole
  • Printer or a round stamp. Note #2: to get the image perfectly centered on the page, I used the center point feature on the Cricut Expression machine (all but the original machine has this feature)

After cutting the first sheet of Cardstock to  4'x6', run it through the Cuddlebug on the front side of the card only.    Set aside.
Cut out the circles. If you are printing and using an electronic cutting machine like the cricut, print out your digi image first, then follow you machine's directions on how to cut out the circle using the center point feature, so you will not cut the image.  Each machine is different, even among the same brands (no two cricuts machines are alike), so know your machine's quirks as well.  If you are using a circle punch and stamp (or even with letter pressing items), cut out the circle then stamp the image on the circle,  for the scallop circle, you do not need the center point feature, so just cut out the circle.  center the circle in the middle of the scallop, punch a hole in the center and secure with brad.  set aside.
Next take the ribbon, and the embossed card blank, and place the ribbon in the center of the front of the card.  I used a cheater method to secure the ribbon the inside of the card with scotch tape, to make it look seamless, you can use double-sided tape on the ends of the ribbon, and an extra step would be to cover the inside, which take more time if you have it.
Finally, take the circle set and place it to the left of the card, and secure it with glue on the brad wings (the medal prongs that fold out), or you can use a foam dot to raise it.  I chose to not pop it up this time, but I normally do pop up an image.  I also normally ink my edges and round off the corners, but I chose to leave it clean and simple this time.
I hope you have enjoyed my card for today.  Moving into a new home is hard, but inviting friends to help celebrate that move makes is a lot sweeter.  Be blessed on this day and enjoy your new home if you recently moved no matter how small or large it is. It is after all your home. 
Enhanced by Zemanta

Monday, July 16, 2012

Paper, the foundation to a great card or layout.

Construction paper colors
Construction paper colors (Photo credit: Wikipedia)

What comes to mind when making that one of a kind scrapbook layout or card?  Paper.  Yes, there are all sort of paper from newsprint to the real heavy cardboard type of paper.   When scrapbooking was just an infant, photos and all sorts of memorabilia was placed in books.  Today, you can use cardstock paper, which looks like construction paper, but do not be fooled by the name cardstock.  Cardstock paper is NOT construction paper.  According to Wikipedia, Construction paper (sugar paper) is a tough, coarse, colored paper. The texture is slightly rough, and the surface is unfinished. Due to the source material, mainly wood pulp, small particles are visible on the paper’s surface. It is used for projects or crafts.  

Textured craft card, in a variety of colours. ...
Textured craft card, in a variety of colours. The visible texture is a characteristic of this type of card. (Photo credit: Wikipedia)
Cardstock (card stock), on the other hand, which  also called cover stock or pasteboard, is a paper stock that is thicker and more durable than normal writing or printing paper, but thinner and more flexible than other forms of paperboard. Card stock is often used for business cardspostcards, playing cards, catalog covers, scrapbooking, and other uses which require higher durability than regular paper. The texture is usually smooth, but can be textured, metallic, or glossy.


The next type of paper commonly used is patterned paper.  This paper come in both heavy and lightweight varieties, have designs on them, and looks like untreated wallpaper.  It can be used as a background or used for mats in both layouts and making cards.  To match the patterned paper to the cardstock, find a common color in the patterned paper the match it up with the common color of the cardstock.
Vellum paper look like un-waxed paper but thicker.  It comes in solids or patterns, mostly white (but comes in a variety of colors).  Use this paper when you want something softened, such as a photo.  You can also use this paper as a liner in invitations (especially something elegant like a wedding)
For homemade (not manufactured) scrapbook albums, chipboard (pressed fiber thick paper) make great covers, letters, and other embellishments.   They come in different weight as well, from cereal box-type weight to heavy moving boxes, but the ones most commonly used are the chipboard made for cereal boxes.  This thickness can be used in die cutting machines such as the Cricut and the Silhouette to cut out letters and other shapes.  The good thing about chipboard is you can paint it, distress it, and cover it with patterned paper or fabric.  Chipboard makes projects more stable.  
These are the most common types of paper used in the papery crafting industry.  Some tips…Please note, if you want your photos to last, all paper, no matter what, has to be photo friendly (acid and lignin free) if you are using the paper your photos.  Otherwise it does not for a non-photo project.   You can find paper in dollar store, there is nothing wrong with that.  You can print your sentiment on printer paper on your computer is you are not comfortable with your own handwriting (for cards and journals). Before leaving this topic, I would like to share with you my favorite brands:  
Cardstock- Bazzill, because it comes textured, blinged, or both. Bazzill also comes in a smooth variety as well.  It does tend to get confused with construction paper, which as explained earlier, is not construction paper at all.  American Craft paper is a close second when I cannot find Bazzill.  Bazzill also make a line that can take the bleeding that Copic markers give out when you color with them and the printing the Cricut Imagine machine does, so I like that cardstock as well.
For patterned paper, I have four favorites: Bo Bunny, BasicGrey, Graphic 45 and K & Company. Bo Bunny and Graphic 45 for whimsy paper, Basic Grey for the antique look, and K and company for everything else. I use all kinds, but I tend to go back to these four.  I am not choosy about my vellum or chipboard, except they do have to be of good quality and you can find good again at the dollar store.

Try different line of papers to see what will become your favorites.


Enhanced by Zemanta

Sunday, July 15, 2012

Summer CHA

This week is the Summer version of CHA.  In case you are unfamiliar with the term, CHA stands for the Craft and Hobby Association.  The convention, usually heard in a different locations twice a year (Summer and Winter) is for scrapbook venders.  These venders bring their latest products for retailers to see and make their orders from. I shop from a lady who is on her way to CHA now, and I cannot wait to look at You Tube Videos to view all the new products from these venders.   Venders include Tim Holtz, Heidi Swap, We R Memory keepers, Cricut, and Sizzix, to name a few.  CHA will often have a day where the public gets to view their product and make a purchase.   This Summer's CHA event is held in Chicago, Ill, and I live close enough to make the 8 hour drive, but not worth the trip if I do not have someone to share it with, and that is usually a scrapbooking buddy.   I hope one day, MDN Creates will be big enough for me to attend the event.  Right now, MDN Creates is just a baby company, still a newborn, but I am learning.  beside that, I have another convention to attend in two weeks, the Longaberger one for consultants.  If you follow me on Tricia's Baskets, I will tell you all about it there.
 In the meantime,  enjoy this link to see all the new scrapbooking products by clicking here. Have a wonderful blessed day.  
Enhanced by Zemanta

Saturday, July 14, 2012

Happy Birthday girl-Monochromatic

Hello-

Today I made a very special card for a very special little girl, my soon to be 4 year old niece.  Ok, so she will be 4 in September, but it is never too early to start a card.  She loves pink and cupcakes, so this retired paper is perfect for this card. Whenever you think of a card to make,make it now, especially if you know an event is coming up.  So this niece of mine is so cute, and smart.  she has a brother who just turned 5 in May, and she like to follow him where he goes.  Not only that, she likes to sing.  What three year old doesn't like to sing.  OK, back to the card.

So the ingredients for this card are very simple, and they call for:


  • pink cardstock
  • Pattern paper:  Note:  in order for this to work, you need pattern paper where the designs are big enough to cut around 
  • Pop dots
  • Sentiment sticker


This is a basic card, so assembling it is simple:  fold cardstock in half.  Adhere paper on card front.  cut out the extra cupcakes (you can get the extra cupcakes from your scraps).  Once you cut out the images, put a pop dot on the back and put it on top of the matching cupcake.
Finally, add the sticker.   You can add a cute little note on the inside for your cute little cupcake.

I hope you like this card, and do not forget to enter the July Challenge on Card a day Blog (  http://cardadayblog.blogspot.com/) I will see you later.  Be blessed.

Friday, July 13, 2012

Save time and money: Make your own kit...Part 2


The best solution is to make kits on your own, and you can do it with your current stash.  The rule here is to not buy anything except consumables (glue, tape runner supplies anything you can purchase at a dollar store)
First, choose your paper.  Will it be a cardstock or a patterned piece of paper?  This is your background piece of paper. Next, choose 3 or 4 pieces of coordinating paper.   If you background is a piece of cardstock, picking coordinating pieces is easy to do, but what if that background piece is a pattern paper, how do determine which is the dominate color?

Take this piece of paper for instance.  I have this stack and I have used it for a mini book, a background pie
ce of paper, and I love it.  I normally do not work with corals and their coordinates, but this stack by DCWV called Mariposa got me very "Springy" this year.  The first thing you will notice about the paper is the Multicolored background.  I have one piece left, and the first piece I cut out to make tags for the mini book I made in May.   The challenge for you is to let the paper "speak" to you.   I can use light green or even the pinkish area where the writing is.  But I am going to go with the red flowers, and base my kit off of that.  Since the paper is thicker, I would even call it patterned cardstock paper, in fact I am looking at the cover, and that is what DCVW is calling it.  3-4 sheets would do, and you can even adjust from that. 
Next are the embellishments.  With this piece of cardstock, you do not need to make it as busy as it already is, so in my case I would just stick to one or two piece of ribbon or even a button or two.  If I had another sheet of this cardstock, I would make it one of coordinating pieces of paper and cut some of the elements out of it, especially if you do not want some things covered like the birdcage or the corner butterfly.  Some papers lend themselves to that aspect of the scrapbooking process, but you can make that decision as you are in the actually creation of the page itself.  You are just making the page kit right now,
Finally, if you have photos in mind, add them, but make sure they are in photo safe envelope.  You add then to the kit now, so that you do not have to look for them later.  It is also ok to do photo placement on a page, and mark on the back with a photo-safe marker where on the page you would like to place them. You can always adjust when you make the page.  Make sure the kit does not clash with the photos.  So in other words, make sure that someone is wearing red or there is an object that is red or even another color on the background paper.  It is Ok if you decide to swap out later.
Finally you want to put all of this in  a folder that is photo safe or one of those project folders.  If you do not have one, you can pick one up at Walmart if you do not have a Michaels, Jo-Ann's, a local scrapbooking store nearby. Even stores like the Dollar Tree may have some.  Make sure that your largest piece fits in side.  Make several kits, and if you are a card maker, you may want to make some of those too, in case the mood make hit you to make a card, or if you need one for an occasion.  You do not have to put your sentiments in the kit now, but it is will save you time if you have it already stamped or printed up.  Saving money is wonderful and people are busy.  So isn't time you start making scrapbooking and card making kits?
Now if you will excuse me while I go make some kits.  I am running low. 


Enhanced by Zemanta

Thursday, July 12, 2012

Save time and money: Make your own kit...Part 1


Hello-

The last time we talked (I posted, you read), the subject of the day was how to use a kit especially when you are an experienced scrapbooker.   With that in mind, I want to briefly touch on something that I am concern about.  Kit of the month clubs, then go right into making your own kit if you have the time and the energy to do so.
First of all, there is nothing wrong with being part of kit of the month club.  I was part of a couple that I may rejoin in the future, but these days I am all about saving money, time, and effort for a lot of the things that I do.  This includes my grocery shopping, clothes, housewares, and my paper crafting.   The major problem I have with these clubs is the pricing.  Yes, many are following what is going on with the recession and other areas, but at the same time, there are many companies out there who have kit clubs, and the pricing is just as inflated as before.  When I am in a kit club, I want to get the price I paid for, and it better be $60 worth of items for $30.  As a business person, I realized there are other factors in the cost, such as materials used, labor, and the shipping (including those nasty gas prices we all have to endure), but as a consumer, how much longer are we willing to put up with this?  Ok, I am being thrown off the course, so I better get back on track. They are indeed beautiful kits when I get them, and someone took the time to plan these kits out.  This is the reason why I am not for cheapening the cost. 
To determine what works for you if you decide to go that route, make sure you can get your money’s worth from a kit.  Make sure the kit will work with your style of scrapbooking.  Do not just join a kit club just to be joining, and then when you get you first kit, you do not like the style nor the colors.  It is a waste of your precious hard earned money and someone else could have gotten the kit.  It does not matter if the club bills or automatically takes money out of your account, make sure you have plenty of money to handle the payment each month, and make sure you can stop the club anytime without a penalty.  I know, you can always sell the kit on Ebay, but why go through the bother of listing the kit, pay a fee to list said kit, wait for a person to say they want it, pay a fee after it is sold, then ship the kit to the winner.  If you paid $50 for a kit, and the person who wins it paid $15 ($10 for the kit and $5 for shipping), you are out $35 (more when Ebay takes part of the $15 paid), then you have to ship it, which is more money from the $15.  Is it really worth it?
Stay tuned to Saturday, part 2 on how to put together a kit.
Enhanced by Zemanta

Tuesday, July 10, 2012

Funding-

I have a new funding page on Go Fund Me.  I am finding that this business needs funds, and you need funds to run a business, so here I go.  I have (and still using ) the following:

Adsense ($0.01 per click do not buy adhesive)
Etsy (It works, but I need more than just Etsy)
Affiliations (Unless that person is interested in buying from that store, forget it)
My parents (Hey, they have their own expenses too, besides that, I have a brother and a sister (plus a nephew ) they are helping out too).
Blogging (love doing that, but it is traffic that I need as well)


So If you like what you see so far (I have more coming), please donate.   The address is http://www.gofundme.com/uhewc.


Enhanced by Zemanta

Monday, July 9, 2012

You got a scrapbook Kit, now What?


Say your BFF (best friend forever) has this idea to get you a scrapbooking kit.  She see this kit that speaks to her, but it may not speak to you.   She knows you scrapbook and thought she would do you this favor.  You receive the gift, but you do not like the papers or anything about it. Do you return it to her, explaining that you papers are not you, or except it graciously.   Except the gift.  After all it is the thought that counts.  You can still use the papers and who wouldn’t want free paper anyway.  Here are some tips on how to make the kit work for you.
  • Keep in mind your kit, put together by the company, and put together colors and styles that are trendy to that company.  Some of these companies uses the Pantone color system.  This is the same system that helps interior decorators and fashion designers decide on the in colors for the year.  This is not a bad thing, just swap out your papers, or throw in some paper you like to go along with the kit.
  •   For the papers and embellishments you do not use in the kit, you can make mini books, cards, and other scrapbook layout.
  •   For a different twist, there is nothing wrong with splitting the kit up.  It is the same thing as I explain before.  If your kit include chipboard items, such as a mini book, a pad of paper, and some embellishments; you have three or more new projects in just that one kit.


The point here is to making a kit work for you, and not the giver.  You friend meant well, and most likely when she got the kit, she thought of you.  This also tip also works if you are in the store and buy a kit for yourself.  Next time I will talk about how to put together a homemade kit

Enhanced by Zemanta