**This post contains affiliate links and I will be compensated if you make a purchase after clicking through my links.
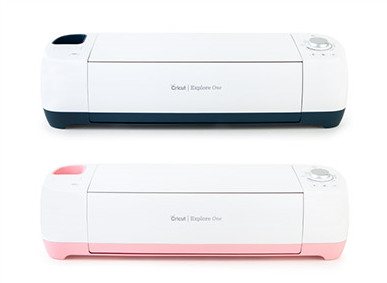
Add some color to your life with Cricut's colorful new Explore One machines! These amazing machines are now available in two new colors: Vintage Navy and Cherry Blossom -- for only $199.99! Purchase your very own machine in one of these new colors today. Be sure to use the code AUGSHIP at checkout because you'll get free shipping on all orders (no minimum)!
The Cricut Affiliate Program is managed by Acceleration Partners. Please review and join our other award-winning programs. You can also follow us on Twitter for program news.
*This post contains affiliate links and I will be compensated if you make a purchase after clicking through my links.
Thus far you’ve heard the Blurb story and learned a bit about the extensive tools and resources that Blurb makes available to their book-making customers. While all that is impressive, what’s really remarkable to me is how they offer all of that and provide visually stunning books made on photo-quality paper—AND do it all at such an incredibly affordable price. It’s really is something to marvel at.
Since day one, Blurb has been praised for their unwavering commitment to quality, which is why renowned photographers, graphic designers, architects, artists, and other creative professionals repeatedly choose Blurb to display their works of art. That speaks volumes in my book (no pun intended) because, if they trust Blurb to showcase their work, then it just seems logical that I should too.
Professional-Quality Books and Magazines Whether you’re creating a photo book, a trade book, or a magazine, Blurb allows you to choose from a wide range of trim size, covers, fonts, layouts, and paper. Paper type is actually really key to any book which displays images. Other book-making platforms may have some nice quality paper, but you’re going to pay out the wazoo for your book. Others use recycled paper, which is good environmentally, but not so great for producing visually-rich images.
Blurb, on the other hand, provides customers with several paper options, including standard paper that has a smooth, semi-matte finish on 80# stock, to uncoated ProLine semi-gloss paper on 140# stock that’s ideal for high-end photography and design books.
Digital Books/Ebooks Blurb is actually one of the few book-making platforms that gives you complete control over creating an ebook. Blurb lets you make ebooks in both fixed-layout (Apple iPad®-only) and reflowable formats (iPad and Kindle devices). You can even convert any book or magazine you create into a gorgeous ebook so you can share and distribute it in a way that’s easy, affordable, and earth-friendly!
Price If price is a factor (when is it not?), Blurb is bar none one of the most affordable printers out there with one of the lowest price per page available – especially when you consider their quality and array of creative options. So that you will know exactly what you’re getting at what cost, Blurb developed a Pricing Calculator. I mentioned their pricing calculator in my last post, but to recap, this fantastic tool lets you see what your price per book will be based on the selections you choose (e.g. soft cover, 7 x 7 photobook, on ProLine Uncoated #100 paper).
You can also compare the pricing of different types of books (trade book vs. magazine, vs. ebook, etc.), covers (hard or soft), sizes (7 x 7 vs 13 x 11), paper type (matte, glossy), etc.
Although their pricing is already impressive, take note that Blurb is generously offering you 15% off any book you create from now through 5/30! Get started now!
I recommend sorting through those pictures on your camera, smartphone, Facebook feed, or Instagram page and start creating your very own book. You’ll be so excited with the results that you’ll probably want to make a copy for all of your friends and family (I’m speaking from experience here!).
If you need some inspiration, I’ll be sharing examples in next week’s post of how some people have used Blurb to create their own creative and useful books—so stay tuned!
**This
post contains affiliate links and I will be compensated if you make a purchase
after clicking through my links.
So last week I shared a bit of the Blurb story and how they came to unleash the
power of self-publishing. But Blurb is actually way more than a self-publishing
platform. They are really a tour de force of creativity that strives to help
give your story – your inspiration – a stage. And they provide some
really incredible tools to make that possible.
Here are a few of my faves:
Free book making tools – This one may be obvious, but
there’s more here than meets the eye. Blurb offers multiple
easy-to-use bookmaking tools and templates to give you complete creative
control and customization: BookWright:
The only desktop publishing software built for creating
professional-looking print books, magazines, and ebooks. It’s super simple
to use, which means you won't need to hire a fancy designer, know a line
of code, or buy expensive software. BookSmart:
A user-friendly book-making tool that allows you to create beautiful,
professional-quality photo books, notebooks, and planners. Adobe InDesign Plug-In: If you use Adobe® InDesign® then this Blurb plug-in
is for you. It lets you create and lay out books and magazines directly
within InDesign and output in both print and digital formats. It also
includes free professionally designed starter templates for photo books,
cookbooks, portfolios, and magazines. Adobe Lightroom: This book creation tool is fully integrated into Lightroom,
so users can make a gorgeous photography book without needing to leave the
Lightroom workflow. It also includes 5 paper choices, including high-end
photo-quality paper from Mohawk Fine Papers®.
Online photo books – With this tool, you can create
your very own online photo book in less than an hour. The online
templates and layouts are gorgeous. All you have to do is drag & drop
your photos from your computer, Facebook, and Instagram accounts. Instagram Photo Book: Blurb allows you to make a little 7 x7 book that’s as
unique as your Instagram feed. You can start with up to 60 images and go
up to 240 pages! It’s like a tiny museum devoted to your style! Facebook Photo Book: Now you can turn those favorite socially-shared memories
into a book-store quality book! You just curate your photos and any
Facebook comments you want to include and voilà! You’ve got a beautiful
60-page book of shared experiences.
Step-by-step Tutorials &
Webinars – If
you ever get stuck on how to do something or just need some creative
inspiration, you’ll definitely appreciate Blurb’s interesting and
informative Webinars and Tips and Tutorials sections. So helpful.
Free Tools to Use - Not sure what size book you
want? Blurb shows you what a 10 x 8 book would look like versus a 13 x 11
with their creation and layout tools. You can also see what different paper types would
look like, such as Premium Matte or Proline Uncoated and what makes them
different.
Pricing Tool – Blurb’s Pricing Calculator will save you from pricing surprises. You just select your
book type, number of pages, type of cover, and paper you want and this
tool calculates what your book will cost. They also have special pricing
on large orders (e.g. 300+ books).
I encourage you to take some creative time for yourself and explore
Blurb’s unique and valuable book-making tools. And remember that from now
through 4/30 you can get 20% offany book you create, just use
code: APRILLIGHTS! If you are thinking of self-publishing or starting a
fundraiser use code: BIGAPRIL and get 20% off 20 or more books!
It is not often that I talk about the product I endorse. The ones I do endorse, like Cricut and this company called Blurb, it is because I have tried them, and I have come to find that is a company I would use all the time. If you are too busy to create your own scrapbook or to shop for a professional who will create on for you, creating photo books like the ones on Blurb online, and have it look like a coffee table book is the way to go. Give this company a try for yourself, and let me know what you think when you do.
**This post contains affiliate links and I
will be compensated if you make a purchase after clicking through my links.
Like many great companies before it, Blurb
was actually started by accident. In the early 2000s, Eileen Gittins, Blurbs'
Founder, rekindled a passion for photography while trying to figure out her
next career gig.
She wanted to compile her photos into a nice coffee table photo book, but she only wanted to print a handful of copies. The
conundrum was that every publisher was quoting her hundreds of dollars for each
book! She found this curious – and frustrating. So she asked herself, are there
other people like me who want to affordably create their own high-quality book
from their photos? The answer, of course, was yes, and it changed her life –
and book publishing – forever.
In 2006, Eileen launched Blurb, a simple book-designing platform and a
publishing process that could quickly produce beautifully made books at
game-changing price.
Everyone from award-winning photographers to couples wanting to commemorate
the birth of their child started using Blurb – and they continue to do so
today. Even after almost a decade, people are still blown away by Blurb’s
user-friendliness, quality, and affordability. People trust Blurb to create
every kind of book imaginable, including:
Blurb
doesn’t just help people make books and magazines, they also help market them
by providing publishers with their own dedicated sales page. Blurb’s dedicated sales
pages allow authors to:
Make their book or magazine available to the public
or by invitation-only
Write a compelling book description
Customize a preview of their book
Share their book with others on social media
Blurb also created their publishing platform to work seamlessly with
Amazon and Apple iBooks Store so authors would have even more options for how
they sell their books.
There are so many remarkable things to share about Blurb – too much for just
one post! So keep an eye out for next week’s post because I’ll be sharing some
of my favorite Blurb tools and tips -- which, if you’re like me, will leave you
thinking … “I didn't know Blurb
could do all that!”
Oh! And I almost forgot to mention that now through 4/28 you can get 20% offany book you create! Can’t wait to see what kind of book you create!
I recently decided that I wanted to learn something new every
month this year. In addition to my many
skills that have been taught to me over the years (both crafting and
non-crafting), there is still a lot I do not know how to do. I do not know how to bake bread, even though
I begged my mother for a bread machine a few years ago, I now find the skill
useless, because experts in the field say that bread is bad for you, and
besides that, there is no one in the house but me. I always wanted to know how to do that
perfect cartwheel, but I never had strong enough arms to hold my weight for a
second (and the reason why I could never make a great cheerleader or gymnast),
and the skill now does not look good on a 50-year old. But I can stand and execute a perfect (well
almost perfect) Forte on Pointe in ballet.
I am not saying these things to brag (hate bragging, it does
not produce anything), but I am saying it to prove that it is never too late to
learn, and when it comes to crafting, there are tons of courses to choose from,
and I have a short list of places you can learn how to craft (or anything else)
from making ravioli to programming a computer, and then some.
Warning: there may be affiliate links
ahead. I will be compensated if you make
a purchase through my links.
First the Cheap and free….
The first and perhaps the cheapest way of learning a craft
is from family and friends. Yes, I had
to go that route, and I will tell you why.
Older people love to show the younger generation how to do things other
than the “latest and the greatest”, and I finding that true as I inch closer
and closer to that side of the fence.
When I was 6, a friend of the family taught me how to knit and to make
candles. When I was 13, my paternal
grandmother taught me how to crochet (although I never want to crochet another
darn hat for as long as I live). My mom
taught me how to sew a straight stitch on the sewing machine. These are the moments I cherish with these
people, and I am forever grateful that if I need any extra money, I can knit or
crochet a blanket, make a votive, or sew pillows for a craft show.
When you do not have a family friend or relative to show you
these things, the next cheapest way is to hook up to your nearest library and
check out a book on the subject. Many
books are for beginners, and if you get that one good book, it will show you
the materials needed for each project, reading instructions, and pictures on what
your project should look like at any given stage of the project. It is called self –teaching.
If you are not a reader, the next best thing to cheap are
videos. I am going to break it down into
two different kinds of videos, the cheap and the not so cheap. You can find them on your computer, and the
first two are You Tube (YT) and Vimeo.
You tube is perhaps the oldest of the two, and it does not cost anything
other than your connection. If you are
not sure how to get You Tube, you can access it here. I have learned so much
about how to advance my scrapbooking and card making, learned about new tools,
and even followed my favorite You Tubers once I got start learning how to do
that craft. I have even set up a channel
myself, even though I do not have many videos on it.
Vimeo is a little different but it does the
same thing as You Tube and is gaining in popularity. To me, the only different between the two,
other than Google having their hands on the once independent video site of YT,
is that you do not have to worry about not seeing other results on a search
term. What do I mean by that? With YT, when you search for a term like, “how
to make a simple greeting card”, YT is can quickly narrow it down to the resul
t
of 60,700 videos, but all of them are not videos on the subject (remember, this
site is run by Google). Vimeo, on the
other hand has a result of 7 videos, but all of them are not on the subject of
the term “Greeting Card”. When person
uploads their video, it is put into a category by keyword or SEO (a technical term
meaning the same thing), and to get the most hits, sometimes that person just
throws in any old word to get a lot of hits on their video, which is another
subject on one of my other blogs, not here.
In other words, be careful what you search for. Tip:
use the word “tutorial” or “tut” after the search term for best results (example:
how to make a simple greeting card tutorial)
Take a course…
No, you do not have to earn a college degree for these
classes, but they do come in two forms: online
and offline, and each has their pros and cons.
First the offline courses.
Your cheapest way of taking an offline or physical course is at a rec
center. They used to be your “how to
make an amazing flower arrangement” type courses. In other words, the course is very basic,
which is good news. Everyone is on the
same level, but your instructor should not.
One sign that your instructor is on the same level as you is when he/she
is trying to figure out a basic tool needed to make something. These courses are usually free or very little
money. The next cheapest way to take a
course is through a retail store. Think
of your Home Depot, Lowes, Michaels, and local scrapbooking store (LSS) type
stores. Most are offered free, because
there are no materials to hand out except instruction manuals, and paper is
still cheap. Most of your craft courses
in a LSS, however, does require a fee. Another
problem with offline course is in the cancelation by you or the venue. When that
happens, you may not get a refund if it is hours before the start of the
class.
When I worked at Archiver’s, there were a couple of courses
that were free, and they were your basic introductory courses, such as
Scrapbooking 101, and Cardmaking 101.
You basically sat through the course, not making anything until towards
the very end of the course, and it was a 45 minute class and the class was
equal to that of a class you got at a recreational center. You also learned what you can get while you
are at Archiver’s, so there was a store tour.
Most classes were $15-$20 ($22 when I left), and it included all of your
materials to make a card, altered piece, or scrapbook page. Most classes lasted about an hour to an hour and
a half. The end result is you got to
take home your finished project and an instruction manual. It was worth the value of the course.
Online
The last way and perhaps, in my opinion, the most expensive
way to learn how to do something is online courses. This is not your 15-minute course on YT or
Vimeo. These courses are usually intense
and very detailed oriented. These sites
include Udemy, Craftsy, and countless others.
I am will only concentrate on Udemy and Craftsy.
Craftsy,
according to their website has a motto, “Learn your craft, your way: when,
where, and how you like it.” You can learn how to do needlecraft,
papercrafting, woodwork, metalwork, and all else in between. To start, take a mini course, they are
free. Once you get your feet wet, you
can move ahead to the ones that cost more, but first, you must sign up for an
account. It is the only way you can keep
up with the courses you have already taken, so you do not duplicate and pay for
it again. The best part is you learn at
your own pace, and you can stop and start a video at any time during the
duration of the course.
Udemy also requires that you set up an
account, but this site is broader based.
Udemy also is more for those who want to learn technical courses, such
as Photoshop, photography, or set up a WordPress blog. With that comes a hefty price of $50-$300,
but there are often sales on a good thing, such as “take a $10 course” that
would normally be $250. This is another
good reason for signing up for emails, because if there is a sale, and you do
not have the money to buy it at the regular price, this is the perfect time (there’s
that word again) to take the course. What
I like about these courses is there is a 5-10 minute preview, so you can see if
the course is for you. If not, you do
not have to pay for it, and you learned something in the process. Each course comes in chapters, so you do not
have to search all over the place for a continuation of the subject
matter. I did find some crafting
courses, but not a whole lot, because of the nature of the site itself.
Finally the end…
Experts say that in order to stimulate the mind, a person
has to learn something. You are never too
old to learn something new. When you
stop, you die, I am not going to lie about it.
It has been proven that when a person stops learning, they are dying, at
least in a mental sense. Learning and
remembering is said to prevent Dementia, diminish the effects of Alzheimer’s
and other mental degenerative diseases in older persons. For the rest of us, learning a new skill may
provide us of extra income, and a whole new way of communicating by getting out
and socialize. Who knows where your new
found skill will take you, including touching someone else’s life, but it has
to be something worth looking into. One
thing I forgot to mention in this long post is Pinterest. I know it could be addicting, but it free,
and if you know how to use it well, it could lead to you all kinds of craft
tutorials, because many people who write blogs do post on Pinterest to gain
traffic and a new friend who shares in the same passion they do.
If you have a skill that is worth teaching on YT, Vimeo,
Udemy, or Craftsy, you can also upload a video and get paid for it. Each site has their own instructions on how to
upload a video and other tips of the trade.
(c) 2015 P.Lynne Designs A mini book I created in 2012
(Warning: The
following activity may cause you to cry in happiness, do lots of ahhs and oohs,
joys of laughter, and may spark that part of your brain that has not been active
since you were a child. Proceed with
happiness.J
)
Hello,
I am starting to make more mini books and journals. I think they are fun and can be as
interactive as you make them. Today,
before I give you what is called a cross posting of journaling, both from a
writer’s view and a scrapbooker’s view, I want to give you an overview of the
differences between all these books.
First of all, I think it is important that you know
the difference of these books (also called scrapbooks) in terms of size, content,
and elements in each of these books, so you can determine for yourself if you
want to make more of a traditional style album, or an interactive one.
What is it?
A traditional photo album (TPA) is just that. Think of your parent’s photo albums. They are commercially made, and only come in
a handful of sizes. Back in the 1970’s,
magnetic albums were introduced, but the only problem is after 20 years, the
photos start deteriorating. Today,
magnetic albums are just as safe in preserving photos as the others by using
paper that is photo safe. The only thing
you can do on a TPA is look at photos, that’s it. There is some reading involved (journaling)
but that is it.
A mini book is usually handmade, with some interaction. In fact a mini book, folios, and journals all
run in the same category, which is homemade.
All of these terms can be used interchangeably and they basically mean
the same, a photo book of your memories.
Size:
Size does matter with photo books (which what I am
going to call them throughout this post).
For your TPA, you can use any size to be considered a TPA. For mini books, a tiny book to an 8 x 8 album
is considered a mini book. A folio and a
journal is larger than 8 x 8, but no bigger than 12 x 12. So the sizes in all of these albums do
overlap.
Contents:
Of course, there are photos involved, as well as journaling,
and I will go more into depth on the journaling part in a separate post (as a
crossover post with my other blog, My Ambiance Life). In a TPA, the photos
are arranged in either a photo protector page with no embellishments or in a
layout page with embellishments.
The other books have interactive pages. You can make a pocket, flip up or down, waterfall
(which is basically a different take on the flip page), a book within a book,
and pull out pages for starters.
Themes and types of books
To me, all photo books need to have a theme, even if
it just the year in which the photos were taken. With TPA, people are use to the fact of just
throwing photos in an album, no chronological, personal, or theme, but I want
to challenge you to this: Try at least
putting your photos in chronological order by year, you do not have to go by
month and year, unless you do a timeline of events. Also with any photo book, you can make the
following types of books (in both a TPA and homemade)
·Smash book- add pictures, event tickets, a
label from a soda you drunk in a different city or country, a card from a dear
friend, a lock of hair from your baby’s first haircut, just about anything.
·Baby book-highlights from birth to the
first or second birthday.
·Travel adventures-highlights from a
cruise, family trip, or country exploring trip.
·Event book-highlights from your event from
start (planning stage) to finish (the fun times)
·College years
·School years- from preschool to graduating
from high school
·Wedding book
·Adoption book (also called a life book)
·House book- highlight from start (planning
stages) to finish of a remodel or house hunting
·Spiritual Journey book-from baptism or acceptance
into your journey and your walk with God, including moments of clarity and
understanding. (Can also highlight pages from your written journal, if you like)
·Business book-highlight moments of your
business, from making the decision to have one to making your first dollar.
There are many, many more themes I could have placed
in this post, but these are the ones I have seen and done. I am currently working one for a friend of
the family, whose matriarch is 105 years old (also a friend of the family, who I
consider my grandmother), so this is a very special album to me.
Creativity
I place this last, because it does not matter rather
you place pictures inside a traditional photo album, or create a paper bag
album, and you can be as creative as you want to be. I used to hear this all the time when I
worked at Archiver’s, a Memory Store,
the words, “But I do not know how to scrapbook.” The next words that came out of my mouth
were, “you can put photos in a photo sleeve”, then I would instruct them on
what products they need to make the book.
Scrapbooks, photo books, and others do not have to be fancy, just
orderly. You can go online and copy a
simple layout, as long as you use the layouts for personal use only. I even invite my readers to copy a look I
have, as long as you abide by my copyright rules. If you decide to do that, please give credit
where credit is due, and ask permission first if you wish to mention the look
you have recreated. I do not mind and I
am sure other designers do not mind as well.
I always acknowledge the original designer when I am stuck on a design.
I hope you try to make an album from scratch. For me, it is very therapeutic, and you exercise
the muscles in your brain that very few adults use after the age of 20.
Cards I made back in November 2014
(c) 2015 P. Lynne Designs
OK, you are being blessed with two blog posts. The reason is I am trying to increase my
readership. I know, it has nothing to do with how I present myself to you, and I
do want to present the best that I can be with all of my blogs. Yes, I have more than one blog, and I am a
proud mama of all of them, but with that comes responsibility of equally
presenting each and every one of them in the same light. I am finding out, however, that just like
human children, each blog has their own personality. Also just like human children, they are all
part of me. I begat each and every one
of them.
Ok, you can all say that I am a little nuts to compare
a blog to children. Keep in mind that I
presently do not have children of my own, but I have a niece and 3 nephews. I have often observed them both as a group and
as individuals. The same with my friend’s
children. I was also at one time
training to be a Preschool teacher. In
case you have not observed children before, they all have different
personalities, even among multiples. It
is what tells us apart as humans. I know
I am sounding sarcastic at the moment.
Back to Bloglovin…
Part of staking my claim is they have to find my
blog. Well finding it is not it, it is
claiming that I am the owner of this blog, so that is why I am writing this
blog post. It needs to be a new post
(Hello, new post here), and a link (note the follow me on Bloglovin link).
So that is it.
Hopefully, this does the trick… Goodnight.
Today, I have a little something for you to make that
is easy. I currently have them on my
Etsy Shop, but it is so easy until I would love to share it with you, so you can make one for Valentine's day.
Psst...spouses and kids, this means you :)
Gift card holders are great for when you want to
present nice and fun and quick. There
are many ways to make it, but I think you will like this one.
This is a modified version and a combo on how I make
my 3x3 note cards, and a You Tube video I learn from Dawn, who is a Stampin UP!
Demonstrator.
You will need the following Ingredients (materials)
Ingredients:
With a diagonal Pocket
(c) P. Lynne Designs
1 12” x 12” sheet of solid cardstock.Get the good stuff.There is a difference between cardstock and
construction paper.Construction paper
is a rough, course paper, mostly used in elementary schools.Paper trimmers do not like it, and in my
opinion makes a project look tacky.You
can get most cardstock paper for $.69 and up ($.49 if using 8.5” x 11”).You can yield 3 card holders with one sheet.
(c) P.Lynne Designs
Adhesive (glue).You can use a double-sided tape runner, wet white glue (Like Elmer’s),
or glue stick.Since this is something
that most likely will be thrown away after the recipient gets it, you can use a
glue stick.Be careful, because not all glue
sticks are the same.Sorry, but the
dollar store is not your friend on this buy.Go to a place like Staples or a craft store to get you glue stick.They still will cost a dollar.
(c) P. Lynne Designs
Paper trimmer (optional).I say optional because not everyone is a
crafter, or like the paper trimmer.I
use one, because I cannot cut a straight line even if they pay me a million
bucks (OK scratch that), but I still like it because I can get it cut in one
swipe.If Paper trimmers are not your
thing, and I do not blame you if it isn't, here are some other options on how
to cut your gift card out:
(c) P. Lynne Designs
Scissors (pencil-not pen), craft knife, and ruler or a
die cutting machine (electronic or manual).For scissors, just line up your ruler to cut every 4 inches.Draw with pencil a line at 4 inches (this is
for width only).Cut with scissors.With a craft knife, you do not need a
pencil, but you will need some sort of self-healing mat underneath your project
so you would not cut your surface.Line up
the ruler like you are about to draw a line, take your craft knife and cut down
the paper.
I mention die cut machine, because this is go if you
are making more than one.This is also a
little advance for a person who is just starting out, I will advise you to
follow the instructions on your particular machine.I have 2 electronic die cutting machines (technically
3, one is out of commission so to speak) and 2 manually operated die cutting
machines. But if I have to make one of something, I will take out my paper trimmer
every time.
Extra squares.This
is for mating.You will need 2 squares (the
first slightly smaller-usually
Two Squares for matting (Optional)
(c) P. Lynne Designs
1/8 of an inch, no more than ¼ of an inch; the
second is smaller than the first one). You do not have to mat the front at all,
if that is your preference, but you will need a shape of some sort for the
front.A simple circle with the words, “For
you” or in the case of V-day, “To you my love” If you know how to cut a heart
out from scratch, that’s great (for me, (laughing
very loudly at one’s self)). If you do not have any punches, don’t worry
about it, any little embellishment will do.
Martha Steward Score Board
(c) P.Lynne Designs
One other thing… I forgot to mention scoring the
paper. This is another purpose for
having a paper trimmer. You will need to
score the paper every 4”. You can also
purchase a scoring board, which allows you to score and to fold with ease.
Put it all together…
Take your 12”x 12” sheet of paper, and the size you
want is 4” x 12”.
Score every 4” (4” and 8” lines on the score board) to
get 3 panels. Fold.
To make pocket…
Cut in half to make a pocket
(c) 2015 P.Lynne Designs
On the last panel, you want to either
cut diagonal (corner to corner) or cut in half (2” from the last score line).Fold and apply glue to the second panel. Set
aside for the moment.
Decorate the front cover:
At this point you are finished, but if you want to
make it a little more festive, e.g. holiday, personalize
Gift card holder with Writing
(c) P.Lynne Designs
it for a birthday, anniversary,
or a giveaway, let your imagination run wild.
You can mat the front and place a shape on it, like
the one I have on my Etsy shop, print a picture of the person you are giving it
to, or write on it
Well, that is it for now. Be sure to check back each week or so for a
new project, Etsy listing, or a post.
T.
Gift Card Holder with Wooden Embellishment
By Kaiser Scrapbooking.
Card Design by P.Lynne Designs (c) 2015
I hope you enjoyed last week’s layout, Snow day. I had fun making it, and it was freeing to
just go through my stuff, and let loose.
Even though it was a simply layout, the only thing new came from my
Cricut Explore, and thus, it saves me tons of money in the long run. I got my machine last February, and it paid
itself off in about 6 months.
Score. I will post in a later
post on why you need to invest into tools like the Cricut Explore, The
Silhouette Cameo, Sizzix and Cuttlebug embossing machines.
Etsy
shop.
I have an Etsy shop, but I have not made and posted
anything for it in about a year, and that is sad when ideas stop flowing.
So, a few weeks ago, I was thinking about what I need
to go in the shop. At the moment, I have
five journal notebooks, which I just renewed for 4 more months. As I was renewing them (which cost $.20 to
renew, unlike Ebay’s hefty fees for just listing anything), I thought, “why did
I stop making projects, and why can’t I start back?” That is when it dawned on
me to start back, but do something simply, but not too simply that people will
not buy products.
I was watching Dawn5377, a YouTubber, who is also a
Stamping up Demonstrator, and she came up with the template behind my gift card
holder, and I recreated it exactly how she did it. The only difference is that I cut out the
double hearts, the V day title, and the squares with my cricuts (I tag-teamed
the Explore and Design Space with my Expression 2 machine and Cricut
Classroom-nice). Hey a girl’s got to do
what a girl’s got to do, LOL. Anyway, if
I had one, it would have taken me 5 minutes to complete the project after
cutting, but like I said, I completed 14 of them. I choose the “love” colors-reds and pinks
(with white).
Something
new is coming to the Etsy Shop and Website.
I am leaving Blogger and going to WordPress. I have enlisted the help of Renae Christine
to help me with this. I have been on
Blogger since I started the blog in 2009, and I have been very unhappy with
Blogger for some time. That is one of
the reasons why I have not been posting.
I have watched Renae for a few years, and she is the person for the job,
having her own stationary business, and several businesses after that. She struck a chord with me, she said that I
(and several others in the webinar) were doing our businesses a dis-service if
we are treating our companies like a hobby instead of a actual business.
I have other blogs on Blogger that I will be switch to
WordPress, as soon as I work the bugs out of this one. I will let you know when the transformation
is complete. In the meantime, I will be
posting here. I am also getting a
updated logo and tagline. It will be completed soon.
Snow Day picture used in the layout Snow Day (c) P. Lynne Designs
Hello, and again, happy 2015. I want to start out by say that I am so glad
that 2014 is over with. I will not say
why, except to say it was not a good year for P.Lynne Designs. I let a plot of person items get in the way,
and I was not make very many things, except playing with Cricut Design Studio,
which is amazing. I cannot wait to begin
cutting them out. Also, I have just been
reviewing and promoting Cricut all year. (Due to the burnout I experienced in
my life.)
It is a very cold day here in Columbus, where I
live. So cold that bible study was
cancelled. Yesterday, my niece and
nephew had an unexpected snow day, which was unusual for the one of the major
school systems to close its door due to snow, but the night before, it was
really coming down hard. Winter has
really reared its ugly little head, and then some, but not like last year. I remember last February spinning my wheels
just trying to fit my car into the garage, without hitting a wall. I went to my parent’s house upset, and my
dad, just went back to my house, rolled over the spot a few times with his
bigger car, and I was able to get in the garage. I pray that I do not have to go through that
experience this year.
Snow Day:
So to commemorate the snow season and the Polar Vortex
of 2014, I decided that I was going to do my first scrapbook layout of the
year. There were several reason behind
it. First of all, I have not done one in
over a year (yikes). Sometimes as
crafters, we get into a funk, and I commend anyone who crafts during their funk
period. In case you are wondering what a
funk period is, it is a time when you just do not feel like crafting anything,
altering anything, the ideas just stop coming, or get too busy doing other
things. In my case, it also put a
serious damper on my Etsy shop. I have
had the same 5 journal notebooks sitting in my shop for the past 6 or so
months. I get traffic, and followers, I am sure they are wondering when I am
putting up something new and fresh for them to look at.
The second reason is I had this picture of my niece
Nine’na sitting in my phone for over a year.
The moment my sister took and sent it to me, I had to scrapbook it, no
doubt about it. Third is I was
commissioned by a lady at my church to make a scrapbook album for her 105-year
old mother around August (her mother’s birthday month), and the only thing I
did was the monogram for the cover. I
needed the motivation to get started and do what I always tell people, who are
contemplating about starting something, JUST DO IT! I guess I was just fretting over it, because
I want the album to be just as good as the last one I made, when she turned 100
years old.
The Layout itself:
I did not buy anything new. Unless it paper, or something that I cannot
make with my Cricut or emboss with my Cuttlebug or my new Sizzix machine (which
I had to get because of the letter
Snow Day (c) 2015 P.Lynne Designs
press option a few weeks ago). Everything on the layout was in my
stash. I love the minimalist look of
scrapbooking pages now, and that was the concept of this page, except the more
blank spots I saw, the more I had to fill up, LOL. So typical of me. Anyway, I decided that I was going to pull
out the blues in this layout, and I have 4 different types of paper (2 blues, a
putty grey, and a teal paper that looks like a bookkeeper’s pad). I ended up
using a 3rd blue for the lettering of “Snow days” and a tag (which
you cannot see the snow flake cutouts on the tag, but the reverse of them you
can see on the layout.) Those I cut out with my Cricut Explore, as well as the
boots and mittens on the page.
I saw a trick On You Tube that another crafter used on
one of her layouts, and for this you really need removable adhesive for this
trick (which I did not have). You use
one little piece of tape and stick it where you think you are going to place it
permanently. That way, you can move it
around, tuck elements under it, and when you are happy with the outcome, you put
more permanent tape down to hold it in place.
I place the photo and one element in place, then started tucking, and I
know I am going to love this tucking method.
It creates this temporary pocket, and I just love how the bigger snowflake
(which was a sample from a die cut machine I did not buy) is peeking out.
Comments
I loved how this layout turned out. There are a few more things that I needed to
add, but I will add over time (I will sometimes go back and update a layout). But it is good for now.
Zazzle Affiliation and Shopify
Last year, I fell in love with the different sites
that allow a person to custom make their own t-shirts, binders, phone cases,
even pillows and deck of cards. You can
even make a business out these sites by just designing your own t-shirts and
placing the link on your website. It is
super easy, once you get the hang of it.
I do three of them, and it is Zazzle that I have an
affiliation with. So check out the site,
and if there is there is anything you want me to have, just let me know.
I also opened up a Shopify store in addition to having
the Etsy shop. It is still called
P.Lynne Designs (Plynne-designs), and right now, I have only one design from
Zazzle that I created on there. In
addition to my designs like on my Etsy Shop, I will also include some retired Longaberger
products that I no longer want, but would be happy to send to a new home. As you may not know, I am also an Independent
Longaberger Home Consultant, where I sell baskets, pottery, wrought iron, and
their accessories. Most of these products are samples that I bought for that
month, and that product has gone into the retirement stage (no longer selling). I am also placing anything from my Shoplocket
shop on there as well, and will eventually close down that account.
Well, that is it with this long post. Sorry for the MIA, but it was so worth it now
that I am back into the swing of things to come.