Saturday, November 5, 2011

When you are writing, do you prefer to use a pen or a computer?


For those of you who do not know, I added writing to my list of things to do while keeping busy.  Writing, like my music (self-created or listening to someone else's music) relaxes me, and gives me a way to enhance other areas of my life (like promoting my businesses or other things).   Anyway, I took on a challenge on BlogHer to post for 30 days something.   Sometimes I will post a prompt they suggest (like today's prompt), and sometimes I will post what I normally post on this blog (such as an up and coming post on December 1st-a card with the theme of Christmas and Children).   
Well today's prompt is all about how I write.  The question is "When you are writing, do you prefer to use a pen or a computer?" When I started writing, it was personal, and something for my children to read long after I have passed away.   I wanted them to know what type of person I was before they were adopted, little notes of wisdom, and for them to know that they were not born in my belly, but in my heart.  Once I got bitten, I wanted to do something that allowed me to say something about the things I love to do, so I started this blog.   A few months later I split this blog up to allow people to learn more about The Longaberger Company, my individual business of being a consultant, and how a person can decorate and have their own business as a consultant.   

Back to the question.   As you see here, I love writing by computer rather by pen.   It is faster, and if I mess up, there is the delete button, and if I spell something wrong, there is the spell checker.   I have become too dependent on this little gift.   I do not shun the pen, because that is how I got started.  I started like many people, in Kindergarten, learning how to print.  by third grade, I learned the art of writing cursive, and all of a sudden, writing in my own handwriting became pretty.  

One tip for you: As much as computer writing is all the rage, and I do love it, DO NOT STOP WRITING IN YOUR OWN HANDWRITING!  Yes I said it.   It shows you care, especially if you are send a personal note such as a thank you, or signing greeting cards.   Another reason for improving on your own handwriting:  What if you have to add your signature to an important document such as your new driver's license or a business document.   I know that school systems are now saying that it is not necessary for a child to learn cursive writing, and two states have cut it out altogether.   It is important for a parent to sit down to teach what school are now failing to do.   A child needs to learn the basics that will help them excel in life.  If not, then where does it leave a country that requires it in business, academics, and other aspects of life.   I am going to stop there, because I will go into some of the other things that children need to learn and computers may not be always available.

Enjoy your day, and I will talk to you later. God Bless You.   

Friday, November 4, 2011

Christmas at Home

Although I was born in Ohio, and I call Ohio my home, I have not lived in Ohio all of my life.   My parents are from Alabama, and when my father was 17, he joined the Air Force in the late 1950's.   He was stationed in Plattsburg AFB, NY, when he came to visit my mom, who was attending University of Michigan at the time.  They were married 50 years ago On July 27, 1961, and I was born 3 years later at Lockbourne AFB, Ohio about 5 miles south of Columbus.   I cannot remember any snow during that time, but I saw my first snow when I was 4 years old at the Big Bear Mountains overlooking San Bernadino, Ca. In a picture, my mom and I were in sweaters looking at the snow.   I encountered my first blizzard in 1976, when we were living at McGuire AFB, NJ, and I never saw so much snow before in my life.  My brother and I played in that stuff.   But the worst snow I ever experienced was 6 years ago in Columbus.   An ice storm hit Columbus, and I had no lights.   I had to feel my way downstairs to my living room, and waited until my mom came and got me.   I could not get my car out of the garage. in my parents house was me, my oldest nephew, my sister, mom and dad with no lights, except for the light of the fireplace.   It was warm, peaceful, and I got lots of sleep that night.

Over at the Card-a day blog, the theme is Christmas at home, and a designer on the blog,  I want to show you a card that defines that memory.    It is made almost entirely with the Cricut Imagine, and this is my first project made with this machine.   I also have the Expression and  the Expression 2, 5th Anniversary Edition, introduced back in April on HSN (Home Shopping Network).   I am not sure if you can see it or not, but there is a dog and a cat looking out at the snow.   It reminds me of all those days and nights where i would look out, and wonder when I could go out and play in New Jersey, when we could go to the mountains in California, or when can I dig my car out of the snow here in Ohio.

I used a newer cartridge. Enjoy the Season, and if you never seen what an Imagine cartridge has on it, it is different from a regular Cricut cartridge.   Not only does these cartridges have things to cut out like a regular cricut cartridge, but it has pattern paper you can print out, and images you can print and cut as well.  You do not have to do the whole image either.

I selected my images to print and cut, which if you already have this cartridge, it is on page 20 in the handbook, and I did not change any colors at all.   The size of the image is 2.0", and I also printed a whole sheet of 12x12 snowflake paper, which is listed on page 40 in the handbook.   The reason I printed out a whole sheet was because I did not know how much was needed, but you can determine your size in the settings, and I would print out about an A2 size, which is about 4x6 (or 6x6 on the Imagine).   take a sheet of 8 1/2 x 11, and cut it in half width-wise to have 4 1/4 x 8 1/2.     Fold it in half to get 4 1/2 x 5 1/2.  Set the card blank aside.  I then cut and printed out a Enjoy the season (at 1.5") on page 27 of the handbook, and changed the background to match the mat.
Take you 12x12 sheet, and cut it slightly smaller than the front of the card blank (4x5) and adhere it to the front.   Take pop dots for that 3-d effect, and put them on the dog/cat image and the Enjoy the Season, and stuck them to the mat.  This is a fun last minute card, when you have forgotten someone on your list.   Don't have an Imagine?   You can do this same effect from any die cut machine, electronic or not.   don't have a die cut machine at all?   You can purchase a bunch of Christmas-like 3-d stickers with brands like Jolee's, EK success, K& Co., and buy a holiday-like pattern paper and make some cards.   The good thing about most of these pre-made stickers is most of them already has a pop dot foam on the back of them, so you will save money in the long run.

Well thanks for stopping by. 

Friday, October 28, 2011

The winner to the "In the Celebration of Sistahhood "Blog hop, and other happenings

Hello, and this is an update to the In the Celebration of Sistahhood Blog Hop.   To be fair, I used Random.Org to do my picking (he is not bias at all, lol).   the winner of my blog candy is Netta.   So Netta, if you are reading this, please email me your address to me, so I can get it in the mail.   my email is plogan@columbus.rr.com, and your information is safe with me.

This is what Netta said, "nice job on your album..love the flowers,  ``Netta (craftynetta)~~  


So thanks again, everyone.   I am resting from blog hops for a month.  November and December will be super busy for me.   I am preparing for a craft fair which will take place at Eastmoor High School, December 3, 9am-2pm I believe (I will get back to you on that as soon as I look at my information again).   I participated last year, and only had Longaberger products, and it did not go well.  My table this year will be both Longaberger and MDN Creates products.  I know, i know the rules of selling, but I have to have something for the kids to buy, as well as those with not enough money to buy. Starting next week, I will be cranking it out, and ordering cash and carry items from Longaberger so they can make it by December 3rd.    If you are in the Columbus area and would like to stop by and take a look, again it is at Eastmoor High School, and it is their winter festival.   Hope to see you there.


I am also into writing now, and have written several articles for a couple of companies from Freelancer.com.   I feel blessed in sharing my work to people, and I do not care if it is through crafting, writing, music, or dance.  Yes I am also a musician (piano, organ, keyboard), and a dancer (ballet, jazz, tap, and literal. )  All of this coming from a person who was very shy as a child.
I am now speaking to any children who are reading this:  you can accomplish anything you want to.  I used to ask God to take away this shyness I had, which to me was bigger than any other problem I had physical.   the true is that you have to believe in yourself, just as God believes in you.  Whatever you are good at, and everyone is good at something.  I never knew that being shy means that I was a great listener.   You do not have to say a word, and instantly that person feels better, because they had a chance to pour their heart out.


One of the things I never got to do when I was younger was to be a model.   I used to get upset about that.   I have some physical attributes that do not set right with the industry, but that is OK, because in a world where everyone is different, they are the most discriminatory industry in the world, and most clothing industries only want certain body types to wear their clothing, but that is OK too, because one day, they may find themselves on the other side where most of us are at now, and they are going to wish that they have never set those guidelines for women and modeling.   Sorry I that I said it here, but I had to get it off my chest, as it is far worst than when I wanted to model.  


Back to scrapbooking.  I am now a proud owner of a Cricut Imagine.   For those of you who are not familiar with this little piece of a gem.   The Imagine or CI for short is a printing and cutting machine made by Provo Craft.   This thing is not little, lol.   I bought it from a friend of mine, who thought it was too complicated, and wanted to stick to her expression machine (she did not purchase the E2 like I did).   Anyway, I took my sister alone, with my niece (3) and my nephew (4) in tow.   I knew that it was big (weights about 40 pounds or is it more like 100!!!), so I was hoping that my sister would get out of the car with me.  Are You Kidding !!!, this woman lower the seat, and went to sleep on me.  My niece is sleep, and nephew wide awake (like he could help me get this "Heavy D" of a Cricut machine out of the door)  It was a good thing her husband was there to put it in the trunk for me.    I get home, and take everything out (purse and the like), and tried to get the imagine between the wall in my garage and my car, and I had to set it on its side and wiggle it around.  I got it up on the table, calibrated it (you have to calibrate both the Imagine and the E2 every time you move them, even within the house), and now it is all ready to go.


Well this is pretty long, so I better stop and get something to eat before the Nate Berkus show comes on and my call in for Longaberger at 8pm.   Again congrats to Netta for winning, and your blog candy will be in the mail as soon as you send me your address.


God bless you all.

Thursday, October 20, 2011

In Celebration of Sistahood Blog Hop

All my life, I have made sure that I align myself with the right people.   These people do not have to be able to validate you as a person and the skills that you have.   These are the people who have your back, and make you feel good about yourself.   For a long time, it had to be my family, my church family, and I left it at that.   when I started scrapbooking, I felt that I was the only african-american female on the planet who made scrapbooks or greeting cards.  Did I stop?  No, I did not.   I was just the only one of my friends and family who did that sort of thing.  

In 2010, I was wondering through Google, and I decided to look up African American Scrapbooking, or some term I can not remember, but I came upon "Scraps of Color", so I decided to take a look.   I could not believe what I saw.  Sistahs, like me, who did the same thing I did were staring back at me, and  I felt like I found Mecca.   I was so happy.   Now do not get me wrong, I do enjoy being in the other groups, and I do have friendships in them, but there is nothing like seeing someone who is the same race as you crafting.  These people at least know what you been through, and when I post on this group, I do not get the blank post I may get from other groups.

So now, I am in another blog hop, and this time it for Scraps of Color.   The item I want to show you is in celebration of Sistahood, and it is an item I am presenting for a silent auction on Saturday, at the Longaberger Golf Club for my central branch's team. Every year we have this luncheon, celebrating life and in memory or a person who has survived breast cancer or has died of it.   The money raised for this event will go towards the Horizon of Hope campaign Longaberger has each year, and it is my hope that we find a cure not only to breast cancer, but all cancers in my lifetime.
This is a paper bag album.   It is my intent that the winner of this album will do whatever they wish to put inside.   The album is super roomy.   Not bad for a first time paper bag album maker.   The covers are made out of chipboard, and the flaps (the part that makes the paper bag stand up) are glued together, as well as the back of the bags.  I suggest that you Google search the term "paper bag albums" or if you have a You tube account, look up the term there as well.  I used burlap for the spine, but I have seen some videos where people have used paper or canvas for the spine of the album.  The papers used in the album come from Die Cuts With a View Old World Collection (6x6 paper pad)
The cover is really simple.  I used prima flowers and flat pearls.   Dream is at the bottom of the cover.

Food is the theme for the next two pages.  As they say, good friends, good food.   The backdrop is a French impressionist painting with wine a cheese to be the celebratory element.  This is a photo mat.   

The next page is a continuation of that celebration, and this page not only holds a photo mat, but two tags on the inside of the page.

This is a better view of the tags inside.

The next two pages are all about being girly.  I thinking more of a french girly, but celebrating the fight against breast cancer at the same time.  I have two large prima flowers that were originally ivory, and I colored them with three different copic makers:  Pawn, light Prawn, and Sanguine. I have a bling pink ribbon in the corner.   the photo mat is edged up with sepia ink, and washed with Glimmer Glam's Rocking on Sunshine.   there is one tag on the inside.

This first half page is actually the flap of the bag, and I have a Coconut Swirl photo mat edged up with Stampin! Up's Chocolate Chip, and lace at the bottom, I purchased at a thrift store.  Tip:  Do not disregard your thrift stores, ladies, they do provide wonderful scrapbook and other supplies for you at a fraction of a cost.   

This is another half page with tags I got a Michaels for $1.

I was in a swap over the summer with a woman in Canada.  Her name is Tracy(Tracystreasures24), and she has a you tube channel called Tracy's Treasures.   she made this envelope, with a birdcage on it.   The saying she has on it says, "The greatest gift is a portion of Thyself-Ralph Waldo Emerson".  I want to thank her again for inviting me to participate in the swap. 

This page is one of my busiest pages, as it has a lot of stuff going on.  Many of the elements here were from a mini album that I was going to make, and did not get a chance to.   This is a pocket within a pocket page.  You have a regular pocket (tag not showing--sorry!), and definition about Cherish (distressed for this page's purpose), a Maya Road pocket for something personal (just sitting empty for someone to  place something inside), the pocket, which was meant for another album fits better here, and two little tags from Michael's. 

This is a half page, with the word "Imagine" and a bling cupcake.  Turn on the other side, and you will have...

Another half page for a photo.

This is another pocket page, with two tags on the inside.   The stamps are from Stampin! Up's "Bliss" Collection.  More lace, and a Martha Stewart item left over from a previous card project.

Busy pocket #2:   Where to start... Prima flowers (note since this picture, I switched one of the flowers to the cover), a a friend made the second element for me, and the corner item is from Making Memories.  There is a little surprise....

Another pocket Page!   How this was made was I goofed when I was making the bare bones of this album. I was folding, and doing my measurements, and where the flap is at on the album, I glued it shut.   OK, I chucked it aside, thinking that I was not going to do anything with it.   As I was doing the last minute touches to this album, a thought came to mind, of making it a secret page.   So I cut it a lot shorter than the rest of the pages so it can fit inside, used my 1 1/2" circle punch so the tags can come out easier.   I also cut the flat (well carefully pulled the flap from the rest of the bag), and with the glue already on, I added paper, cut a slit on the side, and added two more tags.   One side says "Peace and Tranquility", and the other says " Laugh, Love, and Live.
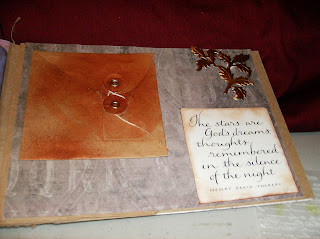
The last page I want to show you is a page similar to another page with the Maya Road pocket, a corner by making Memories, and a quote, which says"The stars are God's dreams, thoughts remembered in the silent of the night--Henry David Thoreau.   

 Celebrate Sistahood Blog Hop In honor of Scraps of Color's 7th Anniversary, myself along with some talented papercrafters, have teamed up to honor and celebrate sistahood and the wonderful women in our lives who make us laugh, cry, shout, scream, play, live.  We honor through our creativity and sharing our stories during this blog hop. Each sistah blogger will inspire you with her creativity and will also be offering up some blog candy! What is blog candy you ask?  It's a giveaway!  So sit back and get ready to be inspired with the Celebrate Sistahood Blog Hop.  Just start here, check out what I've created, and follow the rules for entry and then move on to the next blog hop participant for your chance to win again and again. Be sure to visit each blog between Friday, October 21 and Sunday, October 23 for more inspiration and chances to win.  This hop closes on October 23, 2011 11:59 pm EST.   Winners will be posted on each blog on or before October 28, 2011. So be sure to check back!  


Again, thank you for stopping by, and if you are following this blog hop, this next one on the list is Da Shawna at http://creativedaze.dashawnna.com.  There is Blog Candy, and it will be coming out of my stash.    God Bless

Friday, October 14, 2011

Christmas Snow


Hello and welcome to fall.  I am a designer for the Card-a-Day blog as well as this blog.

This time, I am not focusing on fall or autumn as some people call it. I am jumping ahead a few weeks to winter. I live in the Northeast state of Ohio. Some people call it a Midwest state.   There is nothing mid-west about it. Winters are not hard around here, at least by a Michigan, New England, or the Dakotas point a view, but they are to a point where you just want to curl up with a warm cup of hot chocolate and a good book instead going to work.   

The card I have to show you is all about snow. It is super simply enough for a child to make one.

I took an 8 ½ x 11 piece of Coconut swirl from the Bazzill Basics line, cut in half, horizontally, and folded that piece in half. I took the bone folder and used it like a brayer to get a crisp edge.  Next, I took the snowflake stamp, loaded it with ink, and stamped it to make my own background paper. I did both sides. An alternative is either stamp it before folding the cardstock or stamp one side of the card base. Set it aside.

I was going through my stash, and I found a foam snowflake. You can get snowflakes from many different sources:  Foam, Wood (paint it white or leave natural), or from a die cutting machine.   Adhere the pearls to the snowflake with the glue dots. I did that by rolling each glue dot in a ball to keep it from showing behind the pearls. If you do this with a child, it may be necessary to skip this step and leave the pearls off. You can even take this same concept, and make ornaments out of the snowflake. Next adhere the snowflake to the card base. I put a little Glimmer Glam in the snowflake, but this is optional, especially if you are working with little children.  The glam just adds a little sparkle to the snowflake.
 
Full Recipe:

 Paper:  Bazzill Basics coconut swirl
 Stamps: Hero Arts-Star Snowflake
 Inks and Paints:  Stampin! Up-Chocolate Chip, Glimmer Glam-Rocking on sunshine
 Also used:  Foam Snowflake, ¼ flat pearl white (unknown brand, got it at Joanne Fabrics), bone folder, and glue dots.

I hope you enjoyed my card.

Tuesday, October 11, 2011

Review of the Cricut Expression 2

Well last week I did it.   I finally published a article on Hubpages about the Cricut Expression 2 or E2 for short (see the right side panel for explanation of terms I use on this blog.)   I hope you enjoy the hub as they call them.   Go to http://plogan721.hubpages.com/hub/Product-Review-Cricut-Expression-2 or click here to read it.   Look for a a new Christmas card to be posted at the end of the week.  Until then, I will see you and God Bless you.

Tuesday, October 4, 2011

blog Hop part 2

Well, it is almost 24 hours, and I finally picked a winner for the blog hop this past weekend.   Her name is Shelly, and she goes by shrsl84bed@aol.com, so congratulations.  I have emailed her, and as soon as she send me an address to send the package to, I will mail it.

Well that is it.  I am looking at some youtube videos before going off to sleepyland.   Good night/morning and God bless you.