Showing posts with label cricut. Show all posts

Monday, April 15, 2019

What I use to create cards


Disclaimer: Patricia Logan and P. Lynne Designs is a participant in the Amazon Services LLC Associates Program, an affiliate advertising program designed to provide a means for sites to earn advertising fees by advertising and linking to Amazon.com. As an Amazon Associate, I earn a commission from qualifying purchases.
Ok, I am finally putting out a crafting post.  Apologies for not having one.  I wanted to introduce myself to some people and reintroduce myself to others who have been here waiting so patiently for that first post in over two years! Yikes, I did not know I was out that long until I just thought about it.  Again, so sorry.  Life and family got in the way, but you must take care of those you love first.  I am quoting the late Dave Longaberger, who used to tell his home consultants at Longaberger that God and family come first.  Everything is secondary or not needed at all.  I feel that sometimes Americans, as well as most of the Western World have forgotten about that aspect of our lives, and it is now money, how to earn, and how to spend it.
Well, I have not forgotten, or I would not be having this conversation with you.  I care about those who read my posts, but I also must take care of those I love.  This means my parents, taking care of myself, and giving God all the praise, but not in that order.  God comes first, always.
With that being said, today’s topic is not a series.  Oops, did I say that?  I mean everything is based on a series and I thought for once I would write down a single post, which has no rhyme or reason, but it has to do with my creative process.  This is one of many things I do in my shop, which also has been neglected until recently. 
No today’s topic is the art of making cards for my shop.  Currently, I have not stocked up since Christmas, and I need to.  After all, I missed Valentine's Day, St. Patrick’s day, and I am about to miss Easter, which is next Sunday.  Mother’s Day is around the corner, as well as Father’s Day, Arbor Day (Does anyone celebrates that anymore?) graduations, and Memorial and Fourth of July (for Americans).  I just thought of this, when 4th of July rolls around, half the year will be gone.  I now feel like Christmas was last week.
Anyway, in addition to showing you what I use, I want to take you briefly in my world on my process of making cards.  Did you know there are different methods to achieve on the endgame, which is a beautiful card? 
Oh, Toodles!
Sorry, Disney ™, I had to steal Mickey’s line when he calls for his Moussaka Tools.  If you are a parent, aunt, or uncle of a small child, you know what “Oh, Toodles” means, and you know how to use it, and this aunt knows how to use it. So, let me get my “Moussaka” Tools.  (Ok, I will stop talking childish now)


The basics
Yes, I do on occasion use my ruler, scissors, and paper trimmer, with bonefolder to cut and score my paper.  After all, this is how we all started out.  This is the simplest form of card making there is, and ever will be in my opinion, but I have also moved up and I will show you.
Cutting machines (Manual)
When I needed a little help, which is quite a lot these days, I break out the tools to make the card look pretty.  I have the following manual cutting and embossing machines.
Cuttlebug.
I use the Cuttlebug for embossing and die cutting.  I have one of the first ones that I bought for $72 on sale at Michaels.  I found out that Provo Craft Novelty has discontinued the machine as of January 2019, but you can still find the newest model in the stores.  It is best to use a coupon whenever you can to purchase tools like this and the electronic cutting machine that I recommend but beware.  Sometimes the coupon will say at the bottom, that it cannot be used for any tools (including sewing machines, and other electronic goodies).  Anyway, embossing folders make an impression on the cardstock, then you can get a die cut to place on the front of the card.
We R Memory Keepers Evolution
I also have this machine, but I do not use it for embossing and die cutting.  I use it for letter pressing.  You can use ink on the embossing folder and make an impression with ink.  They also make plates that you can use for the letter pressing.  In fact, I prefer this method better than using embossing folders.  In either case, please wash them before storing the folders or the plates.  Not good when you go to use them for your next project.
The way it works for both the Cuttlebug and the Evolution are you have a plate/paper/cutting die, embossing folder, or plate/outer plate sandwich, use the handle to pass this sandwich through the machine, and create a design.  Trust me, there are YouTube videos on both machines, and it is much easier than I am making it sound. 
Electronic Cutting machines…
If you do not want to create cards by manually feeding paper through a machine, put a little electricity behind it.  There is an electronic attachment for the Evolution Advance cutting machine, which costs extra (or get it in a bundle from Amazon or HSN), or you can go all out and buy a Cricut, Silhouette, or Brother 2 machine.  I have the Cricut Explore and Cricut marker, both do the same thing, except the maker cuts more materials than just paper.  It cuts fabric and thin sheets of wood (Bussa).
With both of these machines, I can cut a blank card with envelope, emboss with the scoring wheel (On the Maker) or stylus (on the Explore), and print from my printer and cut out the image on the cutters (print then cut feature).  I can make multiple cards with this machine by cutting everything at one time (if I use both machines).  This is the fastest way I can make a card, but I still have to put it together.
Adhesives (Glue and tape)
My most used tool of this form is a double-sided tape.  I use the brand, Scor-Tape, which if you are like me, you stock up on this tape and use it sparingly.  I use it in addition to a wet glue, which is Aleene’s Tacky Glue, that I have found, in all places, Dollar Tree.  (3 fl. Oz, so get plenty).  I also found small bottles of Mod Podge at the Dollar Tree too.

Finally, let’s put it together..

Ok, before we can put something together, my process is very simple.  This is before we use the tools I mention, or if you have made cards before, use the tools that you have.  I always say that this business is an investment.  If you are not in it for the business, then it is a hobby.  Either way, you are investing time and money for this, so, if you plan on buying any of the tools that I mentioned in this post, you have to want to use them.  Do not buy for the sake that I told you to buy them.  This can be a waste of your money and time.  If you are making cards one time, save the trouble and the headache of learning something new and fun, and buy something from Hallmark or American Greetings or hire someone like me to make you a card.  If you want to make something, there are kits at Joann’s, Michael’s, and Hobby Lobby that are a lot cheaper then buying a big machine you are going to use one time and let it sit there to collect dust.  When you buy a machine, even a manual machine like a Cuttlebug, you are investing in yourself the time and the money.  The hobby is relaxing and calming and the endgame is to cheer someone up or to celebrate an achievement.
My process
I plan, a lot.  I want to know what the theme, topic, whatever.  I have a sketch pad to draw it out.  I used several methods in the past, but my go-to method is sketch pad first, Adobe Illustrator and Photoshop second if I have to draw out something for my machine to cut out.  Sometimes, I skip the Adobe sisters (yes, my software are female) and go straight for Design Space.  This is online software that allows me to talk to my Cricut Maker or Explore.
With Design Space, I am allowed to use the shapes and images to cut out for the card.  I can import what I draw on the Adobe sisters, which is saved as a Jpeg or PNG file. Once imported and/or brought to the work area, I can tell the machine what to do.
In my planning, I may also incorporate a little stamping or some other technique for the card before putting it together.
Once I am done with the cutting and technique process, I put it together.  If there is more than one, I do it assembly style, grabbing each piece, stamping, or inking process one card at a time. I used to do an assembly method where I would do one piece at a time, like putting trees on each card, then stamping, and so forth, but I found the process tedious and boring.  Doing it the way I do it now is better for me because if I have to stop, I know where I am on the card, and I can get back to it where I left off.
This is my method of making cards, both a single card and multiple cards.
My points:
There are tons of tools out there for card making, from the simple to the more complex.  I have given you information on basic tools and more advanced tools.  You can find many techniques in your free public library and your free video library called, YouTube.
Also, many of the products listed can be found through Amazon, including the Cricut Maker and Explore Air 2 (I have the original Explore with the Bluetooth adaptor).
Have fun if this is a business and allow your creativity to shine but keep the customer’s interest at heart.  Remember it is about them.  Even if it is not a business investment for you, still have fun.  You never know whose heart you may touch through your work.
Finally, do get inspiration from everywhere in order to make your cards.  It may be from a stamp set, a walk through the woods, date night, a color palette, or a board on Pinterest.  Whatever the inspiration is please take it as inspiration and not as your work.  Cards are a work of art.
If you are in Central Ohio Area, I would be more than happy to teach you the basic of card making or any technique of papercrafting.  You can send an email to Admin@plynndesigns.com (new email address).  Also, you can send any questions you have on papercrafting through this address.


Monday, April 8, 2019

Progression is so sweet and the rewards…

Have you ever worked towards something that you really wanted?  The closer you get, the more excited you become as each task is completed.
Well, that is how I am feeling about now on my new website.  Ok, call me a nerd or a geek, will you, but it is true.  I feel that there is a geek inside of each of us.  You do not have to be a techno geek.  You can be a foodie (food geek), an auto geek (lover of cars and anything with wheels), or a fashion geek.  To me, being a geek is cool, and if being a geek means I have more knowledge in that subject, then that makes me an expert.  I will cover what makes me an expert in the crafting department some other time.
I am having a blast working on this little project, following step by step instructions at the hand of Renae Christine.  I have mentioned her several time on the My Ambiance Life blog, and how I got started with this website.  I feel like can freely talk about tech stuff there than on P. Lynne Designs.  First off, if you can follow instructions step by step, you can create a website/blog.  That website can be either in WordPress or Blogger.  If you are a beginner, I suggest that you go no further than these two platforms because once you go beyond Blogger, and you are scared of breaking your computer, WordPress is your only option before signing up for a college course in Joomla, JavaScript, Ruby on Rails, or an HTML course. Renae makes it so that you do not need a college course at all when creating a website, so if those names I gave you makes you sweat, do not worry about them at all.  I do not mind these website languages at all and been hearing about them since I left my job at CompuServe.
What does it mean to have rewards?
On My Ambiance Life, I finished a blog post talking about my social media, blogging, and YouTube channel stats, and I am not happy with them, but I am not sad either.  Why?  Because it is a work in progress. Once this website is up and running, it will be rewarding.  I will be a week late from my intended time, which was yesterday.  The reason is I had some things I needed to work on, such as getting a new protective hairstyle and working with my CPA on my taxes, as well as dealing with someone who is not pleased with me having a business. (There is always that one family member, trust me). Anyway, that blog post on My Ambiance Life should be published on Friday, it is a matter of Blogger doing its thing and publishes it at 12 Midnight.
What’s new on P. Lynne Designs?
OK, I am rambling, but these are the things you can expect to see on my new website.
  1. Handmade products of cards, mini brag books, bookmarks, and custom orders of scrapbooks and wedding, graduation, and birthday invitations. You may see planner supplies and gifts too
  2. Services such as freelance writing and graphic design. 
  3. Scrapbook supplies from Prima marketing, Graphic 45, and American Crafts (including We R Memory Keepers and Bazzill).
  4. Affiliate sales from companies like Cricut
  5. And this blog.  Yes, I will be transitioning this blog over to WordPress.  The old blog posts may stay here, and when the need allows me, I will put an updated version of an old blog post on the new site.
This should be fun, and I will have things for you to come back to, such as discounts and other goodies.
Guess what?  You do not have to wait for the action.  Why?
You can go over to the new website right now to be on my email list.  The URL is https://plynndesigns.com and you will get to a coming soon page.  Signup and you will be one of the first to be notified when the site goes live.  I hope to see you soon.
One final tip:  do not be afraid of trying something new.  This is one way that you can grow and understand.  You are a wonderfully made geek, and it is fun to be an expert.  My charge for you is to try something new and exciting and to offer advice when asked.
Have a wonderful week, and God bless you.


Wednesday, November 28, 2018

Cosmetic Changes to my Blog

Photo and Photo Editing by
P.Lynne Designs (c) 2018
“I did a thing”, as little children say often when presenting something new and different to their parents.  I did a thing is fresh, new, and with a touch of whimsy, and parents eat it up like crazy. Parents say “Awww”, while sometimes they roll their eyes in that “Oh Boy” moment.  The parent will peek around the corner to see if this thing is “a mess” or “the cutest little thing ever in life”.
Sometimes, we as bloggers are like that.  We want to please “our parents”, AKA readers, and you look around the corner, rolling your eyes, and we, as bloggers are waiting for “Awww” or “help me, Lawd Jesus, what did she do now?” The “aww”, comes from “Look what my little princess as done”, and the “Help me” part comes from, “How much is it going to cost me, now?”
So, once again, as little children would say, “see, mommy and daddy (I hope there are some men reading), I did a thing”.  A cute, but simple, little banner in Photoshop 2019 (yes, my subscription upgraded me).  So far, I like the new version.  Not too over the top, but there are some things that I am glad that are new and back from the great Adobe beyond. 
The banner is a gradient background with teal, 2 browns, and a pink (you know I have to have my pink).   Will be changing all of my blogs to this simple look.  Here is the reason why I changed the banner.
  1. Again, it is simple.  No explanation there.
  2. With Photos, you have to change the banner too many times.  I am sorry, but I do have other things in my life that need “tending to”.
  3. I have found that people get tired of seeing a photo of stuff you made 6 months ago, and these items I made over a year ago.  Two of the photos were swap projects, and I hope that my receivers are enjoying them.  I enjoyed making them. 
  4. How do I fit everything I do in the company on a photo, without making it crowded?  TY (Thank you).
The other changes.
Banners and other cute graphic things are not the only things that I am changing about this blog.  Scheduling is a top priory to me.  I have a semi-schedule on my other blog, My Ambiance Life, and I love it.  I cannot guarantee that I am going to stick to this schedule, but to me, it keeps me grounded.
-          Uploading posts.  Whenever I write, I can guarantee that it will be scheduled, uploaded, and posted by 6 AM the next day.  This is the uploading and posting schedule I have stuck with for a couple years for any blog post, and it has worked.  Why?  You have three types of readers Morning, Noon, and Night.  If readers are loyal, the morning readers want it by the time they get their morning coffee.  They have a few moments to kill before work.  It is like reading the newspaper.  Noon readers read during their coffee/lunch break. This may be the only time they have to wind down for a few minutes before continuing their work.  Nighttime reading is just that, nighttime reading.  It is like the lunchtime reader, this may be the only time they have to read, especially after the kids have settled in for the night, or they may read while junior is practicing sports, dance, or any other event.
-          Continuity:  I feel like when I read a blog, I like to see sections to go too.  It helps if I am searching for something special from that blog, it does not become a hunting for a rare gem or truffles.  That subject is right there, and I am able to do the research and move on from there.  In this blog’s case, the wish is your command, and I will have sections.
-          Better tutorials.  I realize that I have been lacking in that area.  As I am learning and getting more confident in making videos, they will improve with time.  Like I said, I want to make them, and being an introvert is no excuse to have the lack of quality, which is better than quantity. 
-          Adding a subject.   I am adding graphic design to my three subjects, making it 4.  Scrapbooking, card making, reviews, and now graphic design. I have been learning Adobe Photoshop and Illustrator for the past 5 years, and it is time I share the love.  My scrapbooking has sort of migrated to include digital, but I will do like the traditional, but not so much.  I make mini books for people to place their photos and other stuff inside.
So that is it for this subject.  I will have another post coming up.  It is reviewing two new accessories for the Cricut Maker.  They are the knife attachment, including calibrating it to the machine. The other review is the score wheel and some truths about it.  All good, but You will have to read the article to see what I think.
Until then, I will talk about changes coming your way, as I develop them.

God Bless.

Tuesday, December 30, 2014

The Best of 2014 on SALE now @ Cricut

(sponsored post)
The Best of 2014 on SALE now @ Cricut
Is your new years resolution to be more crafty? Lucky for you, you can ring in the New Year right with the Best of 2014 sale at Cricut! Right now, you can save on their top selling products in 2014, cartridges, supplies, digital sets, and more through January 6th and you can get Free shipping @ Cricut use code: FREESHIPDECEMBER


Cricut is the #1 brand of electronic cutting machines in the world. You can unleash your creative side by using their hundreds of ready-to-make projects. Grab this deal now and make 2015 a great year!


Thursday, November 27, 2014

Black Friday and Cyber Monday Deals at Cricut


Just in time for your holiday crafts, Cricut is hosting amazing sales on Thanksgiving, Black Friday, and on Cyber Monday. See all the details below:

Thanksgiving and Black Friday:
Valid: 11/27-11/28
Thanksgiving & Black Friday Sale: Cricut Explore $219 + $30 off all Explore Bundles

Cyber Monday:
Valid: 12/1 Only
Cyber Monday Sale: Cricut Explore just $229 & $20 off all Explore Bundles

Additional Coupons:

Valid:
11/21-12/1
$5 Off Orders $50+ with code: CRICUTBF5

Valid:
11/1-11/30
Get free shipping to the U.S. all month with code FREESHIPNOV

Happy crafting!

Tuesday, August 19, 2014

New changes, new ways of thinking.

I hope you enjoyed last week’s summer Mason jar project.   I will be posting at least once a week on a Tuesday with either a SVG cut out that you can cut on your Cricut Explore, a review of some sort of crafting tool or crafting line, a tip or a project that you can either make yourself, or purchase on my Etsy shop, which is a finished project or a pattern to build from.  It may not happen all at once, but these are my plans at the moment.  Please make a comment on anything that you have tried, liked, hated (be gentle, but I won’t bite J if you think it is the worst project you ever seen), or think I should try.  I am relearning.   I have lots of habits to break, such as consistency of blog posts (taking a lesson from being away for so long).  I have learned a lot from a couple of classes and reading articles on the etiquette of social media.  So I am taking it slowly, and building back my momentum, by first posting once a week, and writing a schedule.
Soon, Blogger will be going away from me slowly, and this blog will be going to a mostly WordPress platform.  I keep saying this, but the true of the matter is I am scared, and I am scared on so many levels right now.  I am scared that in the mist of this move, Google will decide that my blog is no longer good enough for them, and they take it down.  I am scared that while I trying to re-build this blog (and I have 4 others that I have been typing in more than this one), some random hacker(s) will come to steal the very content that I have been writing on this platform since 2009.  But you know what?  I am not worried, because I know someone who is bigger than the universe, and who will protect my integrity, and knows that I will produce good works, and that is God.  I am going to stop right there, because I know I have just offended someone, but I do not care.  This blog was founded on my belief system, and I love doing what I am doing, and believing in who I believe in, because I am a survivor, and I am not going to give up, as the old Destiny’s Child song rings out.
Sorry, I went a little off-topic.
I have been playing with my Cricut Explore, especially the Design Studio, and learned that I can share what I create.  Last week was a preview of what I can do.   This week, it is shipping labels.   We all need them, at least I do.  This one is a little fancy, but Postal ready.   If you are having problems opening this or last week’s file, please let me know.
This is file is formatted for US addresses.

·        Mailing label

Thursday, January 23, 2014

Technic Thursday: Cricut Explore

photo by Capadia Designs
It has been quite a while since I have done a review on the Cricut machines, and I realize that I am still getting hits on my article on Hubpages, and there has been lots of changes in the Cricut camp (namely ProvoCraft) since I published it.  For instance, Cricut Imagine has had its issues (such as long software updates), and PC has decided to no longer make it and support it.  This makes it the biggest and the heaviest paperweight I have ever owned.  No love for the Gypsy or Design Studio either.  PC has even replaced beloved key people (like Jinger Adams) with people who could care less if you are happy sending that third machine back to them or not.  People were mad, furious, and they started to gravitate towards the Silhouette Cameo, making it the star of the electronic die cutting world.
Who would blame them?  I, myself started thinking about doing the same thing.  In October 2013, I did a little updating to my condo, by adding new carpet and painti
ng the walls downstairs and my upstairs hallway.  I had to move everything out to do it.  In the process, I lost two major cords; the cord to my musical keyboard (it takes ‘D’ batteries) and the cord to my Cricut Expression 2.  I know, tragic.  It was either upgrade to the Cameo or replace the cord.  I replaced the cord, but I am still thinking about replacing the CI with the Cameo.  That is, until I heard about the new Cricut Explore this week.
I am partial to the Cricut line, so much until I gave a friend of mine the Cricut Expression 1, and I have not looked back.  She loves it.  So what makes this new machine so special that it would make a former Cricut user switch back? We will have to wait and see.  
Photo by Cricut.com
Cricut Explore is being claimed as the easiest design and cut system in the world, according to PC.  You can go from a design in progress to a complete design in just a few clicks (so yes, you will need a computer for it).  This new machine does it all:  It cuts, embosses, it allows you to design with brand new software called Space.  You can cut with the cartridge you already own and will get in the future, and it draws. (Unlike the Imagine which just prints and cuts.)  The main complaint that customer have had in the past with PC was not being able to use SVG file with the machine.  The good news is, with the new machine, you can without buying the special software that PC sued other companies about in the past.  You can even use it with your Ipad and other tablet computers.
Like a kid in a candy store, I cannot wait to try it.  It is supposed to debut on HSN (Home Shopping Network) in Mid-February, stores in March.  Like everyone else who have had problems with their current machines and with customer support on those machines, it is a wait and see for me. I need to see this thing in action.  So it is one thing to have this thing become Cameo’s main competitor, it is another to have this machine work for you on day one.   If I get it on launch day, it will be with HSN’s flexpay.

When I get my new machine, I will do a review on it for those of you on the fence by the time it launches on HSN.  In the meantime, I will once again play with my other two (I can get by without updating the Imagine if I need to cut and print).  And you stay safe and warm in this frigid weather.  Be blessed, my friend, and create something wonderful. 


Thursday, March 14, 2013

For Cricut Lovers: new mats

I just received a new tweet from Provo Craft....Remember the green mats for the Cricut machines?  They went by way of the Dinosaur about 1 1/2 years ago, and people were left buying the white mats with the black stripes on them.  Ever wonder what those stripes are for?   If you own a Cricut Imagine machine, you will know that these stripe are for the printing portion of the full on Cricut Imagine experience and it helps guide the mat a paper in, and it help the machine know where to print..  I personally thought that it was great that all the machines, except the cake machines, which received their own food grade mate, to have one mat.   Well not so fast, friend, it seems that it did not sit so well with Provo Craft, so as of today there will be three new lats for the machines.   Each one of these mats will be be fore the different types of paper that are associated with them.  I assume that the white mat will still be available for the Cricut Imagine, or I am in big trouble when the ones I currently have are no longer usable.
Light Grip mat
copyright Provo Craft and Novelty
I will have a review when I try them out (money is a little low, and I am not sure when they are available to the stores)
First up is the LightGrip mat.  (Light Blue) It is for those papers, which are light to the touch.  they are the printer paper, vellum, and other papers that can be easily torn,
Standard Grip Mat
Copyright Provo Craft and Novelty
Second is the standard grip mat.  (Green) This mat is for your stand pieces of paper like patterned paper and cardstock.  This is the paper Cricut white mats are used for now.  
Lastly, there is the heavy grip mat (Purple)  This mat is for you heavy materials such as fabric, light metal, and chipboard.
Strong Grip Mat
Copyright Provo Craft and Novelty
Personally, I am glad that PC did this, but it makes you have too many mats.  I understand why.  Currently, I always feel frustrated if I just cut out something, and it tears because the adhesive is too sticky or when the paper moves because the mat has been overused.  Maybe they have solved that problem as well.   I will not get a better feel for the new mats until I have tried them out myself.   I want to try them on both my E2 (Expressions 2) and my E1 (Expressions ) machines.  However since they do not have the black lines on them, so, I can not try them on my Imagine machine.
You can order them now on Cricut.com, but at this time I have no idea when they will be released to the stores.

Below is a chart I got from their website: www.cricut.com   Have a blessed evening.
Paper comparison chart
Copyright Provo Craft and Novelty 

Sunday, November 25, 2012

My Prayers have been answered....

cricut cartridges
cricut cartridges (Photo credit: MattandAshley)
At least as far as Cricut is concern.  Friday, I dragged my mom out to go with me to look for a paper storage item at Jo-Ann's.  They also had cartridges on sale.  So we go in, and I started looking for the paper storage unit.  Found it.  Next, I went over to the Cricut section with mom following behind with the cart.  I wanted one of two carts: Elegant Edges or Mini-books.
Elegant Edges is this cart that somewhat resembles Storybook with shapes and edging.  what makes it different from Storybook (which btw is an older cartridge and I adore very much) is some straight edging (some call it bordering). Elegant Edging is a full cartridge, which means it had more than 50 images to choose from (see my last post for further details).  Mini-books is a project cartridge, which means that all the images tie in together to make a project, in this case, a mini-book.  I have been looking to step up my game in this area of my creativity, even though I have made several books already, all different sizes, shapes, and types, I have not made any of the ones Cricut suggests to cut out with the machine.  It would be interesting, because I have one due to go into the mail next week, and I do not like the current one I am making for my mini-book partner.  Monday, I am firing up one of three machines, cutting the book of my choosing.
Oops, I made a big Boo-boo.  Here is where I was supposed to tell you which cartridge I chose to buy, and by now, you may have guessed the Mini-Book Project Cartridge.  Well I can always get the Elegant Edges one later, especially since Mike's (My nickname for Michael's Arts and Crafts) and Jo-ann's have a sale on them every other week.
Anyway, I will take pictures of the new one when I am finished it.  Meanwhile, have a blessed Sunday.
Enhanced by Zemanta

Thursday, November 22, 2012

Just in time for Black Friday-Cricut (Repost)

I am an affiliate of Cricut. If you have not used this machine before, you are missing out on a treat. The reason why I am an affiliate is because I use this product (I have three machines, more on that later), and more teachers use this machine, because it is easier on children (Although the I would recommend that children start using it at age 7), and there are cartridges geared towards the classroom. Cartridges: Cartridges are what make this machine run, and do the job needed to cut the images. There are many types of cartridges. The first type is the foundation cartridge. It comes with the machine. These cartridges is a sampling of what to expect from the other cartridges, such as shapes, letters, and 3-D projects. The next type of cartridge is seasonal cartridge. To be honest, most cartridges of this type are now retired,and only one or two can still be sold in the stores. Your best bet is on Ebay and other auction sites. Seasonal and the newer cartridges called project cartridges have about half of the images of a full size cartridge. The project cartridge are images that help make a project, for instance, a mini book, or bridal shower decorations. The last type of cartridge is the full size cartridge, which comes in to different sizes, one for the regular machines, and one for the imagine machine. The cartridges for the imagine machine allow the machine to print and cut out images.

The Machines:

I am not going into the basis of the machines, but you can read about it in a previous article of mine I wrote for Hubpages by clinking on this link.  It talks mainly about the Cricut Expression 2 machine, but I also give some pointers about the other machines as well.

Overall, The things I like about this line of machines by Provo Craft, is they are versatile.  In addition to using the cartridges in the traditional way, many crafters like myself hook the machine up to their computer, go online to Cricut.com, and work their machines through the Cricut Classroom. In Cricut Classroom(CCR) crafters cam load up their cartridge on their machine, and through the software bring it up on their screen online and make new shapes out of them.  Provo Craft also have additional images (both free and paying) that a crafter can cut with their machine.  This makes Cricut a competitor with other electronic die cutting machines, such as The silhouette , Black Cat Cougar, and Craftwell Ecraft machines.  This allows me to save my work on my computer, and get back to it later.  Of course I can also use my machines without a computer too.  I have three uniquely made machines, each with a different purpose in mind when a bought them.
For the Expression machine, when I first bought it, it was replacing the original Cricut machine that started it all.  the Original machine ( or baby bug as some like to call it) cut only the the size of a 6 x 9 sheet of paper.  For me, the problem with the machine is I would take either a sheet of 8 1/2 x 11 or 12 x 12 paper, and cut it down to the size of the mat.  This machine is great for making cards.  When I got the Expression 2 machine, I got it to replace the first one, because it was getting tired, but I found out that the E1 machine has a lot of life left in it.  After that, it was a matter of the machine having WiFi and other little goodies that the original Expression machine did not have.   For the Imagine machine, it was the ability of printing and cutting in one machine, a feature that neither of the other two machines do not have the capability of doing.  I used them in much the same way too.  I get out E1 for simple jobs, E2 to see how to cut my shapes, where they can go on the map, and cut with the build in shapes, the Imagine to colorize, and to print out the cartridge shapes and cut them out.  I did not get the Cricut Mini, because it is made to cut out on only 8 1/2 x 11 piece of paper, and I can do that with the machines I have by just re-sizing the cutting area.

So this is my return look at the Cricut machine, and how I became an affiliate for this product.   Here is the link to the Black Friday sale by Cricut.com.   Click HERE for Cricut's Holiday DoorBusters Sale!

 In the next couple of days, you will see a Hanukkah card from me.      In the meantime, have a deliciously, guilt-free, but grateful Thanksgiving day, complete with football games, guest galore, and blessings abound.  be safe when you go shopping so early on thanksgiving and Black Friday.  Give some love to the small and home businesses next Saturday, and Cyber Monday, and I will talk to you later.

Update:
30% OFF all Digital Cartridges!
Get the Cricut Expression 2 and Teddy Bear Parade for $219!
Enhanced by Zemanta

Friday, September 7, 2012

Fall crafting musings

English: Redeem Cricut Rewards for free craft ...
(Photo credit: Wikipedia)
Before you see you see the latest card I made, I want to take time out to talk to you about doing a little organizing.  Yes, I know people organize in the spring (Spring Cleaning), but I am talking about organizing your crafting space, no matter what type of crafting you do, rather it is needle crafting, sewing, scrapbooking, or some other craft.  First of all, it has been recommended that a person do two major cleanings:  Spring and Autumn.  This does not count towards the everyday cleaning you do.  I am starting to do that for the first time in my life.  So as I do things around the house, including time management and my crafting area, I want to document everything I do. Currently, my townhouse does not lend itself for me to have a whole room for my crafts, that's for my next house, which I want to upgrade to 3-4 bedrooms, maybe a basement, AND A BIG YARD for children to run around in.

I have been in a slump all summer craft wise.  Sure, you have seen my cards when I make them for the Card a day blog (I have another one tomorrow), but between vacations (went to a family reunion and to Canada), a Longaberger consultant's convention, working to get my Longaberger business together (I have been spending lots of time at Homestead promoting the business and the company), and dealing with personal and spiritual things (God is not a thing, it is mostly my church and lots of activities to reintroduce my church to the community again), I am lucky I even remembered I do this for a living. (you can breathe now, sorry for the long sentence).   So now it is September, and my house looks like a cyclone has been through it.  Sure I did basics, but since I do not own this town home, my landlord (My daddy) wants to come in to paint while he has a painter available, plus I do not like how it looks either.  I just hope he lets me pick out my paint color.  Back to the organizing side of crafting.

I have not touched my cricut machines in 5 months, which is the longest I have gone ignoring them, since ignoring baby bug (original Cricut) when I first got it.  So the first thing I did was created a maintenance chart for them in Excel.  I noted things such as check blades, get a deep cut blade for all three, check the print ink levels on the Imagine, and do updates on all three (E1 (Original Expression Machine) E2 Anni. (I have the 5th anniversary version of the E2) and Imagine machines).  Also included are checking mats and cartridges.  Next I ran an update on my computer, and updated CCR (Cricut classroom) Adobe Air, and Cricut Sync.  of course they were out of date.  Since the last time I updated (back in January 2012), I added a new antivirus software from Microsoft, but it activated my firewall, so I had to tell the firewall that it is OK to download anything from ProvoCraft.  Now, I am running updates on the E2 since it was the closest machine to the computer.  I want to "Pinkafy", (if there is such a word) my E2 and Imagine to add Pink end caps to replace the grey ones on the Imagine machine and the green ones on the E2.  No rush one the deadline.

Finally, I need to move some furniture around, and it involves my siblings and my eldest nephew.  No one can never be still long enough for me to tell them what I need, so I am playing by ear. (where's a good husband when you need him, and I want one, so ladies, are you willing to give up your hubby for a day?  I will feed him-JK)  Oh, and I am creating a binder.  Taking some advise from the home organizers who craft (and on You Tube), this is where I am going to separate everything.  Personal from business, tools from paper, envelopes from chipboard.  You name it.  The binder is a pink binder from Staples, and so far, I am happy with the process.

My last advise for you as you organize, take advise from the experts, but make it your own.  For example, I love the binder system that Alejandra from Home Organizing on You tube has, but I also have some old binders that I either have to incorporate in the new system or get rid of only to by lots of Staple's binders, which is not very cost effective.  So to combat this problem of mine, I will look at the older binders to see what I can use, then go to Staples to replace the bad ones.

So tonight you will be able to see the card I made this time, which is in the theme of Autumn.  If you have any comments or advise, please send them.  In the meantime, have a blessed evening.

Enhanced by Zemanta

Thursday, July 19, 2012

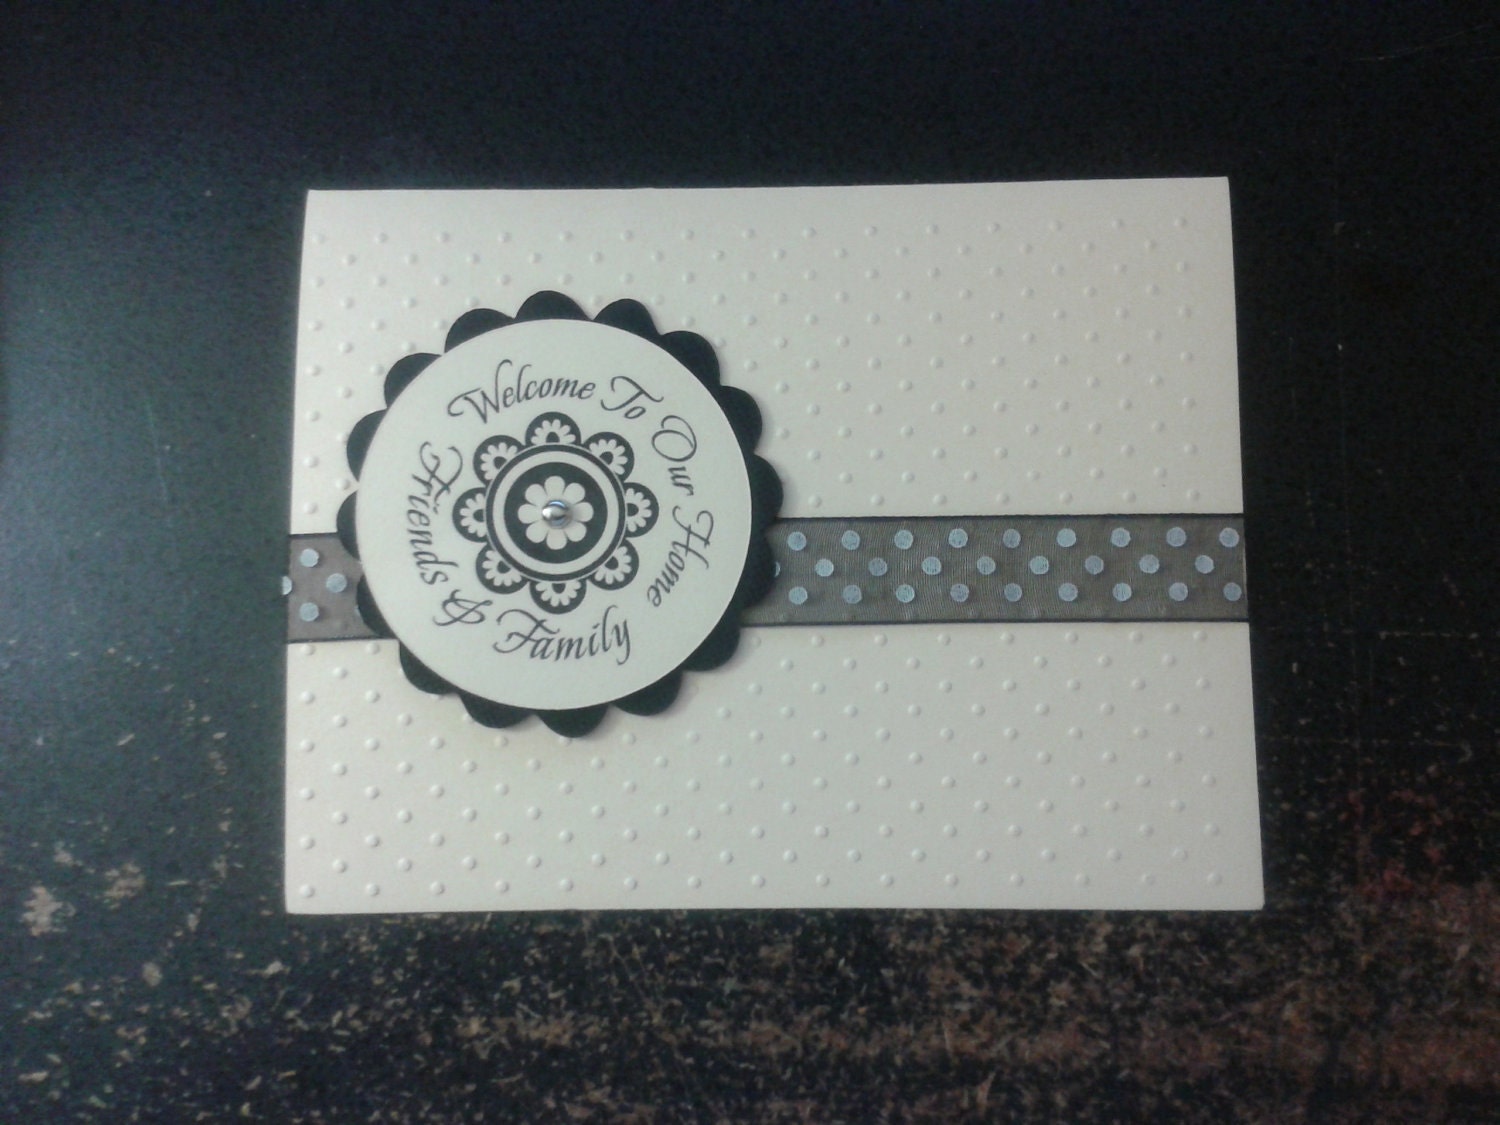
Welcome to Our Home

 Welcome to Our Home a set of 8 cards and EnvelopsThis card was created about a year ago, but I wanted to show that you can make a simple but elegant card, and you still can use it for any setting, rather it is an open house with friends, a intimate gathering for a few, or a dinner party with all the trimmings.  You will need the following materials:


There is nothing like a new home.   If you are a former apartment dweller, this is a sign of relief.  Condos do not count here.  As a lady from my worship center once told me, a condo is nothing more than a fancy apartment.  I say, a home is where you make it, while Oprah always say, "a home should rise up to greet you."  No matter rather your home is an apartment in a gated community, a family mansion where you can fit several generations in it, or a small two bedroom single family home in suburbs, you may want to invite some friends and family over to celebrate the happy occasion of being in a new home.


  1. Cardstock (3 sheets.  1 cut 4'x6', a scrap piece for the circle(2.25'd), and a sheet for the scallop circle)
  2. Ribbon for the center of the card
  3. 1 silver brad for the middle

The tools you will need are:
  • Cuddlebug or another type of embossing machine
  • Swiss Dots embossing folder (or you favorite small pattern embossing folder if you do not have Swiss Dots, which is made by Provocraft)
  • A die cutting machine (manual or electronic) or if you do not have that, a circle punch (2')
  • Note #1:  I used my Cricut machine with both the circle and the scallop circle, and the cartridges I used was the Storybook Cartridge (Pages 53 (right corner-circle) and Page 40 (Middle lower (scallop circle))but any cartridge with these two shapes will do
  • Paper piercer to poke the center of the whole
  • Printer or a round stamp. Note #2: to get the image perfectly centered on the page, I used the center point feature on the Cricut Expression machine (all but the original machine has this feature)

After cutting the first sheet of Cardstock to  4'x6', run it through the Cuddlebug on the front side of the card only.    Set aside.
Cut out the circles. If you are printing and using an electronic cutting machine like the cricut, print out your digi image first, then follow you machine's directions on how to cut out the circle using the center point feature, so you will not cut the image.  Each machine is different, even among the same brands (no two cricuts machines are alike), so know your machine's quirks as well.  If you are using a circle punch and stamp (or even with letter pressing items), cut out the circle then stamp the image on the circle,  for the scallop circle, you do not need the center point feature, so just cut out the circle.  center the circle in the middle of the scallop, punch a hole in the center and secure with brad.  set aside.
Next take the ribbon, and the embossed card blank, and place the ribbon in the center of the front of the card.  I used a cheater method to secure the ribbon the inside of the card with scotch tape, to make it look seamless, you can use double-sided tape on the ends of the ribbon, and an extra step would be to cover the inside, which take more time if you have it.
Finally, take the circle set and place it to the left of the card, and secure it with glue on the brad wings (the medal prongs that fold out), or you can use a foam dot to raise it.  I chose to not pop it up this time, but I normally do pop up an image.  I also normally ink my edges and round off the corners, but I chose to leave it clean and simple this time.
I hope you have enjoyed my card for today.  Moving into a new home is hard, but inviting friends to help celebrate that move makes is a lot sweeter.  Be blessed on this day and enjoy your new home if you recently moved no matter how small or large it is. It is after all your home. 
Enhanced by Zemanta

Sunday, March 25, 2012

My review: Scrapbook Expos. Tips on navigating them.


Once a year, Columbus, Ohio is the host of a scrapbook expo.  The Memories Scrapbooking Expo showcases local area venders who carry Scrapbooking supplies. Think of it as one great big shopping mall for crafters.   I have been going for years when it started out at Veteran’s Memorial Downtown.   It more out about 2-3 years ago to the Ohio State Fairgrounds.   It is a two day event, and in addition to buying supplies there, you can actually work on projects.   During the years I worked at Archiver’s, I always wanted to work the expo, but according to my manager, I was much needed at the store, and I was disappointed.

So this year’s showcase had 52 venders, and one of the problems I had with the building is they do not give venders enough room to allow customers to move around.   Just to be on the safe side, I had my mother tag along with me.   The one thing they need to allow is the movement of customers from booth to booth, and without the space of the booth.

So, what did I buy?

I bought within my budget, which was $100 cash.   If I went over, I had my business debit card to pick up the slack, or my mother.  The first booth, I bought some state 3-d stickers by Jet-setters (not the name of the vender).  Nebraska is perfect for the pictures I took in 2007 when we (me, my parents, and oldest nephew (then age 11) went to visit a family friend and his wife.   California stickers for the pictures I took on the second half of the trip (same year).   We went to the beaches, Disneyland, San Diego, Hollywood, Beverley Hills, and my childhood home in San Bernardino.  To name a few. Last some Florida stickers for my parents cruise last month.   Next, we went over to the Stamper’s anonymous booth, and I got my first set of Tim Holtz textured fade folder, made by Sizzix.   If you are familiar with the Cuddlebug folders, it is the same thing, and you can use these with the Cuddlebug. (Even though Sizzix highly recommends you use them with the Big Shot and any of their machines.   The only thing I was not pleased with this vender, is they had catalogs out in the open of the booth, and then he tells people you have to spend $50 to get the books.  It should have been on a sign somewhere.  
After I made the purchase, we walked around a little more, and along the way were booths with the beginner or busy person in mind.  This vender, whose name I really did not pay attention to, had page kits and pages already put together.   I looked but did not purchase, because I am trying to have something like that as one of my products, but it is nice to see someone else doing it.   I wish I had time to ask her questions about her success in this line of scrapbooking, but I was leaving in a few moments and she was busy with customers.   The next booth had scrapbooking supplies that I normally buy at Archiver’s, so I did a hit and miss with that vender.

Food!

I have not eaten so me and mom grabbed a bite at the only two carts at the expo.  I did not feel like eating tacos, so it was off to the next one.  I wish I had grabbed a taco.   First off, the woman acted like she could not wait until she left for the evening, then she threw together a deli sandwich the way I do it at home if I was in a hurry.   The meat was very cold the bread (which was white bread) was even colder.   My sandwich had cheese on it, and the woman forgot to put some on mommy’s.  The sandwich was roast beef was dry, even after I put mayo on it.   Let’s just say that the lunch was not worth the $8.00 she charged.

Back to looking

Next place was Jillibean.   I like this line, because she names her seasonal line usually after soup, and I love soup.  I bought 4 piece of Easter paper from the “Southern Chicken Dumpling Soup” line. As well as some labels and a pack of Wood Flags (made of real wood).   Next stop was a place where a guy was selling Washi Tape.   Washi tape is to me paper tape that was all the rage in Japan, and made it here to the United States and the rest of the world for decorating purposes.   It is often transparent, comes in bright and cheery colors.   Many companies from the vender I am talking about, to Tim Holtz to K and Co (Makers of the Smash book).  On his website, the vender sells the Washi Tape for about $3.00 a roll.  At the expo, he was charging $4.00.   What gives?  Unless you have a great big bill to pay for when you get home, please do not over charge your customers.   I just walked away, and I will get Washi tape either on his website, or purchase elsewhere.  My last place I visited before going home was a vender selling Cricut cartridges.   Here is another tip:  Get them on Ebay, unless there is a sell going on at Mikes, Hobby Lobby, or Joanne’s.  You are better off.  I had to have the cart, “New Testament”.  Why?  Because I could not wait for it to go on sale at Michael’s, Hobby Lobby, Or Joanne’s.  I need to work on some Easter cards, ASAP.   It is “Stop the Presses” time.  Mom wants Easter cards to send out, Other than that, New Testament would have to wait.

My overall feelings…

I love shopping for scrapbooking stuff.  I cannot get too much right now because of budget constraints.   Other than that, I like to stock up on supplies.   I would have enjoyed it more if I did not have only two hours to get everything (mommy had to check on the nephew’s homework and call his teacher before 3pm, plus we had church revival that night).   If you are the type of person who loves going to expos like this, have fun, and would on projects at the same time, this is for you.   I am disappointed that there were a lack of local (Columbus area) scrapbooking stores who participated this year, but then we had 4 LSS ( local scrapbook store (s) ) closed for good between last year’s expo and this year.   Unless I am willing to order online, deal with Mike’s or Joanne’s, or drive to either Easton Town center, Grove City, or Powell, Ohio, there are no more LSS for me to go to,  My mom, who is not a scrapbooker enjoyed herself, and we ran into one of the members of the church we belong to.

Tips:

Here are the tips I find useful:

  • Plan ahead and know your budget.  Ever if you have paid all your bills, and gone grocery shopping for the month or have money like “The Donald”, still have a budget.
  • Check to see what you have, and what can wait until you do go to a “brick and mortar”, and get you basics there.  Sometimes these venders have sales, and maybe not.
  • Pack a lunch.  Yes most of these places have food, but they are usually higher in price, and not good for you.
  •  Go with someone.  A friend or a family member can help with you budget.
  • Get items that you cannot find at the LSS.
  • Do not stress and have fun.  Have plenty of money, and have a backup system in case the fund run out.   

Monday, March 12, 2012

How Did I get into the Cricut Machine….


I love answering questions for people.  I do not care if it is something that people just want to know or if I just volunteer my answer, I love to just give my opinion to a question.

So I was on Facebook and one of the ladies I follow (like) is My Cricut Craft Room Blog.   She asked a question, how did you get into the Cricut?  First off, before I answer this question, I wanted to let you know about a couple of things:  I was looking for something to talk about, and I am trying to change up my blogs a bit.   For those of you who are new to scrapbooking, the Cricut is an electronic cutting machine.  There are several types of machines, and I have 3 of these types:  Expression, Expression 2, and the Imagine.   I do have a document on this blog on the different types of Cricut machines listed except the last one made (the Cricut Mini), so I may repost it, including the mini on the sheet.

Anyway, back to the question.   I got started with the Cricut machines back in 2006.   Back then, there was only the original machine, which cut out shapes and the alphabet on a 6 x 9 sheet of paper (half of a 12 x12 piece).   I was working at Archiver's at the time, and I was asked to demo the machine for 2 minutes while another co-worker took a break.   That was love at first demo.  When Archiver’s stopped selling them the first time around I snatch up the last one, but I did not play with it much for a while.  Fast forward 6 months later.   I had a swap I needed to do, and I had to make 60 tags.   Ok, what the heck was I thinking, and the swap was due.   Finally I said to myself, “you have that thing, the Cricut you begged for a Christmas present, so use the darn thing.”  I was able to finish my tags, and have been going nonstop since then.   I got the Expression in 2007, the E2 and the Imagine machines in 2011.   I then sold the Original after the E2 came from HSN.

So that is how I got started with this obsession called a Cricut machine.