Showing posts with label Paper. Show all posts

Sunday, July 14, 2013

A haul and something I like to call shopping with coupons.

I went to Michael’s Friday, and spent to get my money’s worth.  When you are looking for materials that will make wonderful presents and products to be sold, make sure you get your money’s worth out of the trip.  I did well and I feel like a Klingon coming back from a great battle (OK, cheesy Star Trek reference…sorry).
So, without further ado, here is what I bought, and what I plan with my supplies. Btw, this in a way has nothing to do with the decluttering I am currently doing.


This first item are tags. I use tags all the time, and they are great for cards, scrapbook layouts, and mini books.   I usually purchase them in either Kraft, Black, or White because they go with anything.   I also have the Cricut cartridge, Tags Bags Boxes and More 1.  There is a second cartridge which I have access to from the Cricut Classroom should I need it.  These were not on sale.


I bought two paper pads.  OK, let get real for a minute.  I posted on June 27 on how to get rid of your unwanted scrapbook papers and to organize the rest, and I buy two paper pads.  Honestly, people, they were on sale and normally priced at $19.99, on sale for $11.99.   They will go to good use.


I needed a smaller scoring board.  Yes, you can use a paper trimmer, and I will talk about that in an up and coming e-book for the essentials you need to get started scrapbooking and card making, but I like the ease a scoring board.  It was not on sale.


The last item I bought was a chipboard kit.  I will use these for mini book covers.  I will show you how I do it in a future video.  What I like about this kit is you can get a few good projects out of this kit. That’s 5 large books and 3 small books, and I almost bought 2 of them.


A shopping tip:  Coupons
To save money, always look for coupons in the Sunday paper and online.  Be mindful of the expiration date, because unlike grocery coupons, these can expire within a week.  Many stores are starting to take on competitor’s coupons more, but they have to be like items or the same item, so be careful here as well.
Well that is it.   I created a little video of today, and I hope you will enjoy it.

Be blessed, my friend.


Enhanced by Zemanta

Saturday, October 13, 2012

New Project: Mini book

I have been a busy woman this week.  I made a mini book that was truly a mini book.  It is now in the hands of the person who won it.
A couple hours ago, I was suppose to tell you about the mini book, but I was very sleepy and took a nap.  I had a very long morning, that started at the crack of dawn.  I woke this morning, and me, my mom, and my cousin Tamah went to my annual Horizon of Hope luncheon in Nashport, Ohio. As always, it was a beautiful event.  My upline's central team was the host.  In addition to me giving my mini book to be auctioned off, I also donated a Travel cup with 3 sample bags of coffee, and a lunch bag.  You can read the rest of the story here:
Making this mini is so simple, and you can bind it with a machine, such as a Bind it all or Cinch.  Start off with two covered chipboard pieces.  I covered them in DCWV's Black Current.  Cover them the best you know how.  If you need help with this step, you can always turn to You Tube for help. The keyword phrase is"how to make mini book covers from chipboard" or whatever you want to call it.
Once you are finished covering the chipboard covers, set them aside.   Next work on your pages.  You will be creating a pocket page for each one, and I used:


  • 6- 8 1/2 x 11 sheets of black cardstock-cut down to 8 1/2 x 9"
  • Assorted patterned pieces of paper to cover the insides of the page and to make tags.  Again I used DCWV's Black current.


Start by cutting down your cardstock with a paper cutter.  if you do not have one, you can use an cutting knife and ruler.  if you do the later, put down a self healing mat so you do not mark up your working surface.   Once you do that, you can began by scoring your cardstock.  Tip for beginners, scoring helps the cardstock have a little give (flexibility) to the paper.  This prevents it from tearing when folding it.  Use a score board for it, or if you do not have one, you can use a paper cutter with a scoring blade on it.  Your first score line will be on the 9" side and you want to score at 4 1/2".  flip you paper so that line is horizontal, and you want to score on the 8 1/2 side at 2 1/2".  Next fold at the score lines.  You want to fold up when folding, and crease with the scoring tool or bone folder.  do the one one the 9" side first and then the 8 1/2 side. set a side.
This next part is optional, but I think it will make a prettier book.  Measure for pocket pages your patterned paper.  you may want to leave a 1/8" space for the top and two sides.  You do not need to allow for the bottom as it will be on the inside.  Cover the outer part of the pocket page the same way.  Then decorate the page. Once you have all of that in place, you may bind it.  You can bind it with a machine as I said from the beginning.  You can also put notebook rings on it by just punching two holes on the sides.  You are all finished except the decorating part.   You can put tags in the pockets.  For this book, it is 12 total pages. You can make as many as you like.

I hope my winner enjoys her book and I hope you enjoy making yours.

Have a blessed weekend


Products used in this project:


Enhanced by Zemanta

Friday, September 21, 2012

How to make a journal spiral notebook…

Spiral Notebook
Spiral Notebook (Photo credit: Hey Paul)

Ingredients:


  •          1 photo either from a website that allows royalty free photo or a picture taken by you.
  •          Photo friendly paper to print photos on, but can bend to the shape of chipboard.
  •          A printer that can print photos
  •          Chipboard (2)
  •          Mod Podge (matt or Gloss, Choice is yours)
  •          Binding machine (prefer a Bind it all, cinch, or a commercial type, but any can do)
  •          O-wires or spiral wires  
  •          Lined or blank sheets of paper (again the choice is yours)
Alternatives:

All binding and photo copying can be done at an office supply store, with a copy center (all the major stores have this) but it comes at a price.  Depending on how many you are making, it can become costly, both in time and in price.  If you are doing this on a regular basis, invest the time and money in getting a good binding machine, printer, and laminating system.  Who knows, you make be able to make some money, and this three- machine system may pay for itself in the long run.

A word about using photos and photo imagine sites:

We all have photos we are not proud of.  Several factors go into why a perfectly good photo opportunity goes wonky.  They include:
  •     Fidgety subjects
  •     Not enough lighting
  •    Weather
  •   Bad camera
  •  No camera (using a smartphone or device as a camera)
In this case, you can turn your photos into a journal cover, but what if you are just not satisfied with the quality of your photos or you just do not take photos at all?  Yes, you can turn to a photo image site.  These sites are great for that last minute presentation you have to do, creating things such as journal covers, and scrapbook layouts that do not involve family members.  Be very careful, because on some sites, you do have to join in order to get the photo you want.  Most are free and you just have to pay for the photo itself.   There are others you have to pay a premium price, and if you just want 1 or 2 photos, it is not worth the price they charge per month.   You can always use the internet images but why risk it.  The chances are that image is protected by the copyright law.  Your best chance is an image that is free of this law.   Just google search the term “Royalty free” or “free images”.

Back to what I was saying…

You can create the photo cover one of two ways:
Using a software program, such as Photoshop or MS Publisher, and create a cover with the photo and type in text at the bottom like this:


  • Print it off, and cover the chipboard or
  • Print directly on the chipboard itself.  Your printer has to be able to except the chipboard or you can always take it to a copy center.

Next, cut the lined or blank paper to the size of the chipboard.
With the binding machine of choice, follow the manufacturer’s instructions on how to bind with your machine. Optional:  if you do not have a binding machine, you can go to the copy center and have them bind it for you.  Keep in mind that if the cover is that of a copyrighted picture, they may not do it for you or charge you extra for it.  They will also make you sign a waiver that the picture is indeed yours.  Even if the picture is taken at professional studio the copy center may not do it, so ask ahead of time before starting this project.
Once bonded, the notebook is basically ready for use.  You can always dress it up with other things or leave as is.


Enhanced by Zemanta

Saturday, July 28, 2012

On the Road

Hello and welcome to another card making day.  I am posting this on the Card a Day blog as a travel card.  I must admit that I have not seen too many cards in the past pertaining to traveling, but today, there are cards out there, wish a friend or loved one safe travels until they meet again in about a week.  In my case, a friend of mine moved to Texas a few years ago, and now she is coming here to take her mom back home to live with her for a while.  Even though that friend's mom is leaving behind her other daughter and her husband, her granddaughter, grandson, and great-grandson, as well as dozens of friends, I am hoping to give this card to her Saturday at her last farewell party before she moves to Texas with my friend, Lena.

This card is simple, and you will need the following materials:   (front of the card)  Mariposa by DCWV, cut 1/8 smaller than the actual card, embellishments that are travel-themed, a rub-on or clear sticker with the hello on it.  I cut the card blank 8.5' x 5' and fold in half. The card mat is an 1/8 of an inch smaller than the card front.  I place the embellishment in the center of the card.  the embellishment is by K and Co and is one of their 3D stickers.   Tip:  of you are frugal enough, you can get that same effect by cutting out two of the same image (or three), stacking them on top of each other, while placing a glue or form adhesive dot in between the images.  a simple clear "hello!" sticker was placed at the bottom of the card.  If you do not have a sticker, you can print in your own handwriting, print with your printer, or some simple alphabet stickers will do.   Now for the inside of the card...

I normally do not dress up the inside of the card, unless I get a request for a sentiment or two on the inside, because some people like my mom write personal notes on the inside.  In this case, I added a special treat to this card.  I modeled it after a card I posted on my blog a couple weeks ago.  the one I posted, I originally made it a couple years ago, and the inside of this card is the updated version. The materials I used for the "pocket" are:
2 tags (1 large and 1 small cut down tag)
Mariposa paper by DCWV
Crumb Cake ink by Stampin! Up
White gel pen.
The first thing I did was to "match" the two Tags.  I took the Crumb Cake ink, and rubbed it on both tags.  with Stampin!Up's new form pads, all I had to do was glide it to coat the tags (I inked both side of the large tag).  With the large tag (#8 tag by Inkssentials), I folded up the tag about 3' to form a pocket, took my ATG glue gun to secure it on two sides, leaving the top edge open.  Then I took the Mariposa paper and  created a false pocket on the tag.  I did a _._ pattern around the tag, and set it to the side.   With the small one, it overwhelmed the larger one, so I cut the length down.and i paced a small strip of the Mariposa Paper on the bottom of the card, and did the same type of faux stitching around the tag, and stuck inside the first tag.   before adhering the set to the card, I stuck a piece of gold organza ribbon around the tag group and tied it off.  more of the 3d stickers from the same K and Co sticker set to complete the picture.
As I explained earlier, no sentiment in the card, but I will write a nice personal note for my friend's mother.  She will be back to visit. she has too in order to visit her other daughter's family.  Until then, I hope she will enjoy her stay in Texas, and I hope you have enjoyed viewing this card. Be blessed on this day, and see you next time.

Enhanced by Zemanta

Thursday, July 19, 2012

Welcome to Our Home

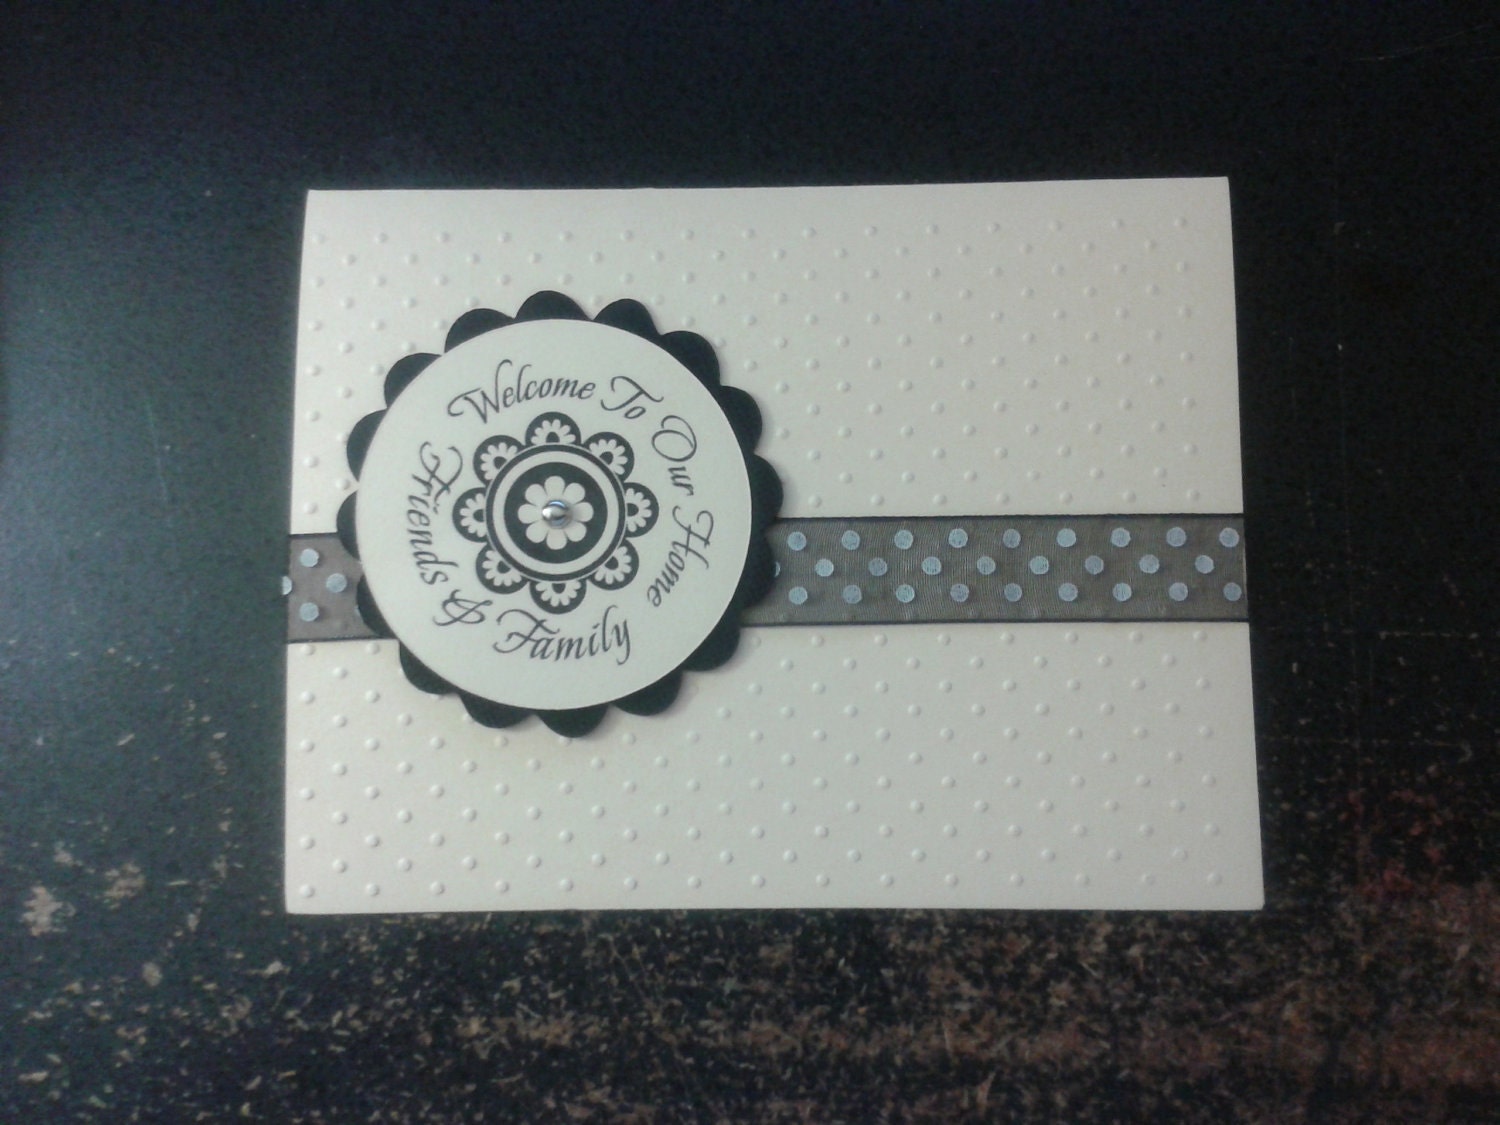
 Welcome to Our Home a set of 8 cards and EnvelopsThis card was created about a year ago, but I wanted to show that you can make a simple but elegant card, and you still can use it for any setting, rather it is an open house with friends, a intimate gathering for a few, or a dinner party with all the trimmings.  You will need the following materials:


There is nothing like a new home.   If you are a former apartment dweller, this is a sign of relief.  Condos do not count here.  As a lady from my worship center once told me, a condo is nothing more than a fancy apartment.  I say, a home is where you make it, while Oprah always say, "a home should rise up to greet you."  No matter rather your home is an apartment in a gated community, a family mansion where you can fit several generations in it, or a small two bedroom single family home in suburbs, you may want to invite some friends and family over to celebrate the happy occasion of being in a new home.


  1. Cardstock (3 sheets.  1 cut 4'x6', a scrap piece for the circle(2.25'd), and a sheet for the scallop circle)
  2. Ribbon for the center of the card
  3. 1 silver brad for the middle

The tools you will need are:
  • A Cuddlebug or another type of embossing machine
  • Swiss Dots embossing folder (or you favorite small pattern embossing folder if you do not have Swiss Dots, which is made by Provocraft)
  • A die cutting machine (manual or electronic) or if you do not have that, a circle punch (2')
  • Note #1:  I used my Cricut machine with both the circle and the scallop circle, and the cartridges I used was the Storybook Cartridge (Pages 53 (right corner-circle) and Page 40 (Middle lower (scallop circle))but any cartridge with these two shapes will do
  • Paper piercer to poke the center of the whole
  • Printer or a round stamp. Note #2: to get the image perfectly centered on the page, I used the center point feature on the Cricut Expression machine (all but the original machine has this feature)

After cutting the first sheet of Cardstock to  4'x6', run it through the Cuddlebug on the front side of the card only.    Set aside.
Cut out the circles. If you are printing and using an electronic cutting machine like the cricut, print out your digi image first, then follow you machine's directions on how to cut out the circle using the center point feature, so you will not cut the image.  Each machine is different, even among the same brands (no two cricuts machines are alike), so know your machine's quirks as well.  If you are using a circle punch and stamp (or even with letter pressing items), cut out the circle then stamp the image on the circle,  for the scallop circle, you do not need the center point feature, so just cut out the circle.  center the circle in the middle of the scallop, punch a hole in the center and secure with brad.  set aside.
Next take the ribbon, and the embossed card blank, and place the ribbon in the center of the front of the card.  I used a cheater method to secure the ribbon the inside of the card with scotch tape, to make it look seamless, you can use double-sided tape on the ends of the ribbon, and an extra step would be to cover the inside, which take more time if you have it.
Finally, take the circle set and place it to the left of the card, and secure it with glue on the brad wings (the medal prongs that fold out), or you can use a foam dot to raise it.  I chose to not pop it up this time, but I normally do pop up an image.  I also normally ink my edges and round off the corners, but I chose to leave it clean and simple this time.
I hope you have enjoyed my card for today.  Moving into a new home is hard, but inviting friends to help celebrate that move makes is a lot sweeter.  Be blessed on this day and enjoy your new home if you recently moved no matter how small or large it is. It is after all your home. 
Enhanced by Zemanta

Friday, July 13, 2012

Save time and money: Make your own kit...Part 2


The best solution is to make kits on your own, and you can do it with your current stash.  The rule here is to not buy anything except consumables (glue, tape runner supplies anything you can purchase at a dollar store)
First, choose your paper.  Will it be a cardstock or a patterned piece of paper?  This is your background piece of paper. Next, choose 3 or 4 pieces of coordinating paper.   If you background is a piece of cardstock, picking coordinating pieces is easy to do, but what if that background piece is a pattern paper, how do determine which is the dominate color?

Take this piece of paper for instance.  I have this stack and I have used it for a mini book, a background pie
ce of paper, and I love it.  I normally do not work with corals and their coordinates, but this stack by DCWV called Mariposa got me very "Springy" this year.  The first thing you will notice about the paper is the Multicolored background.  I have one piece left, and the first piece I cut out to make tags for the mini book I made in May.   The challenge for you is to let the paper "speak" to you.   I can use light green or even the pinkish area where the writing is.  But I am going to go with the red flowers, and base my kit off of that.  Since the paper is thicker, I would even call it patterned cardstock paper, in fact I am looking at the cover, and that is what DCVW is calling it.  3-4 sheets would do, and you can even adjust from that. 
Next are the embellishments.  With this piece of cardstock, you do not need to make it as busy as it already is, so in my case I would just stick to one or two piece of ribbon or even a button or two.  If I had another sheet of this cardstock, I would make it one of coordinating pieces of paper and cut some of the elements out of it, especially if you do not want some things covered like the birdcage or the corner butterfly.  Some papers lend themselves to that aspect of the scrapbooking process, but you can make that decision as you are in the actually creation of the page itself.  You are just making the page kit right now,
Finally, if you have photos in mind, add them, but make sure they are in photo safe envelope.  You add then to the kit now, so that you do not have to look for them later.  It is also ok to do photo placement on a page, and mark on the back with a photo-safe marker where on the page you would like to place them. You can always adjust when you make the page.  Make sure the kit does not clash with the photos.  So in other words, make sure that someone is wearing red or there is an object that is red or even another color on the background paper.  It is Ok if you decide to swap out later.
Finally you want to put all of this in  a folder that is photo safe or one of those project folders.  If you do not have one, you can pick one up at Walmart if you do not have a Michaels, Jo-Ann's, a local scrapbooking store nearby. Even stores like the Dollar Tree may have some.  Make sure that your largest piece fits in side.  Make several kits, and if you are a card maker, you may want to make some of those too, in case the mood make hit you to make a card, or if you need one for an occasion.  You do not have to put your sentiments in the kit now, but it is will save you time if you have it already stamped or printed up.  Saving money is wonderful and people are busy.  So isn't time you start making scrapbooking and card making kits?
Now if you will excuse me while I go make some kits.  I am running low. 


Enhanced by Zemanta

Tuesday, March 6, 2012

Paper review: Graphic 45-All that Jazz

This is a short comment review on Graphic 45 scrapbook paper.   I am trying to find what it takes to be a wholesaler. Why?  Well because i am trying to pump some money into my business.   I have been watching some You tube videos lately, and a lot of people are starting to get into scrapbook kits.  I love kits, but I can never find what I am looking for,  I want kits that feed the creative mind, and some (not all) of these kits have one or two kinds of paper, a little bit of embellishments, and not a whole lot of creativity.  If you want it to be completely yours, you have to add more stuff, which means going back to the store, and finding something that may not match.   I rather have leftovers to make something matching (a card, mini book...etc)

So today starts the day for something I think will be kits to make and sell.  I have seen it on the YT channels  Paper Phenomenon, follow the paper trail, and others.   even if it is a few, it would help.   I am researching for about a month, and testing with a few kits in April and May, then I will see as I go along.   My hope is that I do not rush into this.  If this is not too much work for me, I will continue.

so as I was researching for my first kit supplies, I ran upon this piece:
All That Jazz


I instantly thought 4x4 mini book and it is perfect for it.   The Graphic 45 All that Jazz paper can instantly be cut apart and decorated with embellishments.   In the next few days I will see.  To be honest, any of the Curtin Call paper would work beautifully with it.   I will see.