Showing posts with label Cards. Show all posts

Monday, April 15, 2019

What I use to create cards


Disclaimer: Patricia Logan and P. Lynne Designs is a participant in the Amazon Services LLC Associates Program, an affiliate advertising program designed to provide a means for sites to earn advertising fees by advertising and linking to Amazon.com. As an Amazon Associate, I earn a commission from qualifying purchases.
Ok, I am finally putting out a crafting post.  Apologies for not having one.  I wanted to introduce myself to some people and reintroduce myself to others who have been here waiting so patiently for that first post in over two years! Yikes, I did not know I was out that long until I just thought about it.  Again, so sorry.  Life and family got in the way, but you must take care of those you love first.  I am quoting the late Dave Longaberger, who used to tell his home consultants at Longaberger that God and family come first.  Everything is secondary or not needed at all.  I feel that sometimes Americans, as well as most of the Western World have forgotten about that aspect of our lives, and it is now money, how to earn, and how to spend it.
Well, I have not forgotten, or I would not be having this conversation with you.  I care about those who read my posts, but I also must take care of those I love.  This means my parents, taking care of myself, and giving God all the praise, but not in that order.  God comes first, always.
With that being said, today’s topic is not a series.  Oops, did I say that?  I mean everything is based on a series and I thought for once I would write down a single post, which has no rhyme or reason, but it has to do with my creative process.  This is one of many things I do in my shop, which also has been neglected until recently. 
No today’s topic is the art of making cards for my shop.  Currently, I have not stocked up since Christmas, and I need to.  After all, I missed Valentine's Day, St. Patrick’s day, and I am about to miss Easter, which is next Sunday.  Mother’s Day is around the corner, as well as Father’s Day, Arbor Day (Does anyone celebrates that anymore?) graduations, and Memorial and Fourth of July (for Americans).  I just thought of this, when 4th of July rolls around, half the year will be gone.  I now feel like Christmas was last week.
Anyway, in addition to showing you what I use, I want to take you briefly in my world on my process of making cards.  Did you know there are different methods to achieve on the endgame, which is a beautiful card? 
Oh, Toodles!
Sorry, Disney ™, I had to steal Mickey’s line when he calls for his Moussaka Tools.  If you are a parent, aunt, or uncle of a small child, you know what “Oh, Toodles” means, and you know how to use it, and this aunt knows how to use it. So, let me get my “Moussaka” Tools.  (Ok, I will stop talking childish now)


The basics
Yes, I do on occasion use my ruler, scissors, and paper trimmer, with bonefolder to cut and score my paper.  After all, this is how we all started out.  This is the simplest form of card making there is, and ever will be in my opinion, but I have also moved up and I will show you.
Cutting machines (Manual)
When I needed a little help, which is quite a lot these days, I break out the tools to make the card look pretty.  I have the following manual cutting and embossing machines.
Cuttlebug.
I use the Cuttlebug for embossing and die cutting.  I have one of the first ones that I bought for $72 on sale at Michaels.  I found out that Provo Craft Novelty has discontinued the machine as of January 2019, but you can still find the newest model in the stores.  It is best to use a coupon whenever you can to purchase tools like this and the electronic cutting machine that I recommend but beware.  Sometimes the coupon will say at the bottom, that it cannot be used for any tools (including sewing machines, and other electronic goodies).  Anyway, embossing folders make an impression on the cardstock, then you can get a die cut to place on the front of the card.
We R Memory Keepers Evolution
I also have this machine, but I do not use it for embossing and die cutting.  I use it for letter pressing.  You can use ink on the embossing folder and make an impression with ink.  They also make plates that you can use for the letter pressing.  In fact, I prefer this method better than using embossing folders.  In either case, please wash them before storing the folders or the plates.  Not good when you go to use them for your next project.
The way it works for both the Cuttlebug and the Evolution are you have a plate/paper/cutting die, embossing folder, or plate/outer plate sandwich, use the handle to pass this sandwich through the machine, and create a design.  Trust me, there are YouTube videos on both machines, and it is much easier than I am making it sound. 
Electronic Cutting machines…
If you do not want to create cards by manually feeding paper through a machine, put a little electricity behind it.  There is an electronic attachment for the Evolution Advance cutting machine, which costs extra (or get it in a bundle from Amazon or HSN), or you can go all out and buy a Cricut, Silhouette, or Brother 2 machine.  I have the Cricut Explore and Cricut marker, both do the same thing, except the maker cuts more materials than just paper.  It cuts fabric and thin sheets of wood (Bussa).
With both of these machines, I can cut a blank card with envelope, emboss with the scoring wheel (On the Maker) or stylus (on the Explore), and print from my printer and cut out the image on the cutters (print then cut feature).  I can make multiple cards with this machine by cutting everything at one time (if I use both machines).  This is the fastest way I can make a card, but I still have to put it together.
Adhesives (Glue and tape)
My most used tool of this form is a double-sided tape.  I use the brand, Scor-Tape, which if you are like me, you stock up on this tape and use it sparingly.  I use it in addition to a wet glue, which is Aleene’s Tacky Glue, that I have found, in all places, Dollar Tree.  (3 fl. Oz, so get plenty).  I also found small bottles of Mod Podge at the Dollar Tree too.

Finally, let’s put it together..

Ok, before we can put something together, my process is very simple.  This is before we use the tools I mention, or if you have made cards before, use the tools that you have.  I always say that this business is an investment.  If you are not in it for the business, then it is a hobby.  Either way, you are investing time and money for this, so, if you plan on buying any of the tools that I mentioned in this post, you have to want to use them.  Do not buy for the sake that I told you to buy them.  This can be a waste of your money and time.  If you are making cards one time, save the trouble and the headache of learning something new and fun, and buy something from Hallmark or American Greetings or hire someone like me to make you a card.  If you want to make something, there are kits at Joann’s, Michael’s, and Hobby Lobby that are a lot cheaper then buying a big machine you are going to use one time and let it sit there to collect dust.  When you buy a machine, even a manual machine like a Cuttlebug, you are investing in yourself the time and the money.  The hobby is relaxing and calming and the endgame is to cheer someone up or to celebrate an achievement.
My process
I plan, a lot.  I want to know what the theme, topic, whatever.  I have a sketch pad to draw it out.  I used several methods in the past, but my go-to method is sketch pad first, Adobe Illustrator and Photoshop second if I have to draw out something for my machine to cut out.  Sometimes, I skip the Adobe sisters (yes, my software are female) and go straight for Design Space.  This is online software that allows me to talk to my Cricut Maker or Explore.
With Design Space, I am allowed to use the shapes and images to cut out for the card.  I can import what I draw on the Adobe sisters, which is saved as a Jpeg or PNG file. Once imported and/or brought to the work area, I can tell the machine what to do.
In my planning, I may also incorporate a little stamping or some other technique for the card before putting it together.
Once I am done with the cutting and technique process, I put it together.  If there is more than one, I do it assembly style, grabbing each piece, stamping, or inking process one card at a time. I used to do an assembly method where I would do one piece at a time, like putting trees on each card, then stamping, and so forth, but I found the process tedious and boring.  Doing it the way I do it now is better for me because if I have to stop, I know where I am on the card, and I can get back to it where I left off.
This is my method of making cards, both a single card and multiple cards.
My points:
There are tons of tools out there for card making, from the simple to the more complex.  I have given you information on basic tools and more advanced tools.  You can find many techniques in your free public library and your free video library called, YouTube.
Also, many of the products listed can be found through Amazon, including the Cricut Maker and Explore Air 2 (I have the original Explore with the Bluetooth adaptor).
Have fun if this is a business and allow your creativity to shine but keep the customer’s interest at heart.  Remember it is about them.  Even if it is not a business investment for you, still have fun.  You never know whose heart you may touch through your work.
Finally, do get inspiration from everywhere in order to make your cards.  It may be from a stamp set, a walk through the woods, date night, a color palette, or a board on Pinterest.  Whatever the inspiration is please take it as inspiration and not as your work.  Cards are a work of art.
If you are in Central Ohio Area, I would be more than happy to teach you the basic of card making or any technique of papercrafting.  You can send an email to Admin@plynndesigns.com (new email address).  Also, you can send any questions you have on papercrafting through this address.


Monday, February 15, 2016

Throwback: December: Cards

( This is a throwback from when I first launched my blog on Blogger.  I have come a long way from these cards, which are not bad, but to me, they were not great either. this was dated January 8, 2009.  Enjoy!

Hello-
Since I did not start this blog last month, I thought I would show what I did for my Christmas cards I made my aunt in Oklahoma.


The first one is real simple. using evergreen cardstock, I stamped snowflakes all over the front and back. I tied see through cream ribbon to the side. for the square, it came from my cutting out a window for another card you will see in a bit. the snowflake is from my stash, and the brand name is Masterpiece, and the snowflake is called Glitzy Snowflake. they come 10 to a pack.
The second card is from made with red cardstock, the image was stamped in a cocoa ink from Versamagic, and I destressed the edges with Colorbox chalk inkpad named Chestnut Roan. the saying (which is a scripture from Luke) and image of the shepards are from the Stampin Up! line (I am not sure if this is discontinued or not). with ribbon. Tip: I got this as well as the cream and the black from Archiver's in the Hot Spot area. all scrapbooking items in that area are $1.99, and each spool holds 15 yards. It is even a better deal if you are an employee at which I am . Now, for those of you have have talking to me on my Yahoo groups know one of the reasons why I never have a paycheck, LOL. I also destressed the cards

My next card I had a little help...from my Cricut. I love this machine, and I live it so much, I had to have two... Both were Christmas presents. The baby (or original for those do not follow scrapbooking trends) was given to me in December 2006. Archiver's used to sell the cricut, and my mother got the last one that was sold at the store I work at. Well, I did not use it much at first. I turned it on occassionally just to keep it from breaking down, LOL. About May of 2008, I decided I better dust off this little bad boy, and get to work. I even joined a few cricut groups on Yahoo, to get some help. Next thing you know, I am working this baby bug, and I am loving it. I do not know why I had not used it before. so around November 2008, Black Friday, someone said on the group that the Expression was on sale for $199 at Walmart. OK, I had said that I was not going to get the Expression, no way, no how. OK, so now I have the Expression, and again, mom said that this was one of my christmas presents. so that is how I got two of them.
OK so back to the cards...The card is a magenta cardstock that I get when I was a member of club Scrap. you get kits that has paper, cardstock, and other embellshments, including rubberstamps. I cut the cardstock in half using the DreamKutz machine (another item that is my fav.) I went 1" in, and 1" down. this with the George and basic shapes cartridge, I cut a 2" circle. I, then took scrap paper and with same cartridge, and made a star, and painted with a gold leafing pen. For the card itself, I thought it looked really plain, so all i did was take Midnight Black in the versamagic line, and started rubbing the pad all over the cardstock. I put a pop dot to elevate the star. for the bible verse, it is just white ink (forgot the name of it) on wine cardstock. Then I took the gold leafing pen and just went around it.


This one is just like the Magenta card, without the ink, and it a square. I cut out the dove (you cannot see it through the ribbon) from beyond Birthdays cartridge. I broke off the branch that the dove holds. Just stamped the verse on cream card stock. No pop dots.


with this card, the circles came from the magenta card that I cut out to make the card with the black ink (hey, they say waste not, want not, LOL). I forgot what line the letters were, but I got the letters from Archiver's during an employee crop (never used them for that project I needed at the time.). I used gold cording for the strings.


Last one- wow, didn't I tell you that I was not going to have these long posts, LOL. Well, the last card I made for my aunt was made with deep red (more like a burgundy) cardstock. I tied cream ribbon around powder blue cardstock, glued it onto the card blank. Oh, I forgot, I did stamped it with the snowflake stamp by Hero Arts, as well as the lighter wine cardstock squares made with the cricut. the doves (the dicut and the reverse image) were made from the cricut as well (by the way, I used to Expression with all of the doves, using the autofill button) The Noel is from the same company as the letters in the other two cards.
whew, that's it. I am tired from all of that pasting of the pictures and other stuff, but it was fun. let me know what you think. Take care, and God bless.
I left in the grammar mistakes, and I had to post the original post from the blog itself because edit would not let me copy and paste.
in case you are wondering what I made in December of 2015, here they are.  The ornaments were cut from the Cricut Explore as well as the writing.  I love the things that this little machine can do. If you never experience this machine before, you can see my review and how to set it up here.  If you are all set up, you can view how to get started with you first project here.   
(All photos are the property of P. Lynne Designs)
Come Let us Adore Him  


Merry Christmas
Jesus is the Reason For the Season

Silent Night, Holy Night
  

Tuesday, January 14, 2014

a crafty 2014...A redo

Happy New Year, Crafters
Today is one of those Q and A sessions, which is part “get it off my chest” and part everything else.   My intention was never to unload, which I am not, but I have to say something.
Do you feel the scrapbook/crafting world and industry is changing?   The reason why I am asking you this question can be answered in 3 problems I see:
1.       Every time I close my eyes, and LSS (Local Scrapbook Store) is closing.   I was on Facebook two weeks when I read a comment from my friend and former manager informed me and anyone who scrapbooks that Archiver’s was closing.   I sat there to let the news sink in and let out a great big, WTF?  Yea, it was that kind of night.  Archiver’s has been in business for 14 short years.  That is a teen for goodness sake.  I should have known this when my hourly salary stopped at $8.15 and I was cut down from 35-40 to 20 to 4 hours a week by 2010, but I thought as I had my last hours as an associate on January 17, 2010 they would bounce back.  I should have known this when the Mall of America location closed in July 2013, making it the first time Archiver’s did not have a Scrapfest in that location since it opened.  The final “nail in the coffin” act was when Memory Lab opened in every location.   They already had a machine that could print out pictures for you.  It was there before I started working there, but in a way, I thought the memory lab was a way of increasing customers who did not have a computer.  I will miss this store.  Now in my area there will only be three LSS other than the Michaels/Joann/Hobby Lobby, which I really do not like to shop at.   I will tell you later.

Wednesday, August 21, 2013

Things I am working on


I know, I do not have a layout, mini book, or card for you to look at and learn how to make.  I will share at the end of the week, so I am getting there.

Mini books

I am working on a tag book for a swap, and it is consists of the following ingredients:

Two chipboard covers (from recollections-but you can find chipboard covers and place, and you can also cut them out with a die cutting machine to get the shape you want.

#8 tags from Ranger. (In the green package)- I get these all the time, but if you have a die cutting machine, you can cut these tags out.  The measurements for the standard tag is 6.25 in x 3.25 in, with, or without the hole. 


Other tags- the swap mini book did not give me an exact measurement on how big the tags had to be, so I made bigger one almost as big as the covers, which are small covers, measuring about 5 in x 7 in, but you can have any size you need to.
The album is held together by two binding rings.  Again binding is at your discretion.  This is only the second time I have bound a book this way.

Cards:
from the DCVW blog
I have picked up a corrugated paper stack from DCWV, and I am going to use on a set for my mom and a set to sell on Etsy.  This company has hit it on the head this time, because I wanted to know where to find this stuff (other than ripping up a cardboard box.   I will post when I am finished with the cards.

Well that is it for now.   Be blessed my friend.   

Thursday, December 22, 2011

I have been very busy lately. part 2


Next, I made some of my mother’s Christmas cards.  They are as follows:
The first card is a snowflake of Mary, Joseph, and baby Jesus in blue cardstock.  The second layer is glitter paper by DCWV (Die Cuts with a View).  The third layer of patterned paper actually came from the Cricut Imagine (for those of you not keeping track, yes I finally got one).  The paper print comes from one of the newer carts, Enjoy the Season.   BTW, the Snowflake was cut out with the E2 using last year’s cart, “When It’s Cold Outside”.  “Jesus is the reason for the season” is stamped on the inside.  (In fact all of them are like that)
The next card was actually scraplifted.   I took the idea from the DCWV blog entry I saw on Facebook.  I did it because I have the stack, which is called Christmas & Winter 180 Stack I got at Joanne’s.   The Ornament on top is from another paper company called the Paper Adventures, and the paper name is (Giggle) Christmas balls.  (You have no idea what I am thinking right now and I will not tell you in case children are reading this post-trying to keep it “G”).   Anyway, the card blank is “8.5 x “11 cut in half, and folded.  As noted before, the inside is the same as the first.
OK, who said that the die cut on the card has to be something Christmassy?  I decided to preview the next holiday to come in Christmas papers.   Again this is scraplifted (I forgot where.  I think it was from an email I received that week.)   Anyway, the card is a premade blank (meaning someone or some company made it besides me), I bought the pack for the envelopes anyway.   Why not use them?   Cut two sheets of 12 x 12 into 6 manageable pieces (the old “eat the elephant one bit at a time” trick works for scrapbooking too), and adhere the red on the card blank.  Cut the green sheet down to layer on top of the red pattern paper.   I cut out the heart with the E1 Cricut machine (original expression).  Inside is the same as the other two sets.  
The last set of cards is super simple.   Take glitter paper cut into a circle.   Take any 3-d sticker (I used ornaments from K and Co. Make an arrangement.   I scraplifted this one too, but I scraplifted myself for this card.   I made it better than the one I made two years ago (Picture in a moment).  In that card, I cut out three circles, and hung them from three pieces of cord.   I cannot remember much more than that.   (continued part 3)...

Monday, May 23, 2011

finally I crafted

Hello, this is a quick post, as I finally crafted something.   Let's get to it...

It's the little things...

I made this card for my friend, Selena, who is moving back to North Carolina this week.   I will miss her and her husband, Lionel.   Anyway, the card is supposed to be  4x4, but I did a little boo-boo, and scored it wrong, so the back is off by an inch. (more room to write my note to her-SCORE!)  The papers are DCWV, the solid paper pack, and paper that are from The Paper Company (I think it is now discontinued), which is torn, not cut.  The flower is from Prima, popped on a pop dot. I started to color it with my copics, but decided at the last minute to leave it natural.  The sentiment is from Stamping UP! stamp set called You are a gem.  I stamp the saying in SU! Chocolate Chip ink.  The only thing that I cut out that was cricut, was a circle to put behind the flower.

Happy Birthday, Deonte!

I made my middle nephew a birthday card, because this week is his birthday.  he will be 4 years old.   One more year, and this kid is Kindergarten bound.   I did a two sheet card.   I cut a truck in red using the Mickey and Friends cartridge at 4.25", the bed of the truck  in blue.   The paper I used was Bazzill.  I folded the blank card at 6 x 5 3/4, which the truck barely makes it.   I wrote in a sharpey Happy birthday, Deonte!!!   for the inside, I cut a number 4 at 4" with the preinstalled cartridge in the E2 called Cricut American Alphabet.  I wrote a little message inside the number for my sister to read to him.  Sorry I did not take a picture of the inside of the card.

I have more work to be done this week for this shop.   I am also trying to get sales for my Longaberger business as well. $141.00 left to go for this month.

Friday, May 13, 2011

New Backup blog

In the wake of what happened to Blogger and my blogs this week, I decided to make a back-up blog for me to post on.  I hope that this will never happen again, but I do not know technology.   so with that being said the new address for the backup of this blog is http://mdncreates.wordpress.com/.   Yes it is on Wordpress, and no, I do not have any plans at the moment to move http://www.triciatreasure.blogspot.com/.  At least in the immediate future.   I want to make sure I can still blog, and I will actually copy posts from here onto that blog, and visa versa.   I have done the same thing to my Tricia's Baskets blog.   so now I offically have 6 blogs to write on, plus some article writing sites:  Hubpages, Helium, Associate Content.  On top of posting on Twitter, Facebook, LinkedIn, and three Ning networks, it is a wonder if I ever get any work done around here.

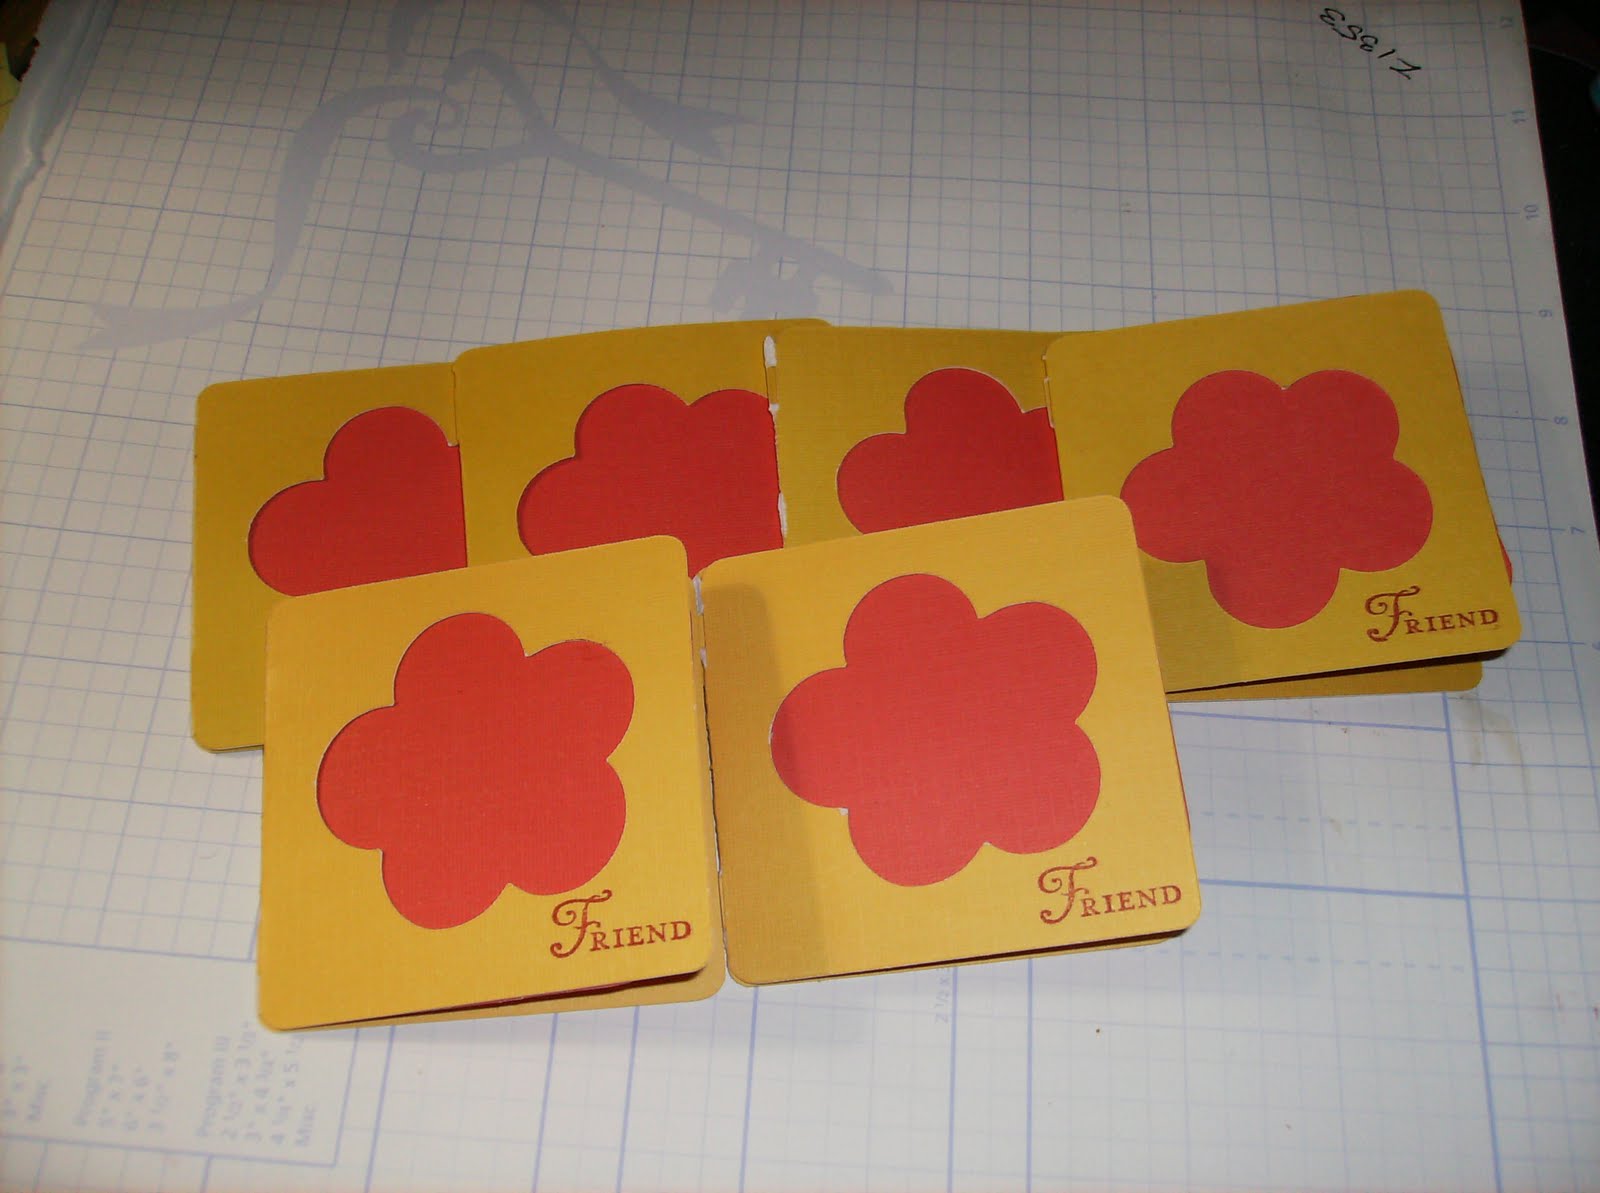
Finally made something:
These cards (which is currently on my Etsy site) were made using both of my Cricut machines.   I cut the card at 3" using my E1 machine and the Pagoda cartridge, and I cut a square, using E2 and the Cricut Essentials Cartridge, pre-installed on the machine.  The paper is from DCWV paper stack (mustard yellow and orange-red).  The sentiment is stamped with the word friend, and that stamp is from Stampin!Up called You're A Gem in Real Red ink.  I did not do my normal distressing, because I wanted sort of a tone on tone look about it, and I did not have a color that closely matched the paper, but it naturally distress along the folding edge of some of the cards.  I made envelopes for the the cards, cutting them at 31/4" using E1 and the wild cards cartridge.   As you see here I did a different shades of the colors Yellow and Orange.  I intended to do it that way.  The paper for the envelopes are from the same company.

I am having fun working two cricuts.  Now if I can only get rid of the baby bug.

Tuesday, February 9, 2010

New card, and they will go on sale


I have my first official set of cards that will go on my Etsy account.
Ingredients:
beige cardstock from Wausau Paper, cover weight, Bazzill Ribbon, Bazzill smooth-Black, free digi stamp from my collection. I fell in love with a feature on my cricut espression, it is called Center point. it gets rid of the need for a punch, but I will get a collection of punches just in case I am out at a crop, and I do not feel like taking the cricut machines. Anyway, this card is super simple, and you cannot see it, but I used Swiss dots from the cuttlebug for a background. I used the circle cut from Plantin schoolbook, and the scallop circle from storybook. After rolling the design from the cuttlebug on the cardstock, then I glued the ribbon on the cardstock. I cut out the scallop circle in the bazzill black. I printed the digi stamp on the wausau paper, then cut around the image using the center cut feature. Lastly, I glued the circle and the scallop circle together then on the ribbon. the only problem is I do not have cream envelopes. I could have cut them out with the wild card cartridge, but the paper is not bi enough. trust me, I tried. I am considering selling them for about $12.00 or cheaper.
Well that is it. talk to you later. God Bless.

Tuesday, March 10, 2009

It's card night...

I know some of you are wondering when I was going to post something, besides my thoughts. Well here they are. I was looking at some of my old cards, and there are some that I do not like, and this is one of them. I was getting started with cards at the time, and this was mad in 2002 or 2003.


It was made with a card blank, I thought at the time I would like a frame around it. The frame is made with on those crochet chains, with adhesives. The thinking of you was with tag die cut, and I am not sure if I made it with my orginal sizzix machine (now with another owner, sold on ebay in 2007) or if I bought a set of diecut tags from Close To My Heart. the mesh is by Making Memories.
Now I remade the card. I did not use the same things in the card, but I did use one key element, and that is the mesh. It now red, and I stuck three flowers made with my cricut with glitter buttons on top. I am not sure if I want to put words on there or not. You be the judge.


I am having fun remaking my cards from yesterday. It shows me how much I have grown both as a scrapbooker and card maker.


This next one, I did not redo, because I love the way I made it. I made this card when I had my Original Sizzix machine (you know, big red clunky die cut machine, hard to carry, LOL) All I did was use the tulip die, cut one in green cardstock, one in yellow. Next I glued the green one to the card. I put chalk highlights on the yellow tulip, and cut off the yellow leaves, and glued it to the green tulip. Then I printed the word Spring on vellum, and glued to the card. it is nice and simple, and I like a lot, at least not to destroy it.
Well that is it for now. I will show more later. I want to thank you for viewing, and God Bless You.

Wednesday, February 18, 2009

Cards-february


Hello again,


I am posting twice, because I was having problems with format in the last one. As I explained in the last one, I finished some cards at a crop. I like this card, because I love when a idea comes together, but truth be told, I scraplifted this one. to the person who I scraplifted it from, thank you for this idea. It is my little country card, with the words, thinking of you.


This is a Happy birthday-Feminine card. If you live in Ohio and surrounding states, you know how many months in the year, where you have blah weather. this winter, I think most of the states had some type of blah weather, unless you enjoy outdoor winter sports. I got sick of it, so I thought I would have some colors to brighten my mood. The ribbon is what inspired it. I got it a long time ago from a Round Robin box. I like it then, and I like it now. I nomally will not do Orange. The Flowers I got accidently, as in I was filling one of the Hot Spot tubs at work, and I accidently wanted it, LOL. I have a dangerious job (Giggle). It is dangerious in this economy crisis.


This card, is a thinking of you card. I will sometimes (OK, most times) will create something simple.

The card has flowers from bazill and Heidi Swapp. Bazill cardstock is the background for the flowers, while the card blank is from unknown cardstock I bought a long time ago from QVC. In fact, I believe it was my last purchase with QVC, which was 2005. I have not purchased anything since I started working at Archiver's 3 years ago. I very seldom purchase anything from Michael's and Joanne's, unless Archiver's do not carry that line, or if I happen to be in the store for something else and I think of the item I need. I really wish that Archiver's would carried the cricut line again, but they stopped in 2006. Oh well. What can I say.

This next is simular to the pink card, and also say, Thinking of You. The Flower is also Bazzill. Got the pattern paper from the clearance bin of you know who. All of the sayings are rub-ons. the card blank is Archiver's cardstock. Confession time: I do not buy card blanks anymore, in fact, I have a DreamKuts machine that just paid for itself, two months ago, and once I get the Wild Cards cartridge for the Cricut, I believe I will help put the card blank companies out of business. I helped keeping them in business for years. Now if I can find a way to make envelopes. me and gluing paper for envelopes do not get along for a moment, LOL. Hey, if I can work a computer and a cricut machine, and produce midi files, I can make a simple little old envelope if I just take the time.

This card is super simple. green cardstock background. Flower rub-on and that Thinking of you rub-on. The ink edging is VersaMagic chalk ink, Oasis Green. I love doing this technique. some people take a makeup wedge or sponge to edge their cards, but I like to take the petite ink pads and edge with those. I do not know the proper technical name for that, so I just call it edging. If there is a proper name for it, please put it in the comments section.
this last card, I decided I was going to try to do a cut file in Design studio, but I did not design the cut file. One of the things I promised myself when I created this blog, is that I was not going to be one of those people, who uses someone else's stuff without giving them proper credit. I also compose music, and I think I sound pretty good, and when I get the nerve to, I may post it to this blog, but for now, lets leave it just that. I would hate to have someone else take credit for something I did that they are too lazy to do themselves, and that goes for my papercrafting as well. People work too hard for their craft. The strawberry was made by one of the ladies, whose blog I am following, OkieLadybug. If you are reading this OkieLadybug, I hope it is Ok for me to use it in a card swap, and I promise to not sell a card with this design on it, before getting your premission first.
With that being said, I will bid you a good night, and I hope you all will have a wonder week and weekend. God Bless You and Keep you in his tender care, and may you have Perfect Peace in your little corner of the world.

Thursday, January 8, 2009

Cards-December

Hello-
Since I did not start this blog last month, I thought I would show what I did for my Christmas cards I made my aunt in Oklahoma.


The first one is real simple. using evergreen cardstock, I stamped snowflakes all over the front and back. I tied see through cream ribbon to the side. for the square, it came from my cutting out a window for another card you will see in a bit. the snowflake is from my stash, and the brand name is Masterpiece, and the snowflake is called Glitzy Snowflake. they come 10 to a pack.

The second card is from made with red cardstock, the image was stamped in a cocoa ink from Versamagic, and I destressed the edges with Colorbox chalk inkpad named Chestnut Roan. the saying (which is a scripture from Luke) and image of the shepards are from the Stampin Up! line (I am not sure if this is discontinued or not). with ribbon. Tip: I got this as well as the cream and the black from Archiver's in the Hot Spot area. all scrapbooking items in that area are $1.99, and each spool holds 15 yards. It is even a better deal if you are an employee at which I am . Now, for those of you have have talking to me on my Yahoo groups know one of the reasons why I never have a paycheck, LOL. I also destressed the cards

My next card I had a little help...from my Cricut. I love this machine, and I live it so much, I had to have two... Both were Christmas presents. The baby (or original for those do not follow scrapbooking trends) was given to me in December 2006. Archiver's used to sell the cricut, and my mother got the last one that was sold at the store I work at. Well, I did not use it much at first. I turned it on occassionally just to keep it from breaking down, LOL. About May of 2008, I decided I better dust off this little bad boy, and get to work. I even joined a few cricut groups on Yahoo, to get some help. Next thing you know, I am working this baby bug, and I am loving it. I do not know why I had not used it before. so around November 2008, Black Friday, someone said on the group that the Expression was on sale for $199 at Walmart. OK, I had said that I was not going to get the Expression, no way, no how. OK, so now I have the Expression, and again, mom said that this was one of my christmas presents. so that is how I got two of them.
OK so back to the cards...The card is a magenta cardstock that I get when I was a member of club Scrap. you get kits that has paper, cardstock, and other embellshments, including rubberstamps. I cut the cardstock in half using the DreamKutz machine (another item that is my fav.) I went 1" in, and 1" down. this with the George and basic shapes cartridge, I cut a 2" circle. I, then took scrap paper and with same cartridge, and made a star, and painted with a gold leafing pen. For the card itself, I thought it looked really plain, so all i did was take Midnight Black in the versamagic line, and started rubbing the pad all over the cardstock. I put a pop dot to elevate the star. for the bible verse, it is just white ink (forgot the name of it) on wine cardstock. Then I took the gold leafing pen and just went around it.


This one is just like the Magenta card, without the ink, and it a square. I cut out the dove (you cannot see it through the ribbon) from beyond Birthdays cartridge. I broke off the branch that the dove holds. Just stamped the verse on cream card stock. No pop dots.


with this card, the circles came from the magenta card that I cut out to make the card with the black ink (hey, they say waste not, want not, LOL). I forgot what line the letters were, but I got the letters from Archiver's during an employee crop (never used them for that project I needed at the time.). I used gold cording for the strings.


Last one- wow, didn't I tell you that I was not going to have these long posts, LOL. Well, the last card I made for my aunt was made with deep red (more like a burgundy) cardstock. I tied cream ribbon around powder blue cardstock, glued it onto the card blank. Oh, I forgot, I did stamped it with the snowflake stamp by Hero Arts, as well as the lighter wine cardstock squares made with the cricut. the doves (the dicut and the reverse image) were made from the cricut as well (by the way, I used to Expression with all of the doves, using the autofill button) The Noel is from the same company as the letters in the other two cards.

whew, that's it. I am tired from all of that pasting of the pictures and other stuff, but it was fun. let me know what you think. Take care, and God bless.