Wednesday, May 8, 2013

Tip: How to use brochures and maps in a scrapbook page...part 1


When most people travel, they bring back with them a ton of brochures of places they have been to.  While this is a good thing to show the family what they have been missing while you have were away having fun, it can be clutter, unless you do something about it.
In this example I am going to use my 2004 trip to Disney.  You got that right, 2004, and I collected tons of brochures and maps of the parks, which have change a lot since I was there.   
Box of 2004 brochures and maps
They have been in a box waiting for me to do something to them since that trip.  See the welcome home folder? I was at the time a Disney Vacation Club member, so that was my welcome home folder with all the goodies me and my family received on that trip.   I have the membership card sitting next to me, also ready to be put in a scrapbook for my viewing pleasure.  Now a word from the organization experts about this sort of thing:   "If you have not used it in a year, toss it, give it to charity, something, either use it or lose it."  My words, their thoughts, and they are right, but I did not toss it in 2005 like I was supposed to. The only proper way is to use what I want and toss the rest away.  After all, I will be getting new ones in December, including and hopefully a new DVC Card.
Now you can go about this two ways (there are more, but for now, let's stick with two ways):  scrapbook with or without photos.  If you scrapbook with photos, make sure you have photo friendly paper behind the photo, since the brochures are not printed on that kind of paper.  This is great when you have people or characters in the photo or want to highlight something special (baby enjoying her first Dole Whip).  You can always get archival mist, but that can be a bit on the messy side, and it might make the colors in the brochures run together.   If you decide to go this route, make sure you test first.   The second way is without photos, and this is for when you did not take any, they turned out horrible, or you want to keep something like a Smash book.   For this example, I am doing a layout with photos, because I found them.  (Do not ask, just know that I found them, LOL)

Step #1:  Gather your photos.  I would start by separating the majority of them by scenery, areas of the park, or themes.   like this
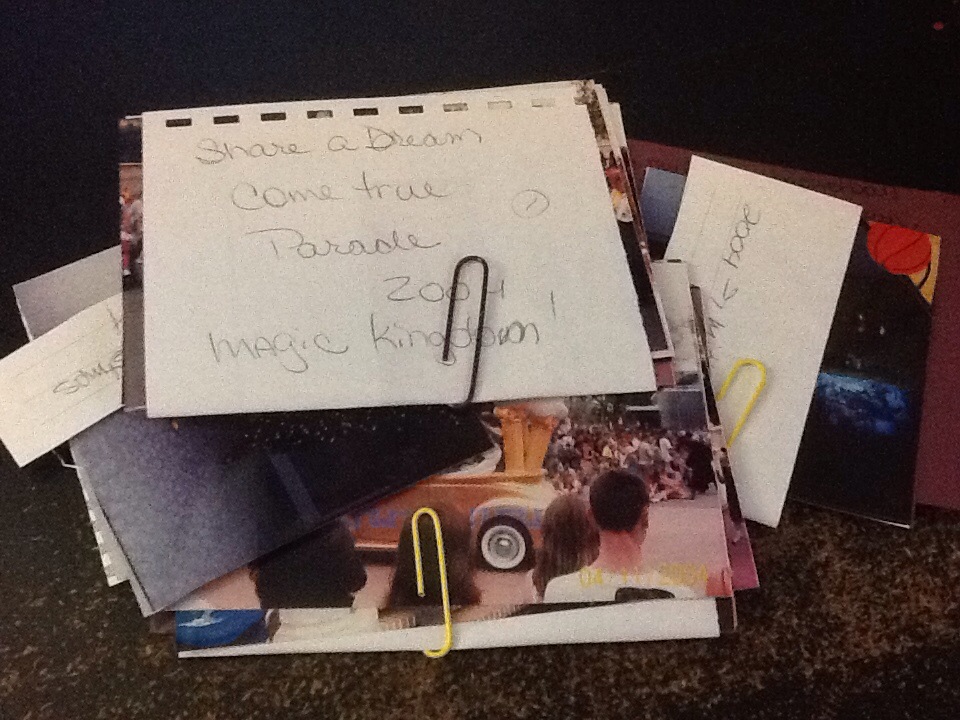
Do not let this pile fool you.   It is only temporary, if you let it.  The photos are not going to deteriorate that fast, but you do have to do something with the pile of photos.  if you are not going to work on them for a while, get a photo-friendly envelope, which are available in most places with a photo kiosk near by (such as a drugstore or a local scrapbooking store (LSS)).  As you can see, I wrote down where I took the photos and the date of the photo.   Since it has been so long, I placed the year on to the slips of paper.   A paperclip or rubber band will do until you can put them in envelopes.

Back to the layout...

I decided for the purpose of this demonstration to go with this photo:


We were about ready to ride the train around the park, and I decided to snap this picture.  It was the perfect shot, and I am titling the layout, Walk down the Middle of Main Street USA, after the song by the same title.
To me, this started my day (even though we had been to Epcot the day before)

Now that I have choose my photo (and feel free to choose as many as you like, just do not over crowd your background paper).  I decided to choose to scrapbook around this one.

Step 2:  Will it be one page or two?  Oh and while I am at it, what size will it be?

The beauty of scrapbook albums is you can use pages as an one or two page layout spread.   I am usually a two spread layout girl myself, because I want to get the most bank for my buck with two pages.  This time, I want to challenge myself and so a one page.   This is great for a layout for one photo.  Since you will be using your brochures and maps as well, you can easily have one layout for the photo and those materials and the other for just the brochures.

Well that is the end of this post but not the end of this layout, stay tuned for part 2 where I will show you how to choose your paper, style and other goodies.   Have a blessed day


Enhanced by Zemanta

Tuesday, May 7, 2013

Wishing you Sunny Days....Thinking of you card.

I am back on track to show you what I made to share.  This time it is another Heartfelt Creations card, that will not be on my Etsy shop, P.Lynne Designs for copyright reasons.  I made this card to go with the theme, Thinking of You.   The teal blue card blank has paper from Recollections pack, Floral Gardens, which has become one of my favorite non Prima, non Graphic 45, and non DCWV paper pack.   I love how the colors of this pack are muted, and this is the first 8.5" x 11" paper I have ever liked.  I tend to gravitate more towards 12 x 12 stacks.

The digi-stamp is from Heartfelt Creations, but any stamp will do.   The sentiment is from the same Heartfelt  Creations collections.  I colored the bird with my Copics Markers.  There is a sentiment on the inside of the card as well.

Have a blessed Day.

Tuesday, April 30, 2013

My Etsy Shop has been rebooted

I have rebooted my Etsy shop, which now has the new name, P. Lynne Designs, and new items.   At the moment, I am crafting by adding new items, and I have dived into the world of digital documents for people who keep or want to keep home management manuals for their home.
So these are the items I have listed:

This first item is a 3 card set with envelopes.  I have a love for shopping, and this is dedicated to all of those who also have that love.   I have forgotten the name of the paper, but it has French writing on it.  the bag is a die cut made with the Cricut.   I distressed the front and the sides.   the bag says "shopping" on it.  The envelopes are made from Kraft color paper.  You can check out the listing under "Related Articles"


The next item is a set of 4 cards, tags, and envelopes.   My challenge at the time was to see what I can make out of a card kit.   The card kit is a retired kit from Close to My Heart, and it is a spring card set.   The tags have flowers on them that match the cards, and the envelopes are made out of vellum.  


The last card set is a set of 6 cards, again made from a Close to My Heart Set with 6 vellum envelopes.   Each card is different but there are 2 Just for you, a Thinking of You, Thank You, Happy Spring, and a non Sentiment card.  all are have the same pattern, just done in different ways, and I had fun doing it.   The point of the challenge comes from another post I had last year.  Use a kit and think outside the box.  You do not have to make the design that is given to you, especially if you are not a beginner and you already have a design in mind.   I love seeing what I can do with the materials that were given to me, and make it mine.

Digital Products.

As I said at the top of this post, I am trying my hand in selling digital products.   For the moment, it will not be cards, but I want to get into invitations.  I have seen several digital products on Etsy, Ebay, and the others.  All you need is your computer and printer to print it out.  The only thing that I do ask of is since the file is made for the person buying the file that it is not sold as part of another package.  These files were meant to be sold for personal use only.   I do not mind creating documents for a business, because I am a freelance writer as well.  I just asked that these documents would not be sold that way.

The first one is a Daily To do list.  It is arranged so that a person can go room by room, and write out what needs to be done.   Print it out on you paper as needed.  I just printed it out on the paper I had in my printer at the time, which was spiral bound paper.
As you can tell by the picture, You can list up to 5 things to do in each room.  I hope you do not have more than five.   If you do, let me know, and I can customize the file to your preference.

   The last one is the same thing, only this is a monthly to do list.  This is a month by month list, and it is also organized room by room.   This is for those things that you need to do on a monthly basis.  

These two are the beginnings of a home management guide I am putting together, and I hope I will have it together by fall.  Why so long?  This is a teaser, but I am working on a beginners scrapbook e-book.   This is for those who either want to scrapbook and do not have the money or the patience to do it, or those who want a refresher course in it.  I am almost finished with the writing portion of it, and then there is the editing and other things that an e-book needs.  I will let you know when it is finished.

Well that is it for now.  I do hope that you do check out my Etsy shop, and I have started to add to it more every day.    Have a blessed day.
Enhanced by Zemanta

Friday, April 26, 2013

Mother's day is in two weeks

Get $25 back when you buy a Cricut Mini!

Mother's are always in a crafting mood.   Give Mom something to craft about.   Click the link to learn more.

Tuesday, April 23, 2013

For all of you who own a gypsy.... and using your resources wisely.

cricut s
cricut s (Photo credit: zcopley)
You can now connect the Cricut Classroom to your gypsy.   I found the information on this website, but you can always find out on Cricut.com.  I personally do not own a gypsy, and never had a desire to do so.   My reasons are simple, I have never been great at multitasking outside of the home.  For instance, the way that Provo Craft marketed the Gypsy when it first came out was to be able to design a layout while at the doctor's office or a little league baseball game.   OK, first of all, the reason why I am at the doctor's office is to get well, or when my oldest nephew played baseball when he was little, I am there to cheer him on and to encourage him to get to the next base, or to catch the ball.  the last thing I want to do is to take my mind off of those goals, and place them on some machine that I can use at home.  Some people are able to do that, I applaud them, and I  am not criticizing them at all to be able to design something and concentrate on cheering their child on during a dance recital at the same time.
It does not mean that I do not like the concept of the Gypsy.  I think it is a neat little gadget, and would be happy to use it in my home, away from my craft room and computer.  For that I love that Provo Craft decided to address that issue for the person who uses their gypsy outside the home environment, like at a crop.  They can download their pieces into the Cricut Classroom (CCR), and cut it out on their Cricut.   You do need to link the cartridges to the gypsy.   You can also go online, load the I am still waiting on the day that I can link my Imagine machine to CCR.   They have tried in the past, but the download to the machine takes forever in a day to get it correct, and that is something I want address ASAP.  So if the powers that be are reading this post, please, please, please, make it so I can use CCR on my Imagine machine, which I feel you have ignored for a very long time.   There are people who own this machine, and it is about time you give it props.
until then, I will continue to use my Imagine on an as needed basics.

A tip about resources.

This tip not only is for scrapbookers and other crafters, but for anyone who can use a little bit of information.   Keep a notebook of resources on hand for when a problem arises.  You can place anything in there, and you can even keep a digital copy on your computer too.   I have a 2 TB (that's T as in Terabyte) hard drive that I can unplug from the computer.  I store all the information I get from the internet there.  This includes projects I would like, information on my machines, scrapbooking techniques and other things I would like to keep a record on.  Yes, I know that is what the internet is for, but I also want easy access to the information.   I like to call it my book of resources, and I keep a binder on the important subjects I need.

I hope you find this helpful, and if you have any questions or comments, please place them in the comments section below.    Thank you, and have a blessed evening.
Enhanced by Zemanta

Friday, April 19, 2013

Quick Note: Name change to Etsy Store and Facebook Page

As you know, I recently change the name of my blog to P.Lynne Designs from MDN Creates, a name that I love, but it does not show professionalism on my part.  I have made a couple more changes to reflect the P.Lynne Designs name.   I just change my Facebook page name to P.Lynne Designs, as well as my Etsy shop, PLynneDesigns (no period).  you can also access it here.  It still have some of the old stuff reflecting MDN Creates, but it is one in the same company.  In about a year, I will completely get rid of it by not renewing the website domain.  I just renewed it in February 2013, but I will create a domain name with the new name, and when I get finish with the site, I will redirect the old name there.  
Why am I saying this?  Because I do not want to lose you if you are a regular reader.   I will have new items on my Etsy shop soon.  Well that is all for now.  I will keep you updated on my progress.   Good night for now.   Be blessed.

Tuesday, April 9, 2013

With Heartfelt Sympathy

Today is another card day, and I am continuing to show you my cards.   Today's card is another Heartfelt Creations card, and it has to do with loss of a loved one.   This is timely, because I have heard of two losses recently.  Last week, my aunt's ex and father of three of my cousins died and today death of a Disney legion, Annette Funicello died of complications from Multiple Scoliosis.  Ironically, both were 70.  So showing you this card is again timely for those of you who recently suffered a loss of a loved one.
 
The materials used in the card are as follows:

1 card blank
1 Digi version of with Heartfelt Sympathy (you can use any digi stamp or regular stamp.)
Copic or any markers, pens, or pencils to color with.  I used my copics. (E25, V15, and G82)
Recollections paper Garden Florals

This card is the same as the first card I showed you last week.  Only thing I did was to switch out the elements I used.  

Continue to have a good week, and  will talk to you later.

Disclaimer:  I am not associated or affiliated with this company at all, nor am I being paid to create this card. This card is also not being sold on my Etsy Shop: MDN Creates.