Monday, June 20, 2011

A Pink Stamper Challenge

This is a late post, so this is the challenge...

Create something with a birthday theme.   So for my challenge, I choose a Cricut card, utilizing the Cricut American Alphabet.   This is one of the cartridges preinstalled in the CE2, E2, or Cricut Expressions 2, 5th Anniversary Edition Cutting Machine, if you want to use the long version of its name.   One of my favorite LSS (Local Scrapbooking Stores) is closing its doors at the end of the month, and I bought some random scraps they had.   So everything cut out of the cart was using that stack.   So I cannot give exact colors I used, but I can give you the brand name, which was Bazzill Cardstock.  
One of the pieces I had for the card base, I cut down to form 2 4x6 card blanks.   It was about a light pink.   The mat was a Bazzill Bling, I think a Pink Cadillac color (again it was in the stack of colors), and the width was perfect (3.75"), and I cut the length to about a 1/4 of an inch from the actual card base (5.75"), and that made 2 as well.  One for each card.   I took black cardstock, which was about 6"x 12", and cut 2 cupcakes from the CAA Cartridge.   the cupcake was 4", and if you have the E2 machine, the one I used is on page 49 of the handbook.   Press the backout button on the screen.  For the top layer to form the decrotive swirl on the "frosting" portion.   use the Cpcke2-s one.   The color I used was light green Bazzill cardstock.   Before I used pop dots, or dimensions, I spritz it with Glimmer Mist.   You do not have to do this step if you do not want to.   I used Dazzling Diamonds for all over, and Moonlight for the bottom.   The way I spritz it was I covered the top part after the Dazzling Diamonds got a chance to dry, which only takes 5 seconds, or less.   I put a napkin over the "frosting" portion, and spritz the bottom with the Moonlight.   Yes, there is an easier method.   You will have to spritz the pieces before adhering them together.  When cupcake is dry, you can adhere it to the card. 
Next I had some butterflies from Delights, which is from American Crafts.  It is the from the Sunbeam Collection.   They are patterned butterflies, and yes, I could have cut them from another cart, but the look I was going for, I did not have the right cart for the butterfly, plus I wanted something made with chipboard, and was patterned.   At the bottom, I just simply printed "Happy Birthday" on the card.   I often use my computer, but this is one of the few times I feel confident about my handwriting, and I wanted it handmade.   So without further ado, here are my 2 cards:


Happy birthday card 1


Happy Birthday card 2


Well that is it for now.    Have a blessed week.


Thursday, June 2, 2011

Quick blog post: What is on your desk...

I am not sure why I entered this, except I follow Creations with Christina (http://www.creationswithchristina.com/), and I saw this post.   She was asking the question, What is on my desk.   Well, here is my challenge (and just to let you know Christina, I have TWO desk I scrapbook on, my computer and a crafting table):


Picture #1 has a far shot of my crafting desk, Picture #2 has both desk together, and Picture #3 has a close up of my crafting desk.  I have not quite finished cleaning up from an envelope swap I finished doing.   I am still in the middle of making my mom's cards.

Well that is a quick blog post, and the end of my Challenge.  Good night, and God Bless you.

Wednesday, June 1, 2011

New hobby in scrapbooking, an envelope tag swap

Hello, and how are you?   I just want to wish everyone a happy June.  20 days before the official swelter season called summer, and frankly, I would rather sit myself in front of the AC than shiver in front of the heater.   My ceiling fan is still on from a few days ago, as is gets hot up there.  I know, it is not very green.   I am working on it.

Anyway, I am in a new swap, hosted by Tracystreasures24, and I had a blast creating these envelope tags.  I made five, and it looks like this:

For this project, you will need:   One business envelope with a window, scrapbook paper to cover the front, and possibly the back, if you want to.   You will also need stamps, ink, and die cuts.  I used my Cricut E2 machine for the die cuts.  The carts I used were Pagoda, and Cricut eccentials.   You will also need a border punch for the edge or a pair of decorative scissors.


The Envelope:

For the envelope, I used the envelope from my bank statement.  To prepare the envelope, I made a slit in the envelope on the one of the short ends of the envelope.  If you have not open your bills lately (shame on you), but tap the bill to the other side of the envelope, cut the slit and remove contents. Place the contents to a place, so you will not forget to pay them.   If you have another envelope, which looks like the first one, you can use it as your template.  For the actual envelope, do not remove the vellum. I used the paper, Foo La La (forgot the name of the company), and I traced on the back side of the paper to get the except area the window was at, and cut it out.   Next, take your border punch, or decorative scissors, and edge up the short end.   Fold to make a border and adhere all but 1 1/2"-2" of the paper to the envelope to cover it.  At this point, you may want to cover the back (I did not for this project). For the inside of the envelope, make a liner, and you only have to adhere the top of the pocket.   Before I adhere it, I took a stamp made by Inkedinka Do, and stamped the top.  I also stamped the flap of the pocket, because the paper was not double-sided.   You can skip stamping the liner and the flap if you have doubled-sided paper. You may also ink the sides of the envelope/pocket if you to hide anything.  set that aside.

The Tag:

for the tag, I used K and Co's Smitten Foil Hearts paper, card stock from The paper Company and CTMH's kraft paper.   That is the front of the tag.  I will get to back in a minute.   I cut the tag to size,and I cut with the E2 a label from the pre-installed cartridge, Cricut Essentials.   I started to just use it as a label, but the more I looked at it, especially after I inked up the edges, it started to look mor like a vase.  I drew on some sticks with a sharpie, and it looked too plain.  then I had the idea of adding flowers.   so I cut some red flowers from the Pagoda cartridge, at 11/2", and adhere them tothe tag.  Some of the flowers, I popped up with dimenisionals to give that 3-d look. time for the other side. (or side B for those of you who remember records.)

Tag (The Backside)


For the back side of the tag, I enlisted the help from som Stampin Up! products.   All the inking for tag and the envelope, I did it in Chocolate Chip, as well as all of the stamping.   I added the photo mat, which was cut from the George and Basic Shapes Cartridge at the last minute, because I thought the back needed something. So I cut out the photo mat in CTMH kraft paper (the same kind I used for te liner), inked the edges, and adhere it to the tag.  Next I took clear stamps from Bliss, which was part of the this year's Sale-a-bration event last month.   I stamped the word "bliss" on top, and stamped a Fleur-de-le (I guess that is how you spell it) at the bottom.   That's it.
 Take a look at the rest of the photos to get an idea on how this is done.  Remember these are just ideas, but you make your envelope tag how you want it to look.  I want to give you some more tips:
*  This can be a use what you have tag.   You do not have to go out to buy all new things for this tag.
*  If you have a lot of the same paper, you can make a lot of tags.  You can make them with your die cutting machine.  I free-handed these, but I usually buy the tags already made, or if  you die cutting machine has a tag die, you can
make them from the machine.  It does not have to be a Cricut machine.
*Do not make the tags too thick (put too much on them.)  You may not be able to pull them in and out with ease.
* if you do not feel too creative, or not creative enough, Jolees has products which you can put on the front (or back) of the tag.
* One more thing...Have fun with it.  I always tell folks that scrapbooking is fun, and relaxing.  Do not stress yourself to the point of frustation.  If you are frustrated, or being pulled away too many times, put it away until tomorrow, or the next time you can get back to the tag.  This project does not have to be made with #10 with a window.  I can be made small, medium, with or without a window.

Well that is all I have for you today.   Here is a last look at all 5 of them:


In the Name of Jesus, I bid you a good night, and God Bless You.

Monday, May 23, 2011

finally I crafted

Hello, this is a quick post, as I finally crafted something.   Let's get to it...

It's the little things...

I made this card for my friend, Selena, who is moving back to North Carolina this week.   I will miss her and her husband, Lionel.   Anyway, the card is supposed to be  4x4, but I did a little boo-boo, and scored it wrong, so the back is off by an inch. (more room to write my note to her-SCORE!)  The papers are DCWV, the solid paper pack, and paper that are from The Paper Company (I think it is now discontinued), which is torn, not cut.  The flower is from Prima, popped on a pop dot. I started to color it with my copics, but decided at the last minute to leave it natural.  The sentiment is from Stamping UP! stamp set called You are a gem.  I stamp the saying in SU! Chocolate Chip ink.  The only thing that I cut out that was cricut, was a circle to put behind the flower.

Happy Birthday, Deonte!

I made my middle nephew a birthday card, because this week is his birthday.  he will be 4 years old.   One more year, and this kid is Kindergarten bound.   I did a two sheet card.   I cut a truck in red using the Mickey and Friends cartridge at 4.25", the bed of the truck  in blue.   The paper I used was Bazzill.  I folded the blank card at 6 x 5 3/4, which the truck barely makes it.   I wrote in a sharpey Happy birthday, Deonte!!!   for the inside, I cut a number 4 at 4" with the preinstalled cartridge in the E2 called Cricut American Alphabet.  I wrote a little message inside the number for my sister to read to him.  Sorry I did not take a picture of the inside of the card.

I have more work to be done this week for this shop.   I am also trying to get sales for my Longaberger business as well. $141.00 left to go for this month.

Friday, May 13, 2011

New Backup blog

In the wake of what happened to Blogger and my blogs this week, I decided to make a back-up blog for me to post on.  I hope that this will never happen again, but I do not know technology.   so with that being said the new address for the backup of this blog is http://mdncreates.wordpress.com/.   Yes it is on Wordpress, and no, I do not have any plans at the moment to move http://www.triciatreasure.blogspot.com/.  At least in the immediate future.   I want to make sure I can still blog, and I will actually copy posts from here onto that blog, and visa versa.   I have done the same thing to my Tricia's Baskets blog.   so now I offically have 6 blogs to write on, plus some article writing sites:  Hubpages, Helium, Associate Content.  On top of posting on Twitter, Facebook, LinkedIn, and three Ning networks, it is a wonder if I ever get any work done around here.

Finally made something:
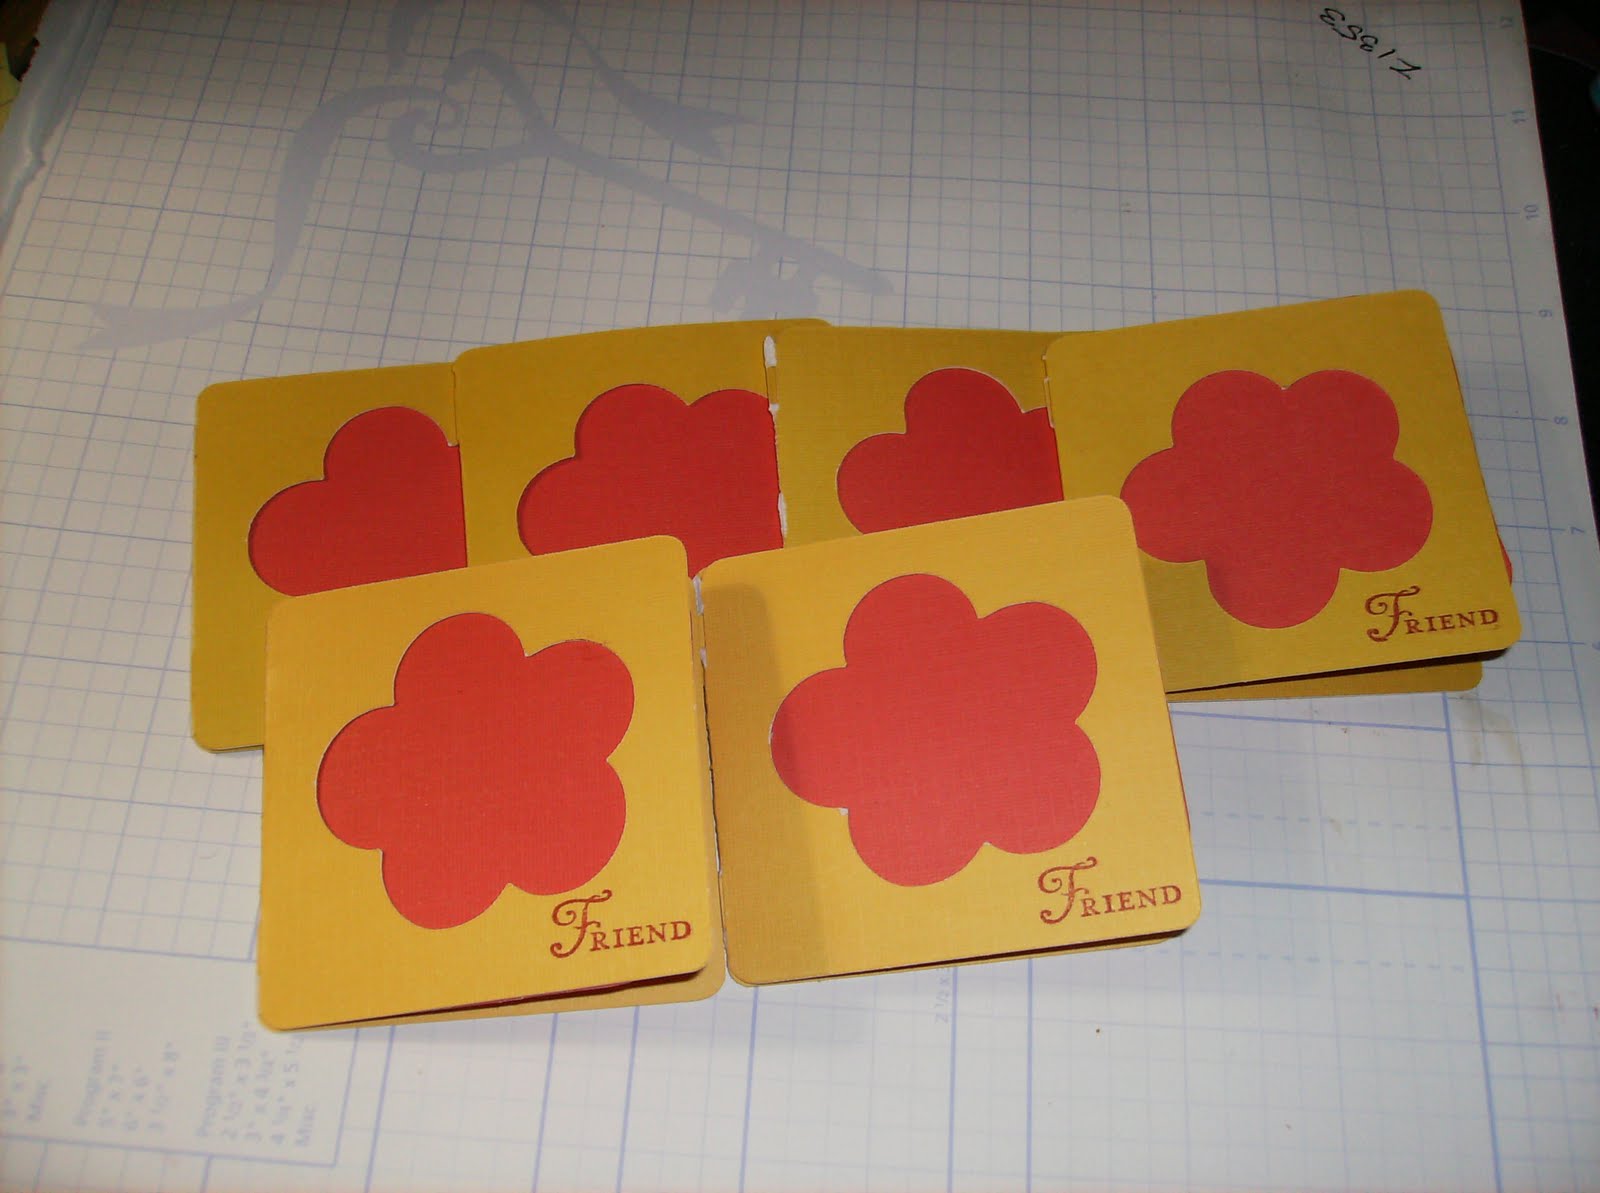
These cards (which is currently on my Etsy site) were made using both of my Cricut machines.   I cut the card at 3" using my E1 machine and the Pagoda cartridge, and I cut a square, using E2 and the Cricut Essentials Cartridge, pre-installed on the machine.  The paper is from DCWV paper stack (mustard yellow and orange-red).  The sentiment is stamped with the word friend, and that stamp is from Stampin!Up called You're A Gem in Real Red ink.  I did not do my normal distressing, because I wanted sort of a tone on tone look about it, and I did not have a color that closely matched the paper, but it naturally distress along the folding edge of some of the cards.  I made envelopes for the the cards, cutting them at 31/4" using E1 and the wild cards cartridge.   As you see here I did a different shades of the colors Yellow and Orange.  I intended to do it that way.  The paper for the envelopes are from the same company.

I am having fun working two cricuts.  Now if I can only get rid of the baby bug.

Monday, May 9, 2011

It's Here!!!!!

As promised, E2 (Cricut Expression 2) has arrived. The stalking of the tracking number on www.ups.com is over. OK, for those of you who are expecting one from HSN.com, I want to give you a few pointers:


1)      Do not tackle the UPS person.  They have a job to do, and they have done their job well (that is delivering your new toy (or baby if you have no children) in one piece.  

2)      It is a heavy box.  Muscles is key.

3)      The company really taped the box, the secondary box and the machine.   Do not panic, this is a safety measure.

4)      You get with your machine the following:

a.       One mat

b.      Power cord

c.       Manual

d.      Certificate of authenticity.  Great for scrapbooking.

e.       UBS cord

f.       Four books for the 4 carts already installed

g.      Blade housing.  Note: Be very careful when you open the plastic for the blade housing.  Me and E2 had out first fight.  When I got my expression and baby bug, the blade was separate from the housing.  With the E2, the blade is already in the housing.  Not thinking, I stabbed my finger, and drew blood.   My finger is fine, but do be careful.

h.      Stylus.   Note:  the stylus is located in the cover.   Got the tip from Robyn the Pink Stamper.

5)      Once you plug up E2, turn it on, and it will guide you to the calibration screen.   Take your stylus, and tap your screen on the “x’s” that appear.

6)      Register your machine, by going to www.cricut.com.   I have not seen the cartridges to register as of yet, so I assume that once you register the machine, they are registered as well.

7)      Have fun

Well, I am going to play now, so I will show you what I made when I get finished.   God Bless.

E2

Hello-

I hope everyone had a happy mother's day.  I fixed my mother dinner, and celebrated my sister and future sister in law just the same.  I am now sitting on pins and needles right now.    Any moment now, a big box will be delivered to me by the UPS person (started to say man, but I have seen what some of us can lift, especially when we are getting a new toy, LOL.)  In the box will be the newest member to my little cricut family, E2.   E2 is short for the Cricut Expressions 2, 5th anniversary edition.    The funny thing about the whole thing is 1)  I am stalking my UPS tracking number.  2)   I keep opening the door.   3)  I am jumpy ( do not know why, the person is going to ring my doorbell, I guess, they like to knock a lot around here.)  5) I was not going to get it, after all, I want the Cricut Imagine so bad, and still will get it.   6)  OK, so my original one is 6 years old, and my E1 is 3, no big whoop there, LOL.   7)   4 installed cartridges is not a bad deal.    8)  Did I say that I was stalking the UPS tracking number?

In the meantime, I am about to say goodbye to oldest member of my cricut family.   Yep, I am selling my baby bug (original).   It is bittersweet, because I need to make room (living in a small townhome is not fun), and I still love it, but at the same time, it is for the best.   If no one buys it, I will still keep it, because it is in a cover with a handle.   I will jut have to finagle space.   I have the listing currently on ebay, then if that does not work, then it is on to Craig's list.

I am pushing to do some projects with the E2 (that is why I am stalking the tracking number, LOL)  Robyn the Pink Stamper has a give-away that ends at 10pm CST (11pm my time) They are challenges, and I want to put E2 through its paces.   The prize is an Imagine.  Oh that would look good, LOL.    I hope to enter, but if it is too late, and it has not gotten here (they promised by the end of the day), I may need to rethink my projects, and do all cutting with E1.   Oh, did I tell you that this E2 is upgradable by Wifi?   This means that I need a router (I have one, but it came with the Dell Dimension, which is now deceased), so I want a new one to go with this almost 3 year old computer. (got it 3 weeks before my neice Nine'na was born.)  does that mean that every once in a while I can get a new cartridge in an update?   Probably or probably not.  Wo knows.    I will post when I have it all figured out.   God Bless.